Content from Registration
Last updated on 2024-07-15 | Edit this page
Course Registration
We would firstly likely to extend our warmest welcome to you, and thank you for choosing the L2D course to empower you with valuable skills in Python programming, data science and machine learning: developed by life scientists, for life scientists.
In order to get started, you will need to register yourself for a GitHub account. Our administrators will then issue you with a Registration Form for us to collect your GitHub handles, and we will follow shortly with an invitation requesting that you join a GitHub Organisation for the current cohort of learners.
Once this has been set up, please keep a note of your GitHub login details, as these will be used throughout your L2D course to access materials, submit assignments and interact with academics and fellow learners.
GitHub
Owned by Microsoft, GitHub is an international community-based organisation that provides a suite of facilities to create, edit, share and publish code. At L2D, we have made a conscious decision to employ GitHub’s infrastructure within our course, in order to initiate new users into the world of GitHub so that – should you continue to explore coding further after the course – you will already be familiar with one of the leading, internationally-recognised platforms and standards for programmers and coders, across the world. This also facilitates enjoining in our community of L2D learners and tutors via GitHub Discussions: a forum for posting questions, sharing ideas and new findings. We also make use of GitHub Classroom: an arm of GitHub Education that allows us to manage your learning journey on L2D.
Content from Lesson Release
Last updated on 2024-09-28 | Edit this page
The L2D course is run on a largely fortnightly schedule, with new lesson topics being made available to you on Mondays, excluding public holidays and closure periods. The dates of these lesson releases are provided in the provided course calender (linked in your assignment repository) and it is recommended that you transfer important dates into your own personal calendar, so that you don’t miss any key aspects of your learning with L2D.
Each lesson release is marked by the receipt of a lesson release email (routinely issued on Mondays) that will contain all information required to access L2D materials and available resources. Please keep an eye open for these, and check that they do not get caught in your junk mail.
Content from Lesson Portal
Last updated on 2024-07-17 | Edit this page
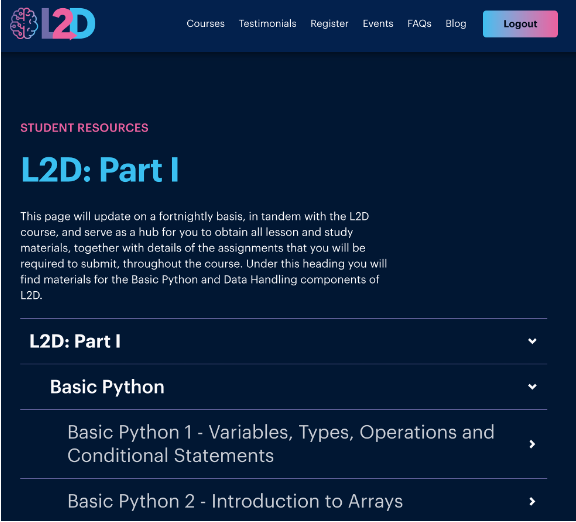
L2D Lesson Portal
The L2D course is centred around two pages:
- Lesson Portal
- GitHub Repository
In your L2D lesson release email, you will find a link to the L2D Lesson Portal. This contains a hierarchical menu of all lesson topics available on the course package you have purchased. As you progress through the course, each fortnightly lesson release will appear on the Portal, added into the lesson and topic hierarchy.
GitHub Clasroom
Accepting an assignment and creating your GitHub lesson repository
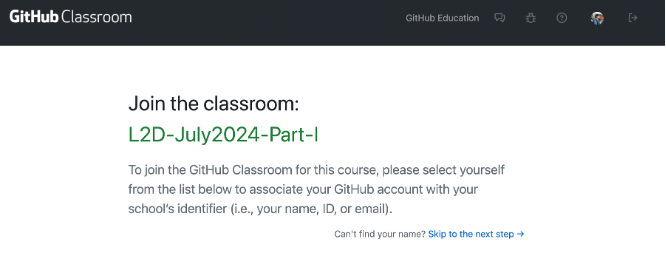
- When you click on a lesson for the first time, you will be asked to accept your lesson assignment via GitHub Classroom: you must be logged into your L2D-invited GitHub account in order for this to work.
You will see a list of names of all the registered students. Find your name and click that. This will result in the creation of assignment repository as shown below in the image.
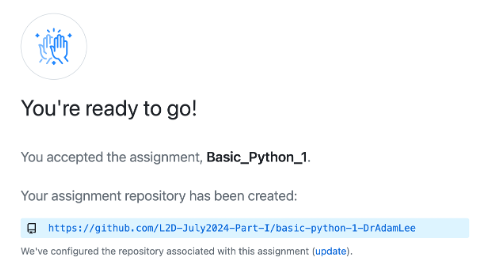
- Once your repository has been created, click the blue shaded hyperlink that contains a unique URL to your own GitHub repository of resources for an entire lesson topic’s worth of learning will be created, automatically.
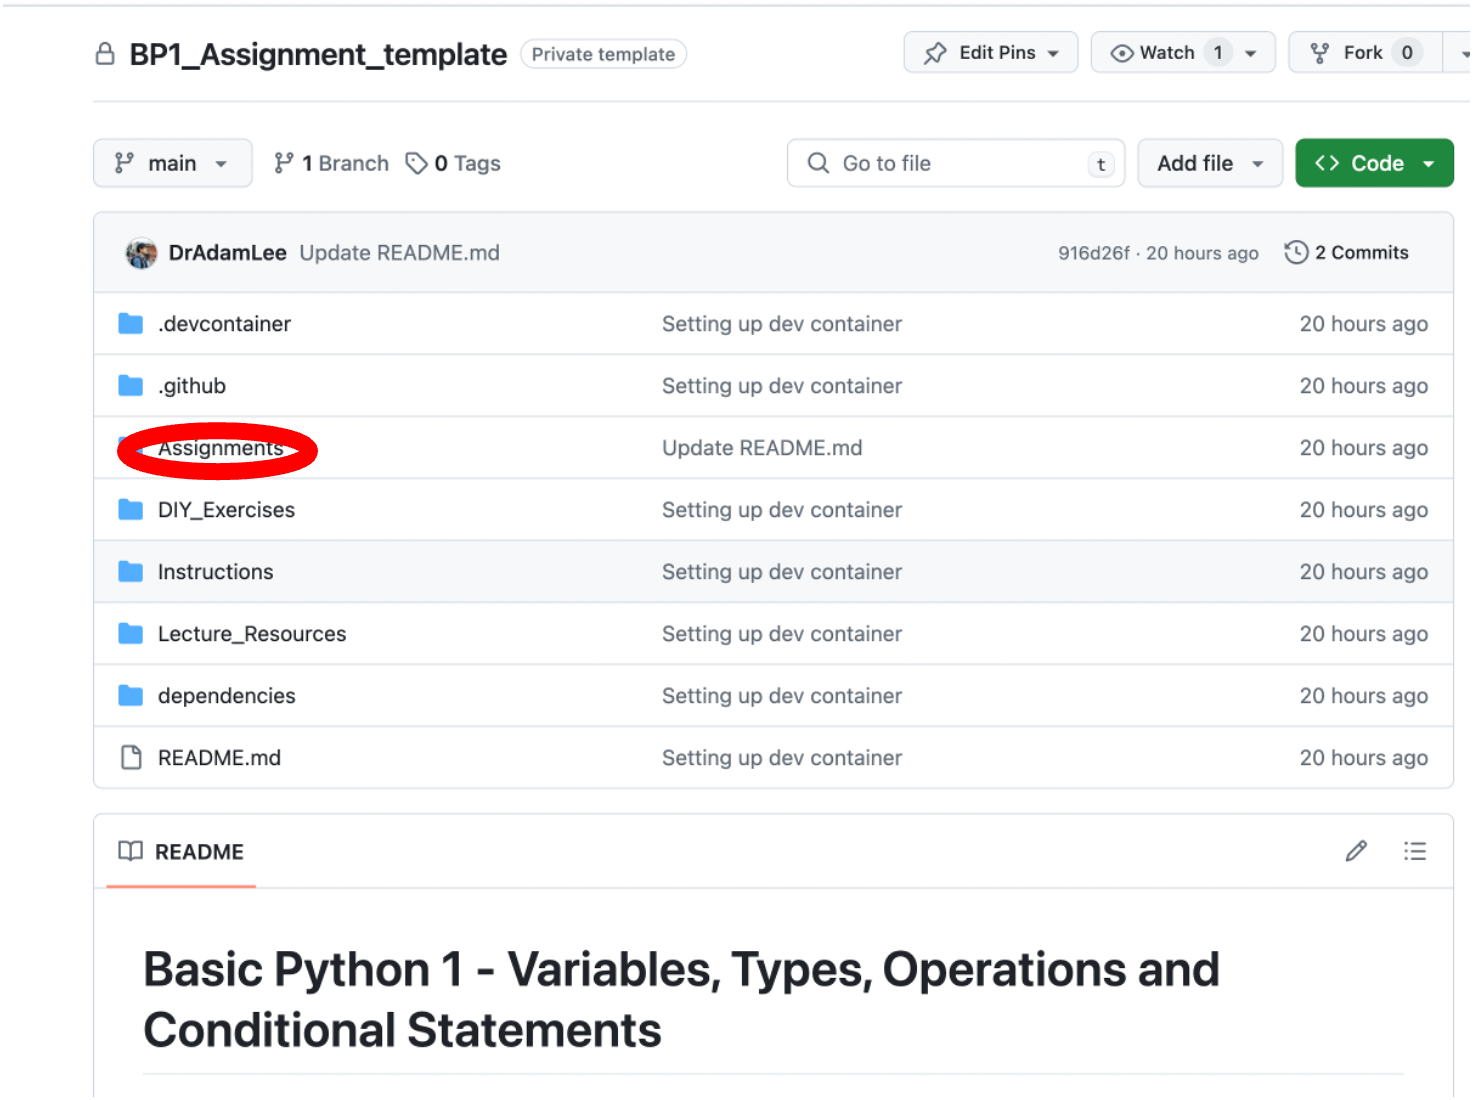
The image to the right shows a sample of what your repository home page looks like.

Information
The hierarchy of its contents is shown in the middle of the screen, with a column showing the most recent commit message, and a column showing the date of that commit. A commit, in GitHub terminology, is a logged change made to a file or folder. These commit messages will be encountered again, when you work on your first assignment, instructions for which will be given later in this handbook.
On a per-lesson basis, you will find the following resources within each GitHub repository.
Assignments: This folder contains blank assignment templates for you to fill out and submit before your submission deadline. Assignments are typically graded within 14 days of timely submission, and these are made available, here.
Practice_Exercises: This folder contains Practice exercises found in the written materials, are made available in this folder as interactive Jupyter Notebook files. (Note: This folder is not available in all lesson topics).
Lecture_Resources: This folder contains any data or Jupyter Notebooks that are demonstrated during the live lecture for the associated lesson. These can be useful if you wish to code in tandem with your L2D Instructor during a lecture.
ReadMe: This is a document that will display on the home page of your GitHub repository, beneath the repository contents, and contains all the useful links and information relating to the selected fortnight’s learning. This includes links to written materials, times and links to live lectures and drop-in sessions, as well as contact details for reaching us.
Note
There are other folders in your repository whose title begins with a full stop. These are developer folders that we use to support the online environments that you will use for working on your assignments. Please do not touch or modify these.
Content from Live Lectures
Last updated on 2024-06-18 | Edit this page
Each Thursday on the week of a lesson release, we hold a live lecture for the L2D course. This runs on Zoom, on the following link, at 14:00 GMT/BST (or as indicated in your lesson release email and GitHub repository ReadMe): Live Lecture Zoom Link
These lectures are recorded, edited and made archival onto YouTube playlists that you will be able to watch, typically a few days after they were streamed. These playlists are linked in your lesson release email, and on the ReadMe files that front each GitHub repository. We will also announce published lecture videos on the GitHub Discussions forum. These videos are made available to you, indefinitely.
Content from Drop-in Sessions
Last updated on 2024-06-18 | Edit this page
After the live lecture component, L2D holds a second live stream on the same day at 15:00 GMT/BST for one hour, whereby students can work through the DIY exercise examples found in the written materials for the lesson topic at hand, together with L2D academics and tutors. It must be stressed that these sessions are restricted solely to the fortnightly lesson topic: learners with wider queries are encouraged to submit requests via the tutor support session booking system outlined in section 8 of this handbook.
You can bring your own questions, share your screen with us, and we will collectively debug and help you with your code. This provides a unique live space for you to have your questions answered, and ensure you have a thorough understanding of the subject material. These workshops are not recorded, and are only accessible to those who attend at the advertised time, as confirmed in your lesson release email.
Content from Course Feedback
Last updated on 2024-07-15 | Edit this page
Submitting Course Feedback
After each live lecture, we ask that students complete a feedback form, which helps us to gauge your level of satisfaction with each fortnight of learning offered on L2D. The form takes a few short minutes to complete, and gives us a valuable opportunity to learn what you like about the course, as well as any suggestions for improvements that you might have for us.
We pride ourselves on our agility to act on your suggestions as fast as possible here at L2D, and highly value the relationships that we develop with our learners. The feedback form is linked here.
Content from Assignments
Last updated on 2024-08-02 | Edit this page
Assignment Submission - via Codespaces
As you progress through the L2D course, you are expected to complete one assignment per fortnightly lesson release. Assignments are template Jupyter Notebook (.ipynb) files found in your Assignments folder, and consist of a set of questions related to the fortnight’s lesson topic. You should complete these with the knowledge you have gained from consuming L2D’s written materials, tutorial videos, live lectures and drop-in sessions.
Assignments are due to be submitted before the next lesson topic release date. For instance, as lessons are released on Mondays, you must submit them before 00:00, 14 days after. Timely submissions result in graded assignments and feedback being returned to you within a further 14 days. If you submit an assignment late, it will not be prioritised by our tutors, and in certain cases, this may affect or delay the issue of any L2D certificates. If you are facing extenuating circumstances and require an extension, please let us know by contacting admin@learntodiscover.ai.
How to submit an assignment
Below are a set of step-by-step instructions showing you how to submit an assignment. At L2D, we make use of GitHub Codespaces, which allows you to set up an online instance of Microsoft Visual Studio Code, and code directly from within your web browser. We recommend the use of Google Chrome, for stability and ease.
Firstly, let’s familiarise ourselves with the Assignments folder, which can be found inside your lesson repository. The example below shows the Basic Python 1 (BP1) lesson repository.
Inside your Assignments folder, you will find:
A ReadMe file that (as with your main repository page) is displayed beneath the folder’s contents.
A Data folder that contains any data that may or may not be required to complete the assignment.
A Feedback folder, that will contain your marked assignment, once it has been graded and returned to you.
Completing an Assignment
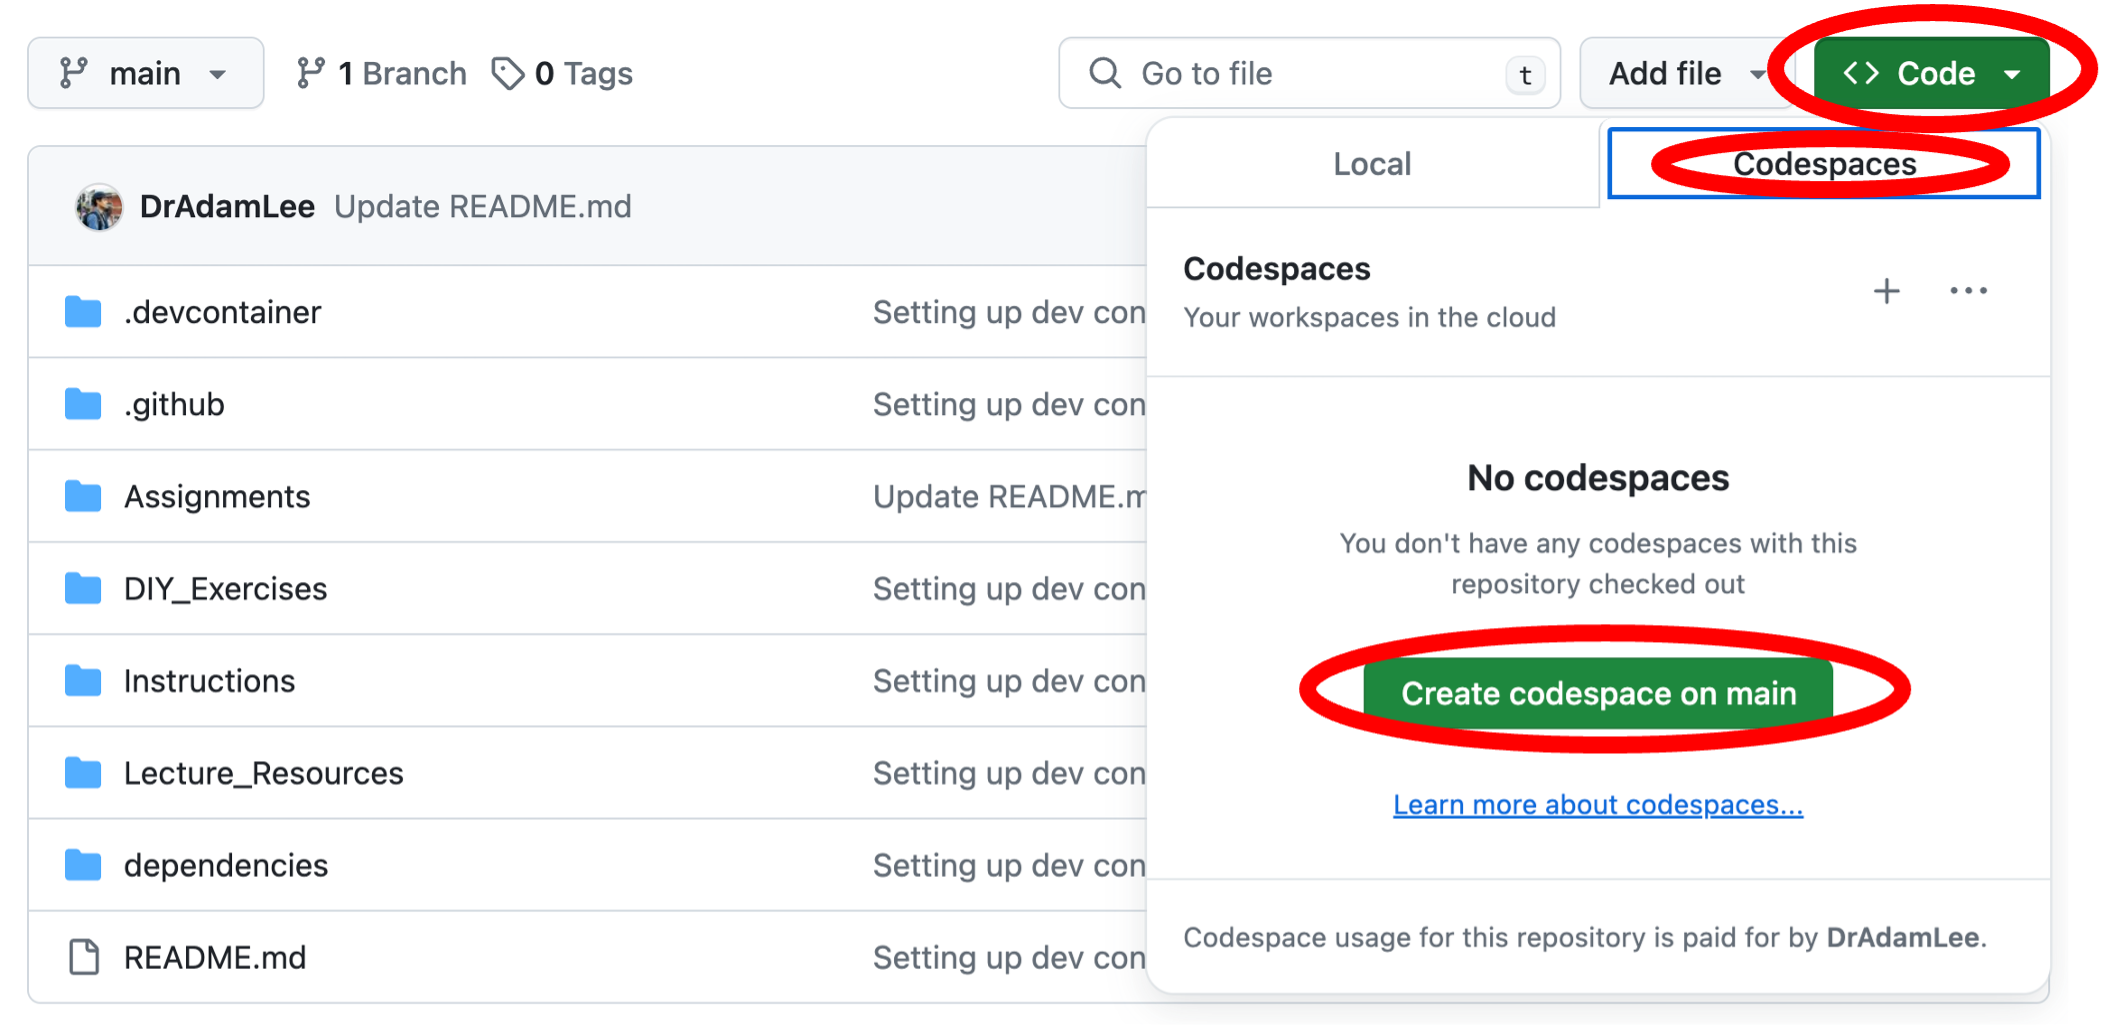
- To begin an assignment, you must first create a new Codespace, by clicking the green Code button, selecting the Codespaces tab, and clicking the green Create codespace on main button:
- This will begin setting up a Codespace for you to work in. This may take several minutes to complete: please be patient. The total time it takes to set up your Codespace could also be affected by the speed of your internet connection. If you would like to monitor progress of the setup, click the blue Building codespace hyperlink at the bottom right of your screen to display the setup log in the terminal tab.

Once your Codespace has been set up, you will see the hierarchy of your entire lesson repository on the left in the Explorer tab. Uncollapse the Assignments folder, and there you will see your assignment template notebook. Click on this, and it will open in the main view, in the middle of the window. Note: the ReadMe file may open and come into view – close this tab, and focus on your assignment.
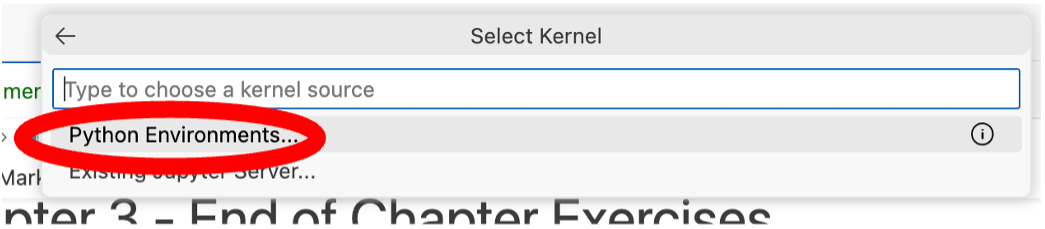
Next, you must click on Select Kernel on the far right of the window. A dropdown menu will appear in the middle of the window: click Install/Enable suggested extensions. Wait a short moment while these install (progress is indicated, bottom right).
You must then click Python Environments… in the dropdown menu in the middle of the screen. (If this has disappeared, you can bring it back by clicking Select Kernel again).

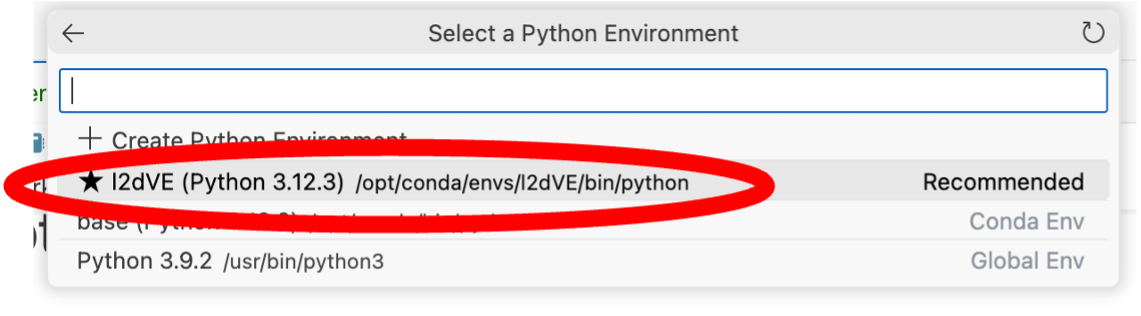
- You will then see an option with a star by it that says l2dVE (L2D Virtual Environment). Click this to select a pre-prepared environment that we have set up for you, with all the required Python packages and modules you will need to work on the specific assignment in question. (Once selected, the active kernel on the right will display l2dVE and the current version of Python being used).
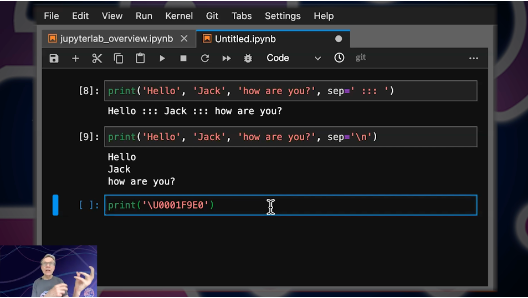
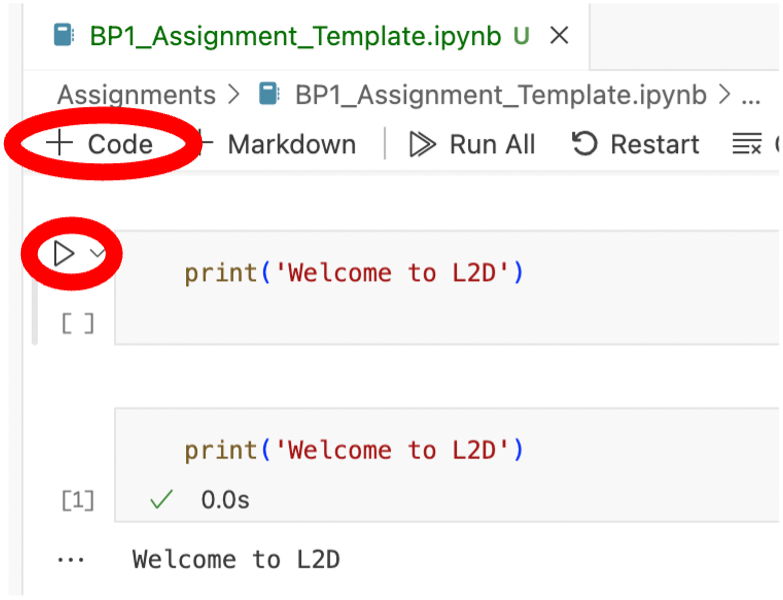
- You are now ready to begin the assignment. You can create new cells easily by pressing the + Code button. You can then fill these with code, and run the code by clicking the little triangular play symbol to the left of the cell (or using keyboard shortcut ctrl + Enter). The output of your code will then be generated and displayed beneath the cell.
Note
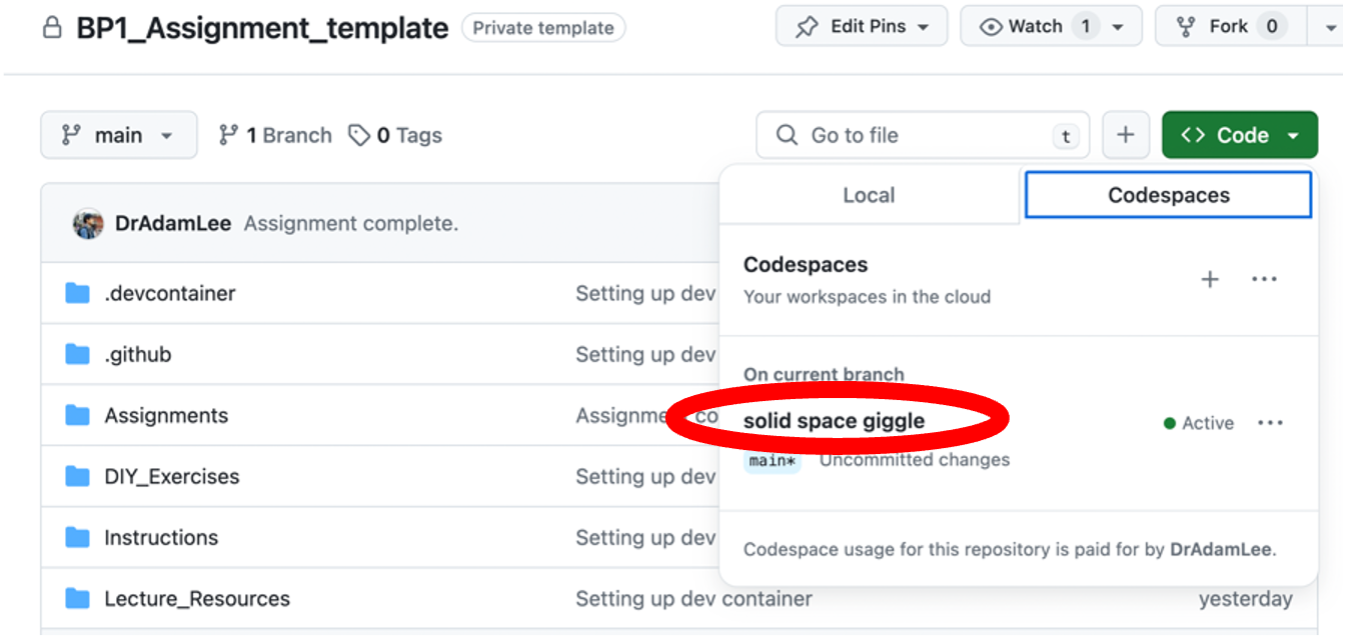
only complete the next steps in the workflow when you are ready to submit your assignment. If you wish to pause working, and come back at a later time – providing you have a stable and active internet connection – your Codespace will autosave your changes as you are working. If you reopen the Codespace you created from your main repository page again, you will be able to pick up where you left off. To access your Codespace at a later date, go back to your main repository page, and click the green Code button. Under the Codespaces tab, you will see any active codespaces that you have in your repository. They will usually be given random, meaningless names to help GitHub uniquely identify them. Click this name, and you will be able to resume where you left off.
- Once you have completed your assignment, you must then proceed to submit it. To do this click the Source Control button on the leftmost tab (a fork symbol), and you will see that – because you have made changes to your assignment template file – a sub-menu titled Changes will appear, and under it will be your assignment template file with a small green U to the right of it. This means that there are unstaged changes that have not yet been pushed back to your repository.
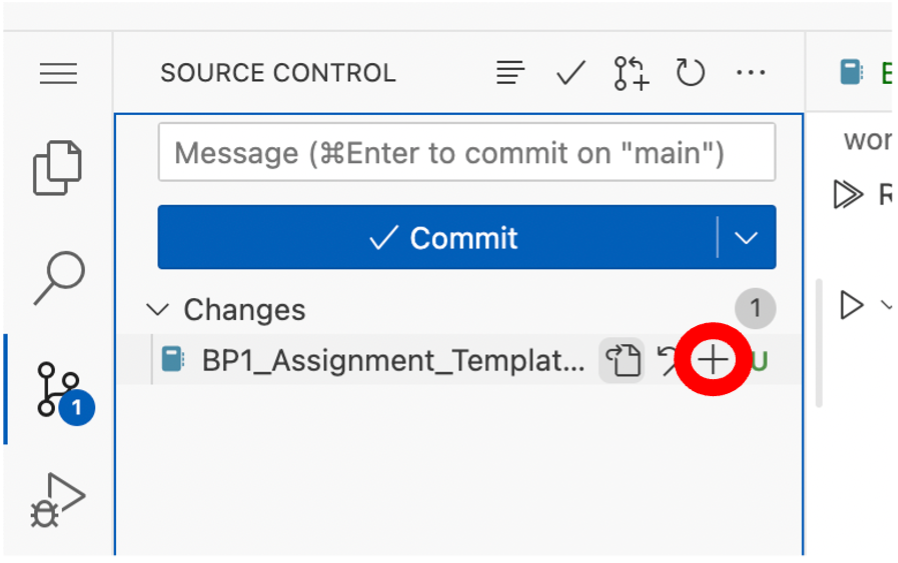
You must first stage a change, commit it and then push this change back to your repository in order to submit your assignment. If you mouse-over the title of the document, you will see a + symbol appear. Click this + symbol, and it will stage the changes made to your assignment.
- Once staged you must commit the changes, and add a commit message. GitHub is based around an efficient version control system, which allows you to add messages to every change made to a file, and keeps a detailed history of all changes made, so that you can easily see every version of a file, at the different stages at which it was worked upon and edited. Click in the Message cell, write down a relevant commit message (i.e. ‘Assignment completed’), and hit the blue Commit button.

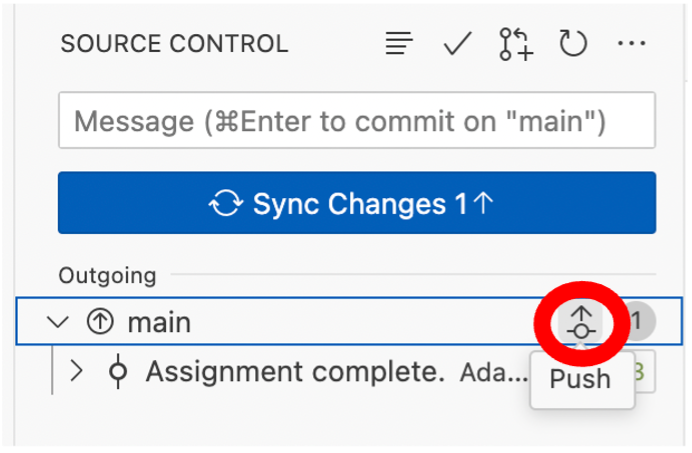
- In order to complete the submission process, you must push your completed assignment back to your repository, and it will register with us that you have submitted the assignment. Mouse-over Main and you will see a symbol of a node with an arrow. Click this arrow to push your assignment back to the repository, and your submission will be registered. Alternatively, you can also click the blue Sync Changes button, which has the same function.
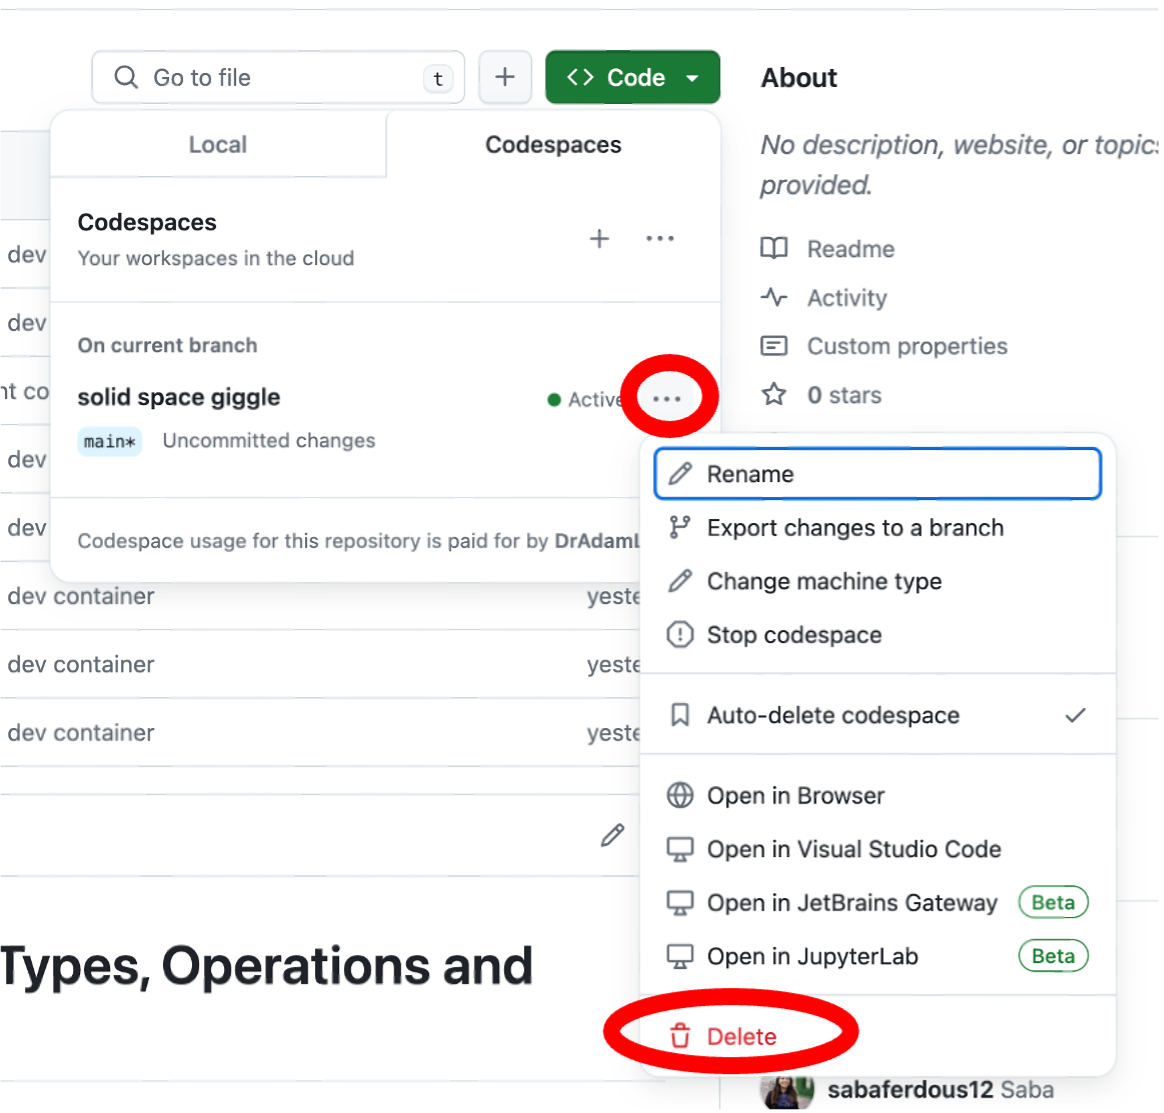
- After you have submitted your assignment, the final step is to delete your codespace. You must do this, as having too many active codespaces places heavy strain on your GitHub account. To delete your codespace, go back to your main repository, click the green Code button, and select the Codespaces tab. Find your active codespace(s), click the three dots … beside it, and select Delete from the dropdown menu.
Initially, for users new to GitHub, this workflow may seem a little daunting. But we encourage you to keep this handbook to hand, so that you can get used to this system of submitting assignments. At L2D, we have selected this protocol for assignment submission to familiarise learners with GitHub’s infrastructure so that – for those who pursue coding in the future – you will be armed with the knowledge of how to use a platform and system for code sharing, collaboration and publication that is recognised and used, internationally.
Assignment Submission - Local
For those who wish to bypass the previously outlined Codespace method, or work on their assignments without an active internet connection, this tutorial video will outline how to use Microsoft Visual Studio Code to open a locally-cloned copy of your GitHub repository, and commit and push your assignments back to your GitHub lesson repository, in order to submit them.
Please watch the following tutorial video in order to complete your assignment submission:
The pre-requisite installation requirements and links referenced in the video are:
Content from Assignment Marking
Last updated on 2024-06-18 | Edit this page
Marked Assignments
Once your assignment has been marked, it will be returned to your repository by your L2D tutor within 14 days of timely submission. The file will have **_MARKED** appended to its title, just before the file extension, and will be returned to the Feedback folder on your lesson repository. Inside your notebook, you will find comments initialled by your tutor in your work and code, indicating your progress. For example, a line commencing with # AL: would indicate that your tutor (initials AL) is leaving you in-line feedback.
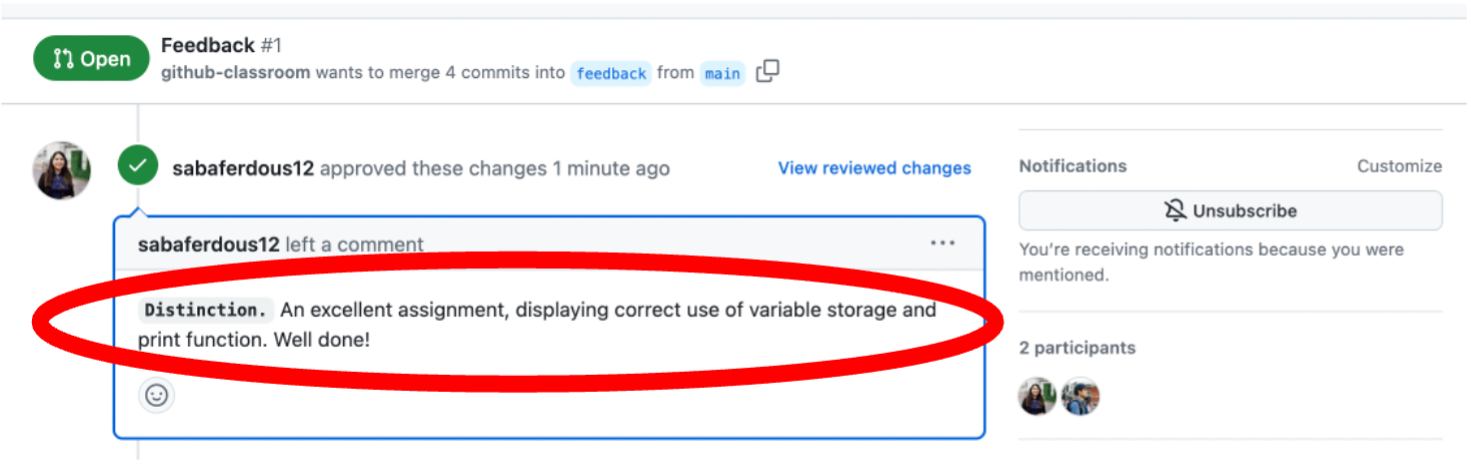
Also inside your Feedback folder, you will see a ReadMe file, which explains each grade boundary, and how these grades reflect the application and understanding demonstrated in your work. Your L2D assignments are assigned one of three grades: Distinction, Pass or Revise.
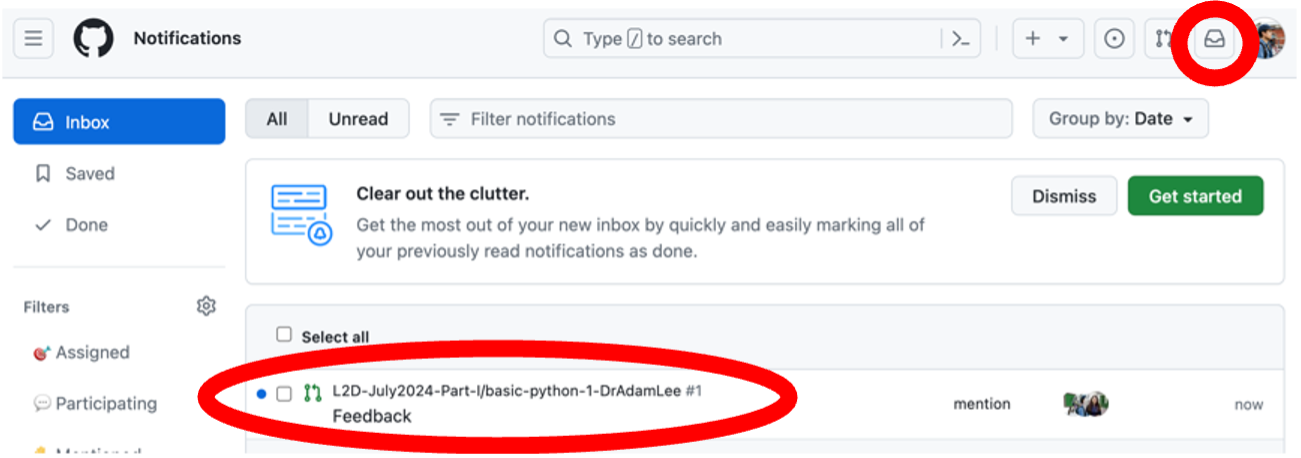
Your L2D tutor will also leave a summary comment on your work, and grade as a GitHub Pull Request. Once this has been submitted, you will receive a notification in your GitHub inbox (top right of any GitHub window), and you will also receive an email to your GitHub-registered email address, indicating that a Pull Request has been submitted by your tutor. If you received a Distinction or Pass, no further action is required, on your behalf. However, should you receive a Revise for your work, you are expected to re-attempt your assignment, as per your tutor’s guidance, and re-submit this within 14 days of receiving your marked assignment.
Revising an assignment
Just as previously described for submitting an assignment, you are required to use your Codespace to open the marked assignment that was returned to you by your L2D Tutor.
Make a copy of this by right-clicking the file name in the browser tab on the left of your Codespace window, and click Copy. Right-click again, and click Paste. Right-click the copy of your assignment, and click Rename and replace _MARKED with _REVISED.
Revise your assignment, as advised by your Tutor, and when you have completed your revisions, submit your revised assignment in the same way as you have done before, by staging the stages, committing and pushing your _REVISED notebook with a sensible commit message (such as ‘Assignment revised.’).
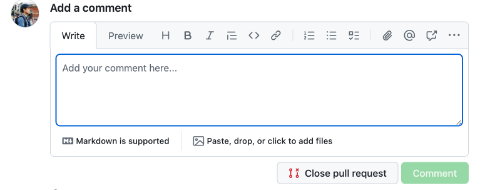
Once you have pushed and submitted your assignment, go back to the Pull Requests tab, find the Feedback left by your tutor, scroll down and you will see a blank Add a comment field. In this, reply to your tutor, saying you have revised your assignment, and your tutor will automatically be notified of your revisions. Please note, this step is critical. Without it, your tutor won’t be notified that you have submitted a revised assignment, and will not know to re-mark this.
Once your assignment has been revised, it will be returned to you in the same way, with your tutor adding a comment to the same Pull Request, culminating in you receiving a notification and email. Once your assignment has achieved either a Distinction or a Pass, you will not be required to submit any further revisions.
Note
As previously advised, please be sure to submit your revised assignment within 14 days of receiving your mark from your tutor. Delayed assignment and/or revision submissions will not be prioritised by our tutors, and if the workload for them is high, this may (without reported extenuating circumstances) result in delayed issuing of certificates for your completion of the L2D course.
Content from Tutor Support
Last updated on 2024-07-15 | Edit this page
Booking Sessions
L2D now offers the chance to book a 30-minute, 1-to-1 discussion between students and tutors. This is aimed at allowing students with particular queries to have these answered and walked-through with an L2D tutor. As an example, these queries can either be about a subject area, assignment question, or final project.
Please refer to this instruction document to help you book sessions with a tutor of your choice.
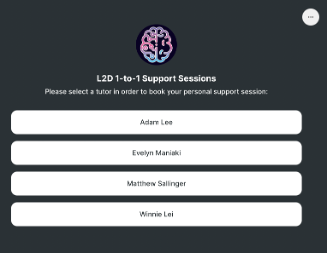
Click on the following URL (and bookmark it for safekeeping): https://linktr.ee/L2DTutorSessions
From the list, select a tutor of your choosing to see their availability. Please note, if one tutor’s availability is not convenient for you, it’s a good idea to check on the others in the list, for a wider array of support slots.
- Each booking consists of a 30-minute slot. Select a slot that is convenient for you. Typically, we make slots available one week at a time.
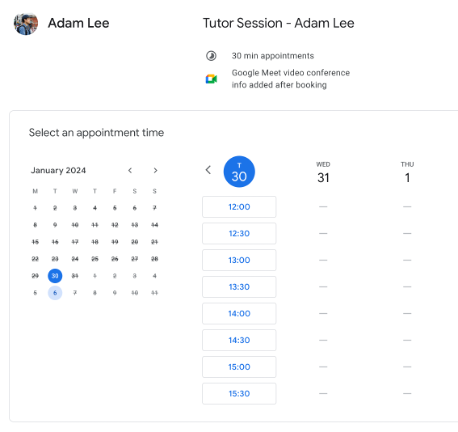
- To book a slot, click the time of your choosing, and fill out the form with your name, email address and the reason for your booking. (Tip: give 1-2 sentences in the last field, to help your tutor know what the support session will be about).
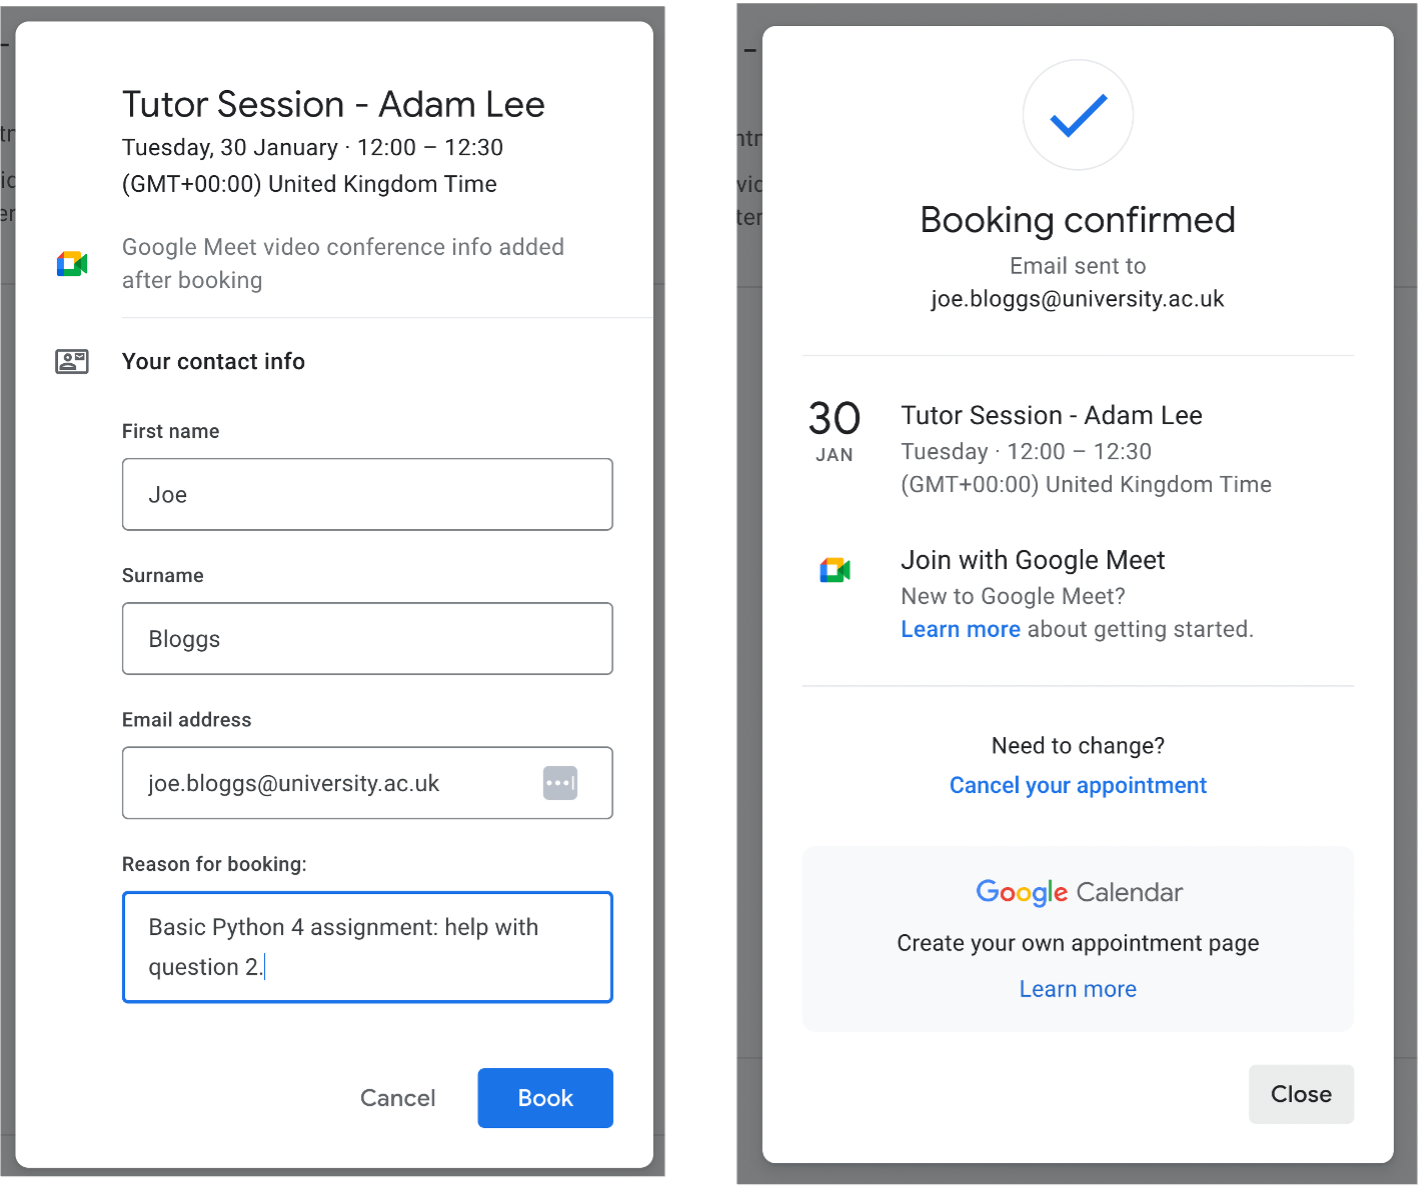
You should then receive an automatic calendar invite to the provided email address. When the time for your support session arises, it will take place on the automatically provided Google Meet link, which will allow you to engage in a video meeting with your tutor, directly from your web browser. No additional software or sign-ups are required.
If you have any questions regarding your tutor support session, please email us on: admin@learntodiscover.ai
Content from Final Project
Last updated on 2024-06-18 | Edit this page
Practice on your dataset
For learners who have completed the entire L2D course (inclusive of Basic Python, Data Handling and Machine Learning modules), you are given roughly four subsequent weeks to complete and submit a Final Project. You can use data of your choosing, or one of the provided datasets to complete your Final Project, and the deadline for submission is advertised in the L2D Course Calendar (and in your last lesson release email for Machine Learning lesson 6).
The point of this project is to make use of techniques across the breadth of the entire L2D course to analyse the data, and write this up into a complete Jupyter Notebook. These will be graded within a further month of submission, and successful completion of your Final Project will result in you achieving a Certificate of Completion for the L2D course.
Tutor support is available for anyone who requires it during the writing of your Final Project, and can be booked using the Tutor Support Session booking procedure, outlined previously in this handbook.
Content from Certificates
Last updated on 2024-06-18 | Edit this page
Certificate of Completion
Once you have completed the L2D course, you will receive a certificate of completion. You are required to have submitted all bar one assignment for each component of the course in order to be awarded a certificate of completion. Three out of four Basic Python assignments must be submitted; three out of four Data Handling assignments must be submitted; four out of five Machine Learning assignments must be submitted, and for those who have taken all of the aforementioned units as a Complete Course package, you must submit your final project. You will then be awarded a certificate for each completed component, together with an overall course completion certificate for learners who have taken the entire course.
Content from Contact Us
Last updated on 2024-06-18 | Edit this page
Ways to get in-touch
There are a multitude of ways that you can reach the staff at L2D.
If your query is academic, we recommend posting it (with as much information as possible) on the GitHub Discussions forum.
You can reach tutors for direct 1-to-1 support, by booking a support session, as outlined in section 8 of this handbook.
If your query relates directly to a marked assignment, you can submit a pull request, in direct response to the feedback comment left for you by your tutor under the Pull Requests menu, at the top of your GitHub repository page.
If you have more general course queries please contact admin@learntodiscover.ai via email, and if queries are academic in nature, they will be forwarded to the relevant course academic.