Content from Getting started
Last updated on 2024-08-05 | Edit this page
Download Chapter notebook (ipynb)
Overview
Questions
- Programming - why bother?
- Why Python?
- How to learn it?
Objectives
- Understand the concept of programming
- Understand the basics of Python language
Programming — why bother?
Data handling and analysis in bio-research and medicine is best done using coding. In October 2017, the American technology magazine Wired published an article in which the author outlines reasons why several established bio-science researchers working in reputable institutions felt the need to learn coding — specifically in Python: “Want to Make It as a Biologist? Better Learn to Code”.
This Course
We focus on the Python programming language throughout this course, but we discuss universal principles shared amongst many programming languages. Through a diverse range of examples, we will be training these principles by solving problems that we face in biological and medical research.
Why Python?
Python is a general-purpose programming language. This means that it can be exploited to design any type of software, from desktop and web, to robotics and automation, to data analysis. The 2020 survey conducted by the Python Software Foundation and JetBrains® found that approximately 85% of respondents used Python as their first language to conduct data analysis.
In addition, the 2021 developer survey conducted by StackOverflow found that Python is the third most popular general-purpose programming language after JavaScript and HTML/CSS. This means that it enjoys a vibrant community that support and maintain its development, and the development of the libraries associated with it. This is confirmed by the fact that the language is ranked as the second most popular language on GitHub®, which is the primary code-sharing platform amongst programmers.
How to learn?
Learning how to code as a beginner is akin to learning how to walk as a baby. You cannot learn programming by memorising directives; no matter how well you memorise them. To learn how to code, one must learn how think algorithmically; that is, how to break different tasks down into logical procedures. The only way to learn how to “think code” is to practice, make mistakes, and how to overcome those mistakes. It is common to make the same mistake more than once, especially in different contexts, and that can become frustrating at times. However, once you get it, you have it for life.
There are lots materials on the web, both free and paid, to assist with your learning. Use them to your advantage! Great programmers are not the ones who know every technical detail by heart; rather, they are the ones who know what they are looking for, and where they can find the answer.
Known Quirk
Unlike popular belief, the name Python has nothing to do with the snake. It is in fact derived from the popular British sketch comedy series Monty Python’s Flying Circus, of which inventor Guido van Rossum was a self-confessed fan.
Python: The Programming Language
Python is a general-purpose, high-level programming language. It was invented by the Dutch computer programmer Guido van Rossum and was released for the first time in 1990.
A high-level programming language is a language that enjoys strong abstraction from computer details. This means that it is closer to the language that is spoken and understood by humans; put simply: it makes the language more enjoyable to work with.
Categories
In terms of compilation (the conversion of code into the binary symbols understood by a computer), programming languages may be divided into two different categories:
1 - Compiled These are languages whose code is translated (compiled) into machine language en-masse, and in advance, using a designated compiler programme — e.g. C, Rust, Haskell.
2- Interpreted These languages rely on and must always be accompanied by an interpreter, whose job is to translate the source code into machine language one line at a time — e.g. Python, R, MATLAB®.
Key Points
- Programming is an important skill which is highly applicable to bio-research and medicine.
- Python is one of the most popular programming language for being general-purpose and high level language.
- Python uses an interpreter for line by line code translation.
Content from Variables, Types, and Operations
Last updated on 2024-08-05 | Edit this page
Download Chapter notebook (ipynb)
Mandatory Lesson Feedback Survey
Overview
Questions
- What are input and output (I/O) operations?
- What do variables do?
- Why are types and scopes of variables important?
- What types of operations are used?
Objectives
- Understanding I/O operations
- Build concepts of different types of variables
- Learning about type conversions and scope
- Understanding mathematical and logical operations
In programming, we process data and produce outputs. When data is being processed, it is stored in memory so that it is readily available, and can therefore be subject to the processes we want to apply.
In this lesson, we will discuss how to handle data in Python. We will start by displaying data on the screen, and understand how to receive input from a user. We can then use these techniques to perform different mathematical and logical operations. We will also cover the fundamental principles employed every time we code in Python. It is imperative that you understand everything before moving on.
I/O Operations
In computer science, input or output operations refer to the communication between an information processing system such as a computer, and the outside world, which may be a user or even another computer. Such communications are more commonly known as I/O operations. In general, this ‘outside world’ may be loosely defined as anything that falls outside of the coding environment.
REMEMBER
Only what we define within the environment and what we store in the memory is directly controlled by our application. We may access or take control over other environments, however, these interactions are classified as I/O operations. An example of this is interacting with a file on our computer. While we have complete control over a file while working on it (e.g. reading from it or writing to it), the access to the file and the transmission of data is in fact controlled and managed not by the programming environment but by the operating system of the computer.
In programming, I/O operations include, but are not limited to:
Displaying the results of a calculation
Requiring the user to enter a value
Writing or reading data to and from a file or a database
Downloading data from the Internet
Operating a hardware (such as a robot, for example)
Advanced Topic
If you are interested in learning more about I/O systems and how they are handled at operating system level, you might benefit from chapter 13 of Operating Systems Concepts, 10th ed. by Abraham Silberschatz, Greg Gagne, and Peter Galvin.
I/O Operations in Python
In this section, we learn about two fundamental methods of I/O operations in Python. We will be using these methods throughout the course, so it is essential that you feel comfortable with them and the way they work before moving on.
Producing an output
The term output in reference to an application typically
refers to data that has either been generated or manipulated by that
application.
For example; calculating the sum of two numbers. The action of
calculating the sum is itself a mathematical
operation. The result of our calculation is called its
output. Once we obtain the result, we might want to save it
in a file or display it on the screen, in which case we will be
performing an I/O operation. I/O operation.
The simplest and most frequently used method for generating output in almost every modern programming language is to display something on the screen. We recommend using Jupyter Notebooks to run our Python scripts, which defaults to displaying the output of a code cell beneath the code itself. We will start by calling a dedicated built-in function named print().
REMEMBER
In programming, a function is essentially an isolated piece
of code. It usually accepts input, does something to or with
this, and produces output. A function can process input,
often using several operations in a particular sequence or
configuration, and process the input to give a final output. In Python
programming syntax, a pair of (typically round) parentheses follows a
function, and these provide the function with the input
arguments it needs when we call it, so that it can do what
we intend, to our data. We will explore functions in more details in
Basic Python 4: Functions.
The print() function can take several inputs and performs different tasks. Its primary objective, however, is to take some values as input and display them on the screen. Here is how it works:
Suppose we want to display some text in the Terminal. To do so, we write the following into a cell of our Jupyter Notebook (or on the Terminal, a code editor or dedicated Integrated Development Environment (IDE)):
print('Welcome to L2D!!!')This is now a fully functioning Python program that we can run using the Python interpreter.
If you are using an IDE (such as Mircosoft Visual Studio Code, for
example) you must save the code in a file with the extension
.py, in order to execute your code using the internal tools
provided by that IDE. The specifics of how you do so depend on the IDE
that you are using.
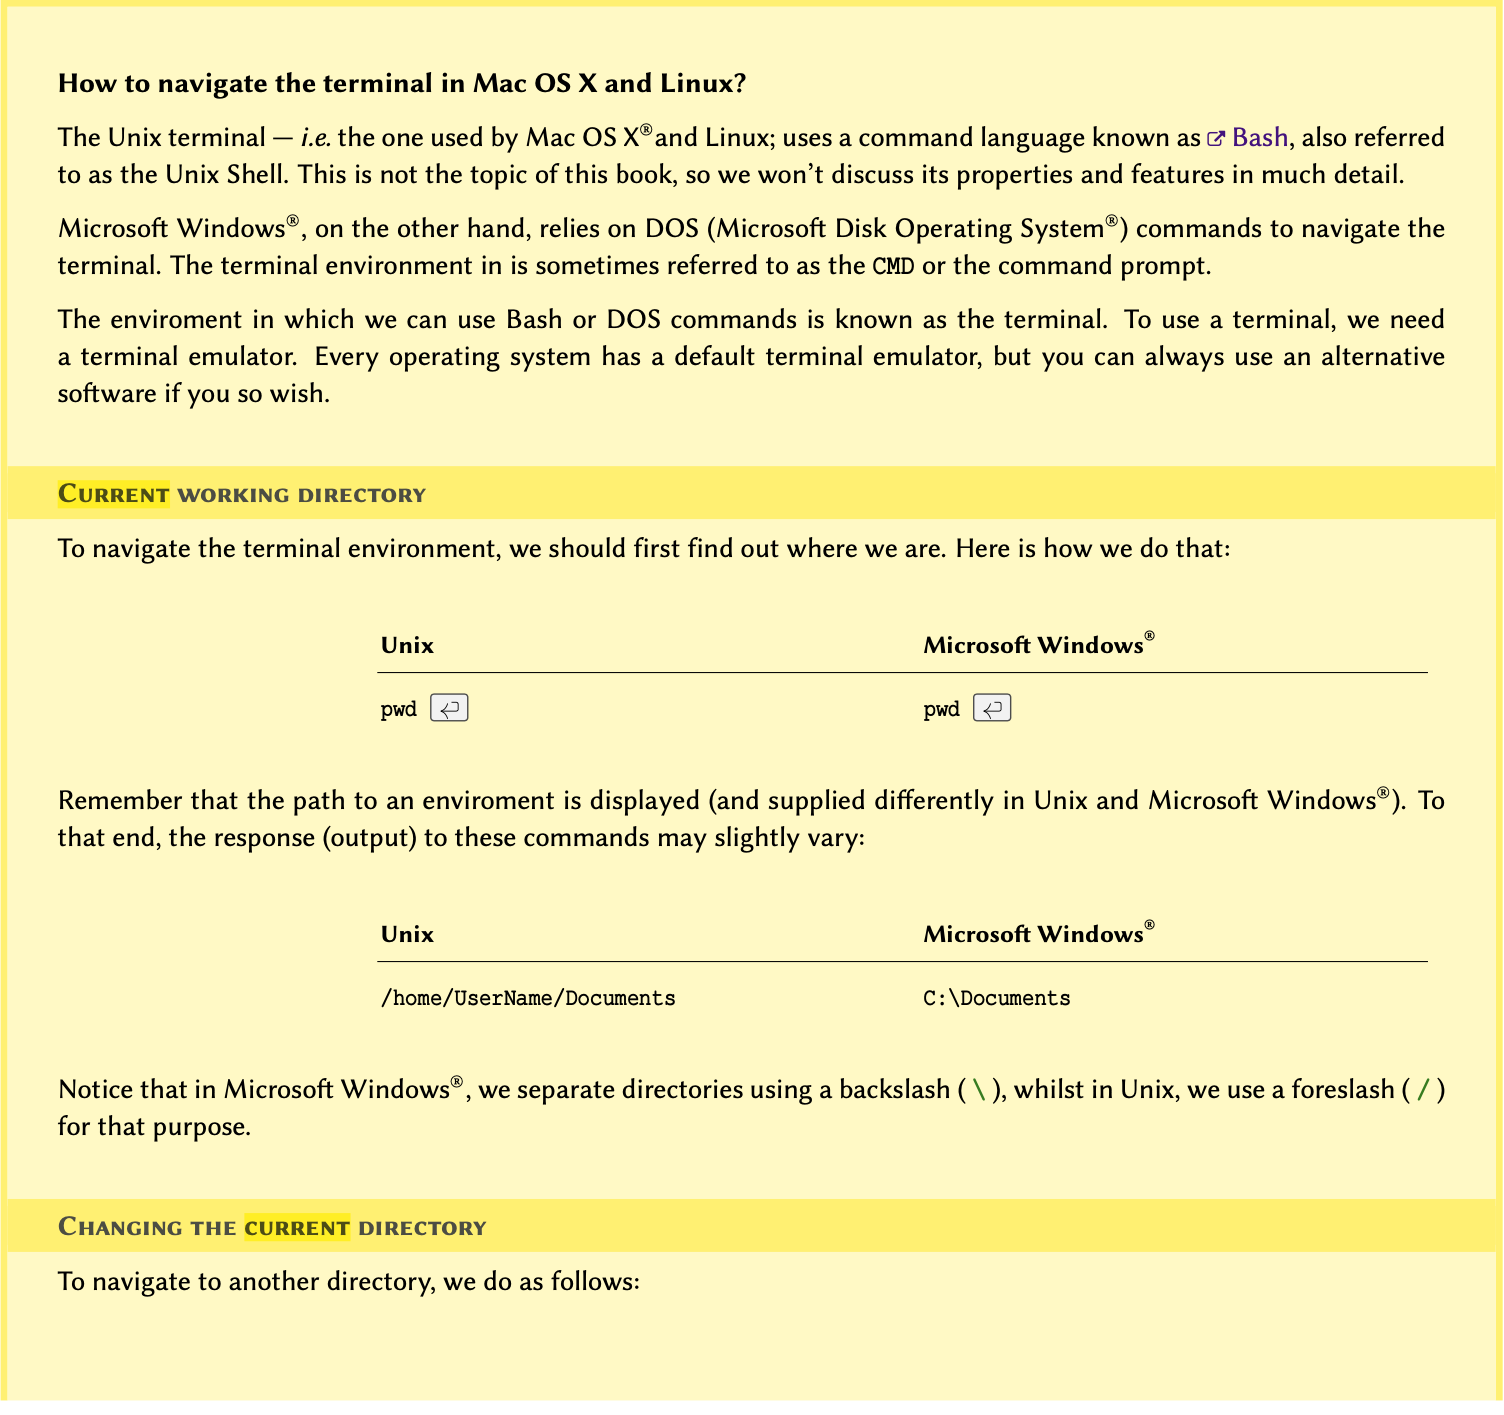
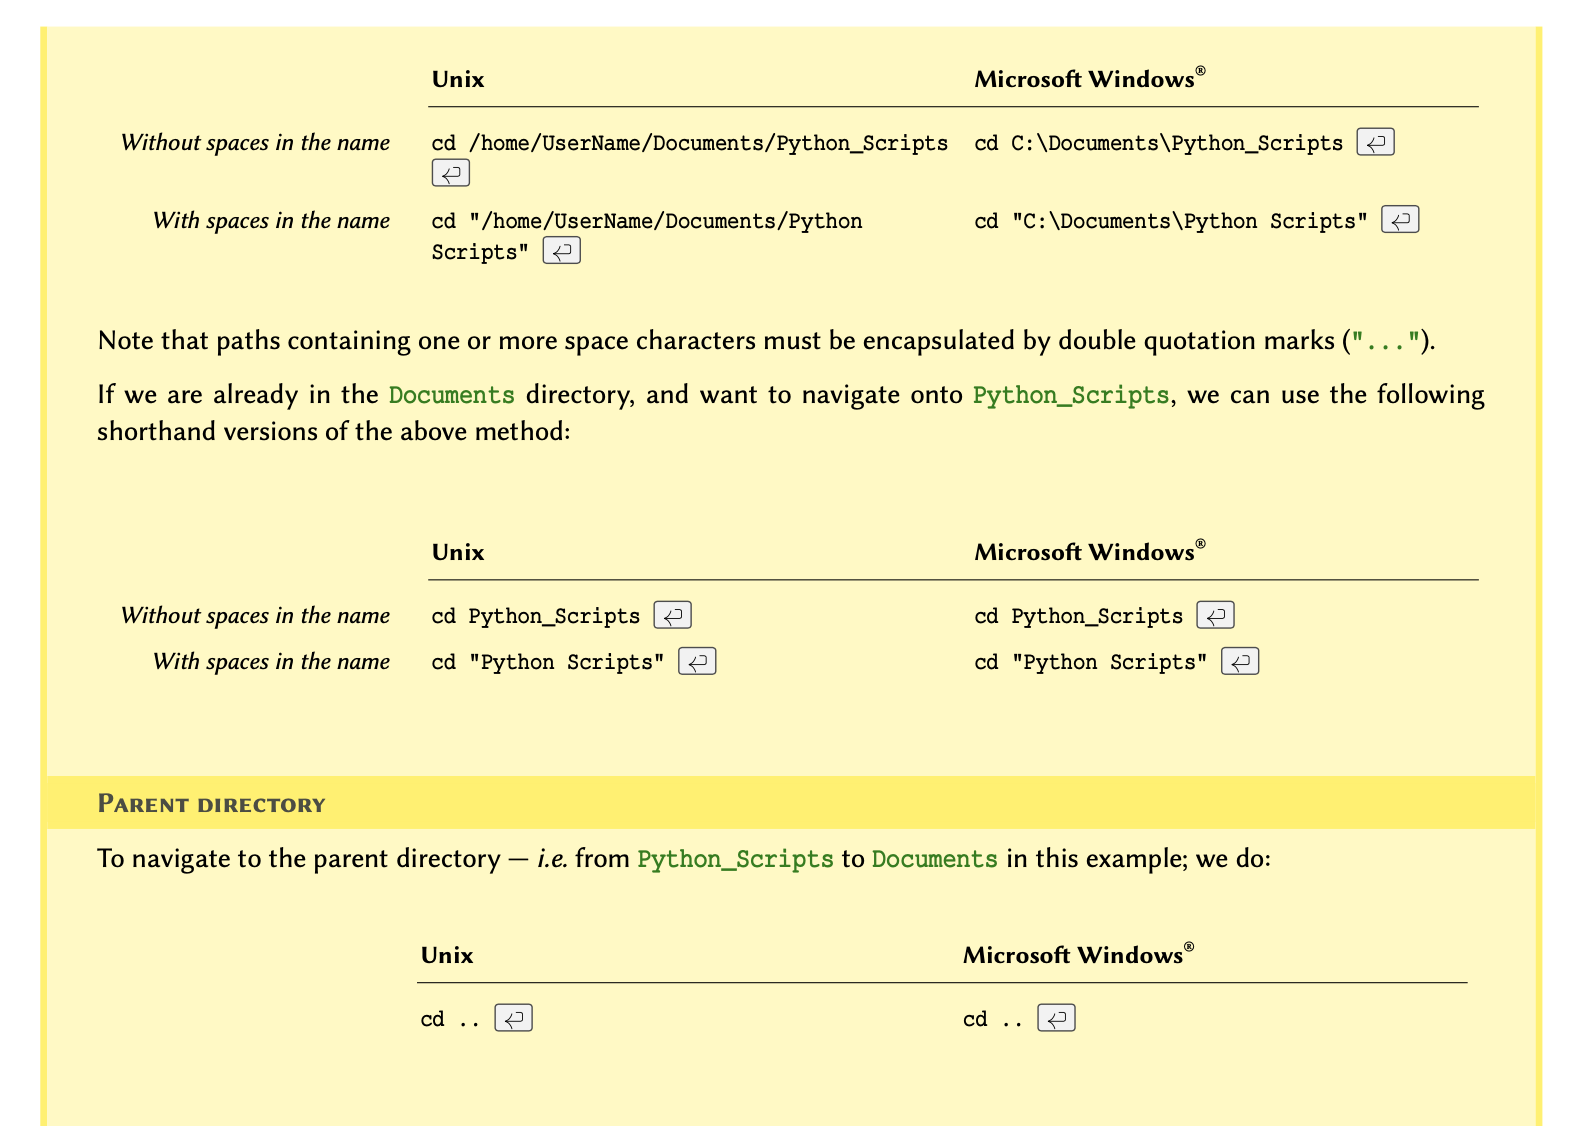
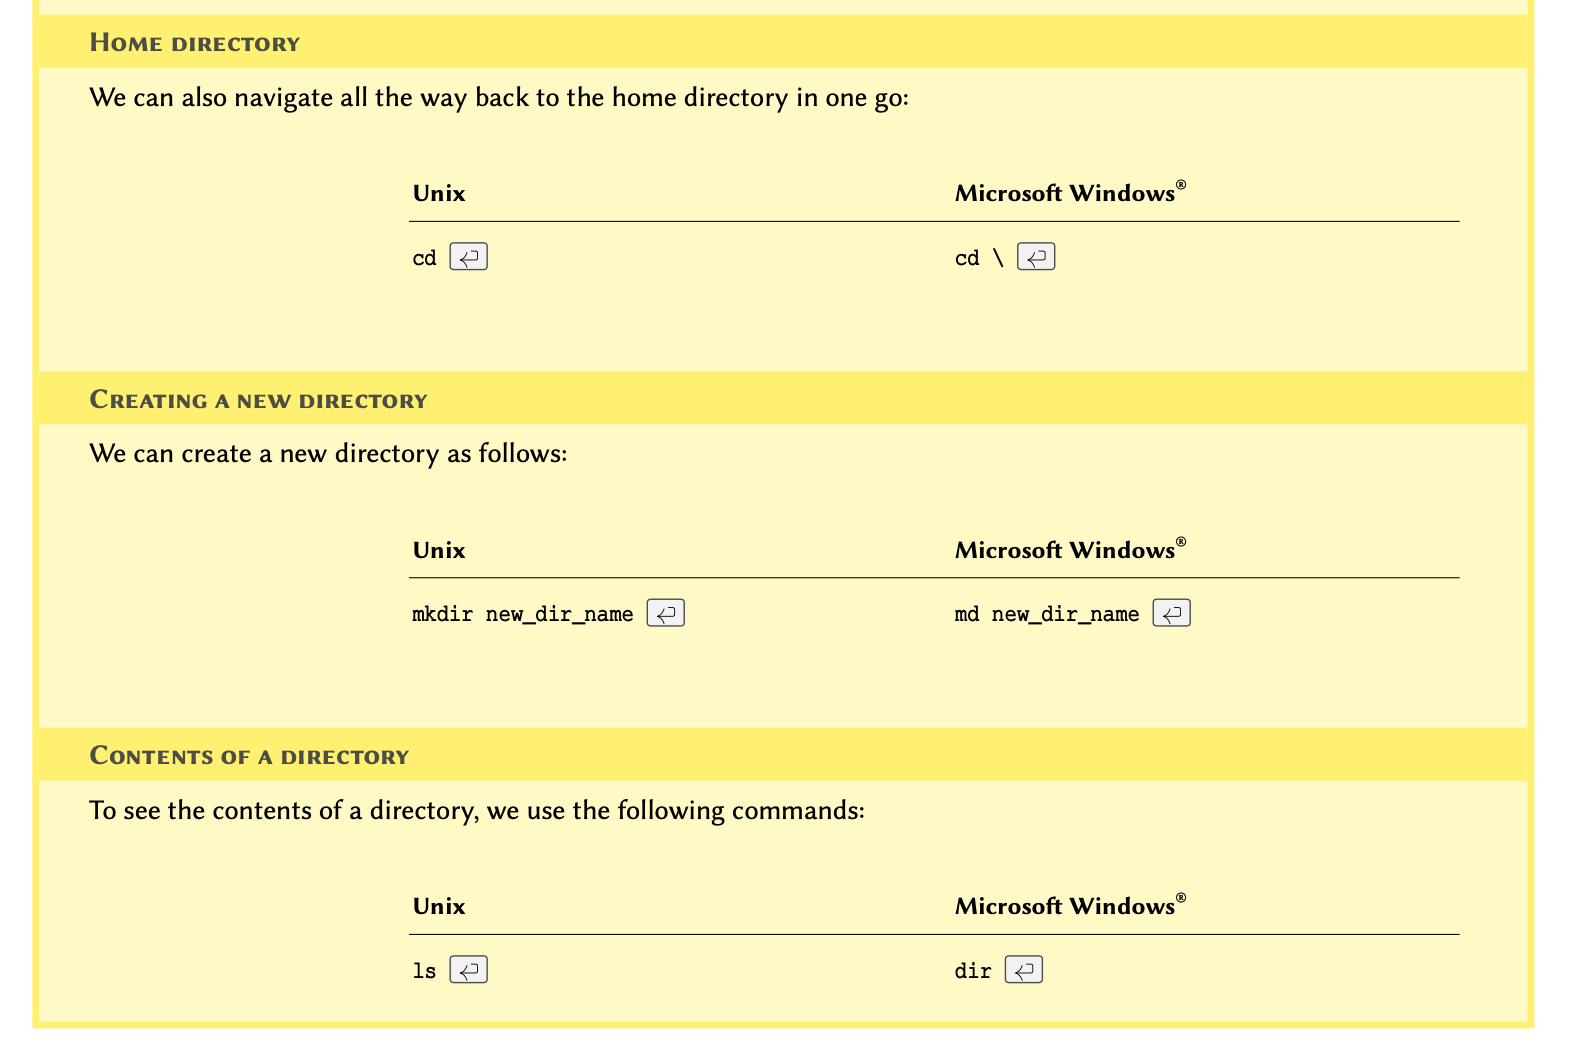
.py Python scripts can also be executed manually. To do so,
we open the Terminal in MacOS or Linux or the command prompt (CMD) in
Windows and navigate to the directory where we saved the script.
NOTE
If you don’t know how to navigate in the Terminal, see the example in section How to use terminal environment? at the end of this chapter.
Once in the correct directory, we run a script called
script_a.py by typing python3 script_a.py in
our Terminal as follows:
OUTPUT
Hello world!
This will call the Python 3 interpreter to execute the code we wrote in
script_a.py. Once executed, we will see the output
displayed in the Terminal window.
In a Jupyter Notebook we can press the keyboard shortcut ‘shift+enter’ to execute the code in a cell. The output will be displayed below the code cell.
You have now successfully written and executed your first program in Python.
REMEMBER
We know that print() is a function because it ends with a pair of parentheses, and it is written entirely in lowercase characters PEP-8: Function Names. Some IDEs change color when they encounter built-in functions, in order to signal to the user that the function is recognised, and available to use, and so that we don’t accidentally overwrite them.
We can pass more than a single value to the print() function, provided that each value is separated from another, using a comma. For instance, if we write the code below and run the script, the results would be as shown in output.
OUTPUT
Hello JohnNotice that there is a space between ‘Hello’ and ‘John’ even though we did not include a space in our text. This is the default behaviour of the print() function when it receives more than a single value (argument).
This default behaviour may be changed using a keyword argument called sep:
OUTPUT
HelloJohnOUTPUT
Hello--JohnOUTPUT
Jane.21.London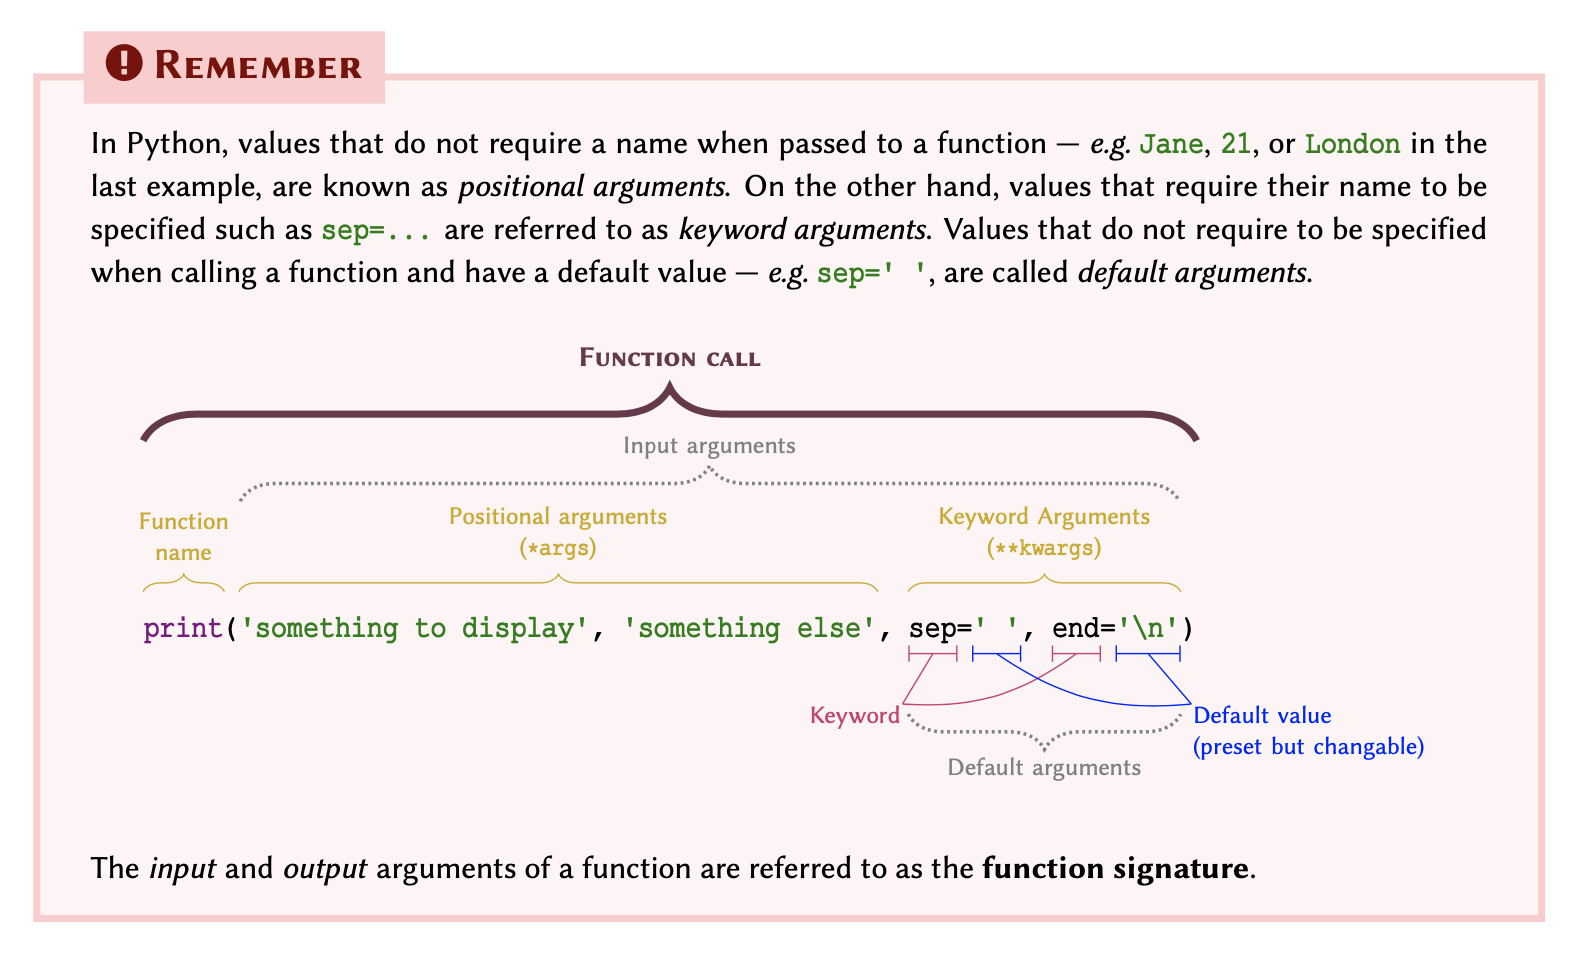
Practice Exercise 1
Write code that displays the following output:
Protein Kinase C (Alpha subunit)
Receiving an input
Inputs are I/O operations that involve receiving some data from the outside world. This might include reading the contents of a file, downloading something from the internet, or asking the user to enter a value.
The simplest way to acquire an input is to ask the user to enter a value in the Terminal. To do so, we use a dedicated built-in function called input().
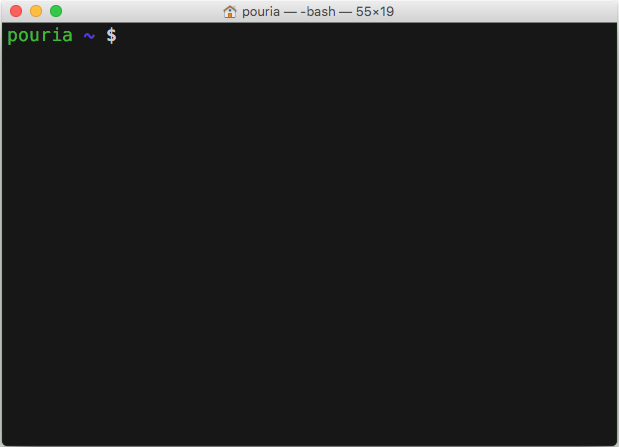
Note
In a Unix system (Mac OS or Linux), a tilde (~) is an alias that is used to refer to a user’s home directory.
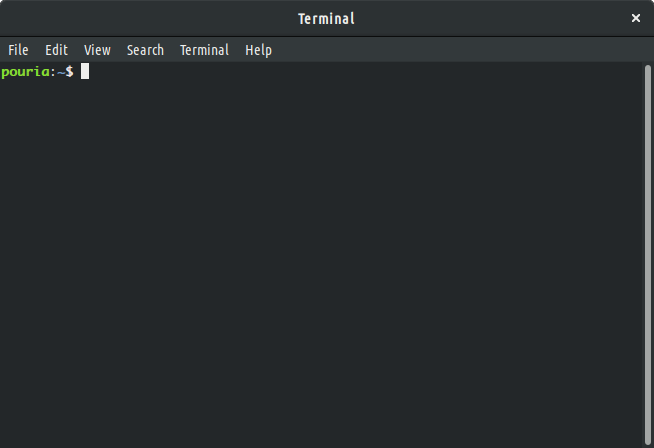
This function takes a single argument called
prompt. Prompt is the text displayed in the Terminal to ask
the user for an input. Figure Terminal window on
a Linux computer and Terminal window on a
Mac, illustrates a screen shot of an example PC’s prompt, where it
displays a user name (i.e. pouria) followed by a tilde (~).
A Terminal prompt may be different in each computer and operating
system.
Here is how we implement the input() function:
input('Please enter your name: ')which is exactly the same as:
input(prompt='Please enter your name: ')If we save one of the above in a notebook and execute it, we will see:
python3 script_b.py

Please enter your name: _
The Terminal cursor, displayed as an underscore in our example, will be
in front of the prompt (i.e. 'Please enter your name: ')
waiting for a response. Once it receives a response, it will proceed to
run the rest of the code (if any), or terminate the execution.
We may store the user’s response in a variable. Variables are the topic of the next episode in this learning material, where we shall also review more examples on input() and how we can use it to produce results based on the responses we receive from the user.
Remember
Python is an interpreted language; this means that the code we write is executed by the Python interpreter one line at a time. The input() function performs a blocking process. This means that the execution of the code by the Python interpreter is halted upon encountering an input() function until the user enters a value. Once a value is entered, the interpreter then proceeds to execute the next line.
Practice Exercise 2
Write a script that asks the user to enter the name of a protein in the Terminal.
input('Please enter the name of a protein: ')Variables And Types
Variables are a type of data container, that we can use to store data to memory. Each variable has three main types of attribute: scope, name, and type. Scope and name must be mutually unique. Starting with name, we will discuss each of these attributes in more details throughout this chapter.
Variable names
The name that we give to a variable is, in fact, an alias for a location
in the memory. You can think of it as a postbox, which is used as a
substitute for an actual address. Similarly, we use variable names so we
don’t have to use the actual address to the location we want in the
memory; because it would look something like this
0x106fb8348.
There are some relatively simple rules to follow when defining variable names, which ultimately boil down to:
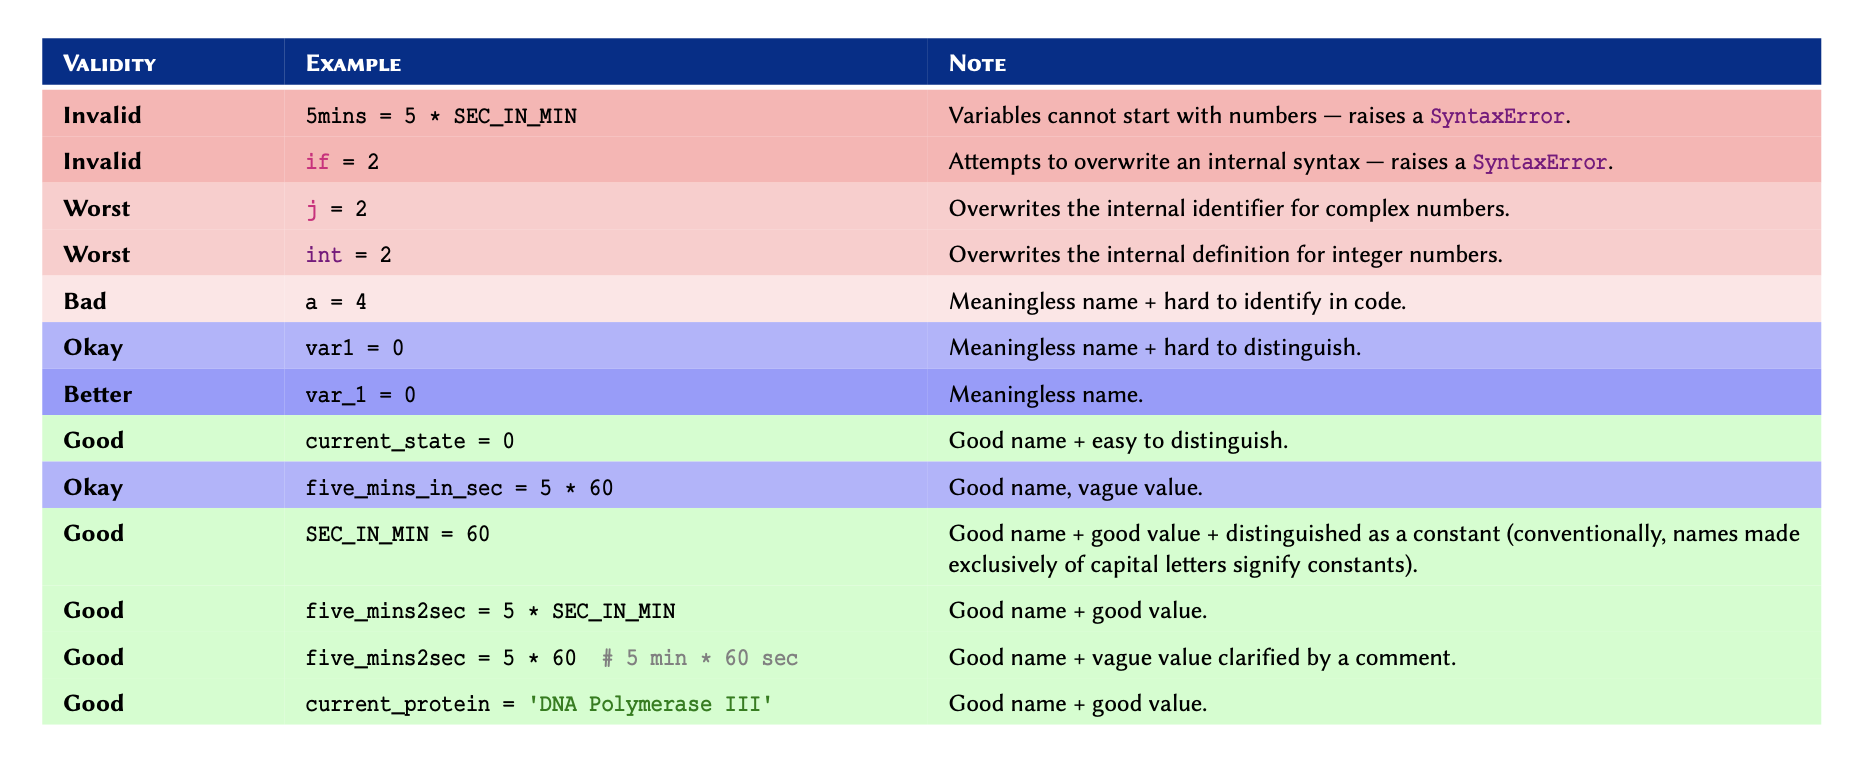
Remember
We should never overwrite an existing, built-in definition or identifier
(e.g. int or print). We will be learning many
such definitions and identifiers as we progress through this course.
Nonetheless, the Jupyter Notebook as well as any good IDE highlights
syntaxes and built-in identifiers in different colours. In Jupyter, the
default for built-in definitions is green. The exact colouring scheme
depends on the IDE being used, and the selected theme.
Once a variable is defined, its value may be altered or reset:
OUTPUT
2In Python, variables containing integer numbers are referred to as
int, and those containing decimal numbers are referred to
as float.
OUTPUT
3OUTPUT
3.2OUTPUT
16.0
Variables can contain data as characters as well; but to prevent Python
from confusing them with meaningful commands, we use quotation marks. So
long as we remain consistent, it doesn’t matter whether we use
single or double quotations. These data are known as
string or str:
OUTPUT
Hi, John DoePractice Exercise 3
Oxidised low-density lipoprotein (LDL) receptor 1 mediates the recognition, internalisation and degradation of oxidatively modified low-density lipoprotein by vascular endothelial cells. Using the Universal Protein Resource (UniProt) website, find this protein for humans, and identify:
- UniProt entry number.
- Length of the protein (right at the top).
- Gene name (right at the top).
Store the information you retrieved, including the protein name, in within four separate variables.
Display the values of these four variables in one line, and separate the items with three spaces, as follows:
Name EntryNo GeneName Length
Practice Exercise 4
Write a Python code that upon execution, asks the user to enter the name of an enzyme and then stores the response in an appropriately named variable.
Use the variable to display an output similar to the following:
ENZYME_NAME is an enzyme.
where ENZYME_NAME is the name of the enzyme entered in
the prompt.
Now modify your script to prompt the user to enter the number of amino acids in that enzyme. Store the value in another appropriately named variable.
Alter the output of your script to display a report in the following format:
ENZYME_NAME is an enzyme containing a total number of AMINO_ACIDS} amino acids.
where AMINO_ACIDS is the number of amino acids.
enzyme = input('Please enter the name of an enzyme: ')

print(enzyme, 'is an enzyme.')

length = input('How many amino acids does the enzyme contain? ')

print(enzyme, 'is an enzyme containing a total number of', length, 'amino acids.')
Variable Types
When it comes to types, programming languages may be divided into two distinct categories:
Types
Python is a dynamically typed language, and falls into this second category. This means that, unlike statically typed languages, we rarely need to worry about the type definitions because in the majority of cases, Python takes care of them for us, and automatically decodes the type of data being stored in a variable, once it is defined by the user.
Remember
In a dynamically typed language, it is the value of a variable that determines the type. This is because the types are determined on the fly by the Python interpreter as and when it encounters different variables and values.
Advanced Topic
In computer programming, type systems are syntactic methods to enforce and/or identify levels of abstraction. This means that type systems take advantage of the syntax of a particular programming language, in order to enforce rules and identify types. This is important, as it can manage abstraction in data, by ensuring that differing data types interact meaningfully with one another. An entire field in computer science has been dedicated to the study of programming languages from a type–theoretic approach. This is primarily due to the implication of types and their underlying principles in such areas in software engineering as optimisation and security. To learn more about the study of type systems, refer to: Pierce B. Types and programming languages. Cambridge, Mass.: MIT Press; 2002.
Note
The values determine the type of a variable in dynamically typed languages. This is in contrast to statically typed languages, where a variable must be initialised using a specific type before a value.
Why learn about types in a dynamically typed programming language?
Python enjoys a powerful type system out of the box. The following table - Built-in types in Python - provides a comprehensive reference for the built-in types in Python. Built-in types already exist in the language, and do not require the use or implementation of any third-party libraries.
 A comprehensive (but non-exhaustive) reference of built-in (native)
types in Python 3.
A comprehensive (but non-exhaustive) reference of built-in (native)
types in Python 3.
* Not discussed in this course —
included for reference only.
$dict is not
an iterable by default, however, it is possible to iterate through its
keys.
Mutability is an important concept in
programming. A mutable object is an object whose value(s) may be
altered. This will become clearer once we study list and
tuple. Find out more about mutability in Python from the documentation.
Complex numbers refer to a set of
numbers that have both a real component, and an imaginary component;
where the imaginary part is defined as \(\sqrt{-1}\). These numbers are very useful
in the study of oscillatory behaviours and flow (e.g. heat, fluid,
electricity). To learn more about complex numbers, watch this Khan
Academy video tutorial.
Sometimes we might need want to explicitly know what the type of a variable is. To do this, we can use the build-in function type() as follows:
OUTPUT
<class 'int'>OUTPUT
<class 'float'>OUTPUT
<class 'float'>OUTPUT
<class 'complex'>OUTPUT
<class 'str'>Remember
In Python, a variable/value of a certain type may be referred to as an
instance of that type. For instance, an integer value whose
type in Python is defined as int is said to be an
instance of type int.
Practice Exercise 5
Determine and display the type for each of these values:
- 32
- 24.3454
- 2.5 + 1.5
- “RNA Polymerase III”
- 0
- .5 - 1
- 1.3e-5
- 3e5
The result for each value should be represented in the following format:
Value X is an instance of <class 'Y'>
OUTPUT
Value 32 is an instance of <class 'int'>PYTHON
value = 24.3454

value_type = type(value)

print('Value', value, 'is an instance of', value_type)
OUTPUT
Value 24.3454 is an instance of <class 'float'>PYTHON
value = 2.5 + 1.5

value_type = type(value)

print('Value', value, 'is an instance of', value_type)
OUTPUT
Value 4.0 is an instance of <class 'float'>PYTHON
value = "RNA Polymerase III"

value_type = type(value)

print('Value', value, 'is an instance of', value_type)
OUTPUT
Value RNA Polymerase III is an instance of <class 'str'>OUTPUT
Value 0 is an instance of <class 'int'>PYTHON
value = .5 - 1

value_type = type(value)

print('Value', value, 'is an instance of', value_type)
OUTPUT
Value -0.5 is an instance of <class 'float'>PYTHON
value = 1.3e-5

value_type = type(value)

print('Value', value, 'is an instance of', value_type)
OUTPUT
Value 1.3e-05 is an instance of <class 'float'>OUTPUT
Value 300000.0 is an instance of <class 'float'>Conversion of types
Why convert types?
It is sometimes necessary to have the values returned by the input() function — i.e. the user’s response, in other types. Imagine the following scenario:
“We ask our user to enter the
total volume of their purified protein, so that we can work out the
amount of assay they need to conduct a specific experiment. To calculate
this assay volume using the volume of the purified protein, we need to
perform mathematical calculations based on the response we receive from
our user. It is not possible to perform mathematical operations on
non-numeric values. Therefore, we ought to somehow convert the type from
str to a numeric type.”
The possibility of converting from one type to another depends entirely
on the value, the source type, and the target
type. For instance; we can convert an instance of type
str (source type) to one of type int (target
type) if and only if the source value consists entirely of numbers and
there are no other characters.
Remember
To convert a variable from one type to another, we use the Type Name of the target type (as described in Table Built-in types in Python and treat it as a function.
For instance, to convert a variable to integer, we:
- look up the Type Name for integer from Table Built-in types in Python
- then treat the Type Name as a function:
int() - use the function to convert our variable: new_var =
int(old_var)
Here is an example of how we convert types in Python:
OUTPUT
12 <class 'str'>OUTPUT
12 <class 'int'>If we attempt to convert a variable that contains non-numeric values,
a ValueError is raised:
OUTPUT
12y <class 'str'>OUTPUT
ValueError: invalid literal for int() with base 10: '12y'Practice Exercise 6
In programming, we routinely face errors resulting from different mistakes. The process of finding and correcting such mistakes in the code is referred to as debugging.
We have been given the following piece of code written in Python:
value_a = 3
value_b = '2'

result = value_a + value_b
print(value_a, '+', value_b, '=', result)
But when the code is executed, we encounter an error message as follows:
Traceback (most recent call last):
File "<stdin>", line 1, in <module>
TypeError: unsupported operand type(s) for +: 'int' and 'str'
Debug the snippet so that the correct result is displayed:
3 + 2 = 5
Handling Input Variables
Discussion
When we use input() to obtain a value from the user, the
results are by default an instance of type str. An
input() function always stores the response as a
str value, no matter what the user enters. However, it is
possible to convert the type afterwards.
Remember
The input() function always returns a value of type
str regardless of the user’s response. In other words, if a
user’s response to an input() request is numeric, Python will
not automatically recognise it as a numeric type.
We may use type conversion in conjunction with the values returned by the input() function:
response = input('Please enter a numeric value: ')

response_numeric = float(response)

print('response:', response)
print('response type:', type(response))
print('response_numeric:', response_numeric)
print('response_numeric type:', type(response_numeric))
The output shows the results when we enter numeric values as directed.
Practice Exercise 7
We know that each amino acid in a protein is encoded by a triplet of mRNA nucleotides.
With that in mind, alter the script you wrote for Practice Exercise 3 and use the number of amino acids entered by the user to calculate the number of mRNA nucleotides.
Display the results in the following format:
ENZYME_NAME is an enzyme with AMINO_ACIDS amino acids and NUCLEOTIDES nucleotides.
where NUCLEOTIDES is the total number of mRNA
nucleotides that you calculated.
Note: Multiplication is represented using the
asterisk (*) sign.
enzyme = input('Please enter the name of an enzyme: ')

length = input('How many amino acids does the enzyme contain? ')

nucleotides = 3 * int(length)

print(enzyme, 'is an enzyme with', length, 'amino acids and',  nucleotides, 'nucleotides.')
Variable scopes
Resolution of namesWhen defining a variable, we should always consider where in our program we intend to use it. The more localised our variables, the better. This is because local variables are easier to distinguish, and thus reduce the chance of making mistakes — e.g. unintentionally redefining or altering the value of an existing variable.
Therefore, the scope of a variable defines the ability to reference a variable from different points in our programs. The concept of local variables becomes clearer once we explore functions in programming in chapter Functions.
As displayed in Figure Variable scopes, the point at or from which a variable can be referenced depends on the location where the variable is defined.
In essence, there are three general rules to remember in relation to variable scopes in Python:
I. A variable that is defined in the outer scope, can be accessed or called in the inner scopes, but it cannot be altered implicitly. Not that such variables may still be altered using special techniques (not discussed).
- A variable that is defined in the innermost scopes (local), can only be accessed, called, or altered within the boundaries of the scope it is defined in.
- The inner scopes from which a variable is referenced must
themselves be contained within the defining scope — e.g. in
FuncBof Figure Variable scopes, we can referencea,b, andx; but notf1. This is because the scope off1isScript→FuncA, so it can only be referenced fromScript→FuncA→ …, but not `Script→ … orScript→FuncB→ ….
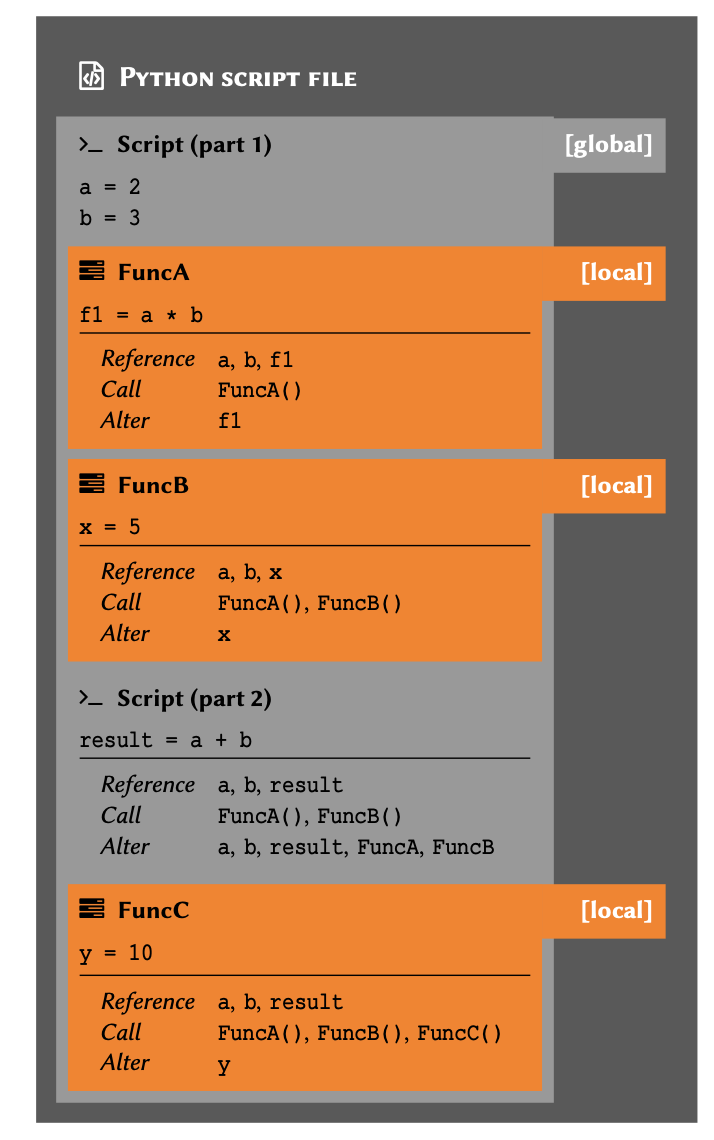
As we discussed earlier in this lesson, it is paramount to remember that
Python is an interpreted language. This means that the Python
interpreter goes through the codes that we write line by line,
interpreting it to machine language. It is only then that the commands
are processed and executed by the computer. On that account, a variable
(or a function) can be referenced only after its initial
definition. That is why, for instance, in Script (part 2)
of Figure Variable scopes, we can
reference every variable and function except for FuncC,
which is declared further down in the code hierarchy.
Although scope and hierarchy appear at first glance as theoretical concepts in programming, their implications are entirely practical. The definition of these principles vary from one programming language to another. As such, it is essential to understand these principles and their implications in relation to any programming language we are trying to learn.
Operations
Through our experimentation with variable types, we already know that variables may be subjected to different operations.
When assessing type conversions, we also established that the operations we can apply to each variable depend on the type of that variable. To that end, we learned that although it is sometimes possible to mix variables from different types to perform an operation (for example multiplying a floating point number with an integer), there are some logical restrictions in place.
Throughout this section, we will take a closer look into different types of operations in Python. This will allow us to gain a deeper insight, and to familiarise ourselves with the underlying logic.
To recapitulate on what we have done so far, we start off by reviewing additions — the most basic of all operations.
Give the variable total_items:
OUTPUT
2We can increment the value of an existing variable by
1 as follows:
OUTPUT
3Given two different variables, each containing a different value; we can perform an operation on these values and store the result in another variable without altering the original variables in any way:
OUTPUT
7We can change the value of an existing variable using a value stored in another variable:
OUTPUT
12There is also a shorthand method for applying this operation on an existing variable:
OUTPUT
2OUTPUT
3OUTPUT
8As highlighted in the introduction, different operations may be applied to any variable or value. We can now explore the most fundamental operations in programming, and learn about their implementation in Python.
Remember
There are 2 very general categories of operations in programming: mathematical, and logical. Naturally, we use mathematical operations to perform calculations, and logical operations to perform tests.
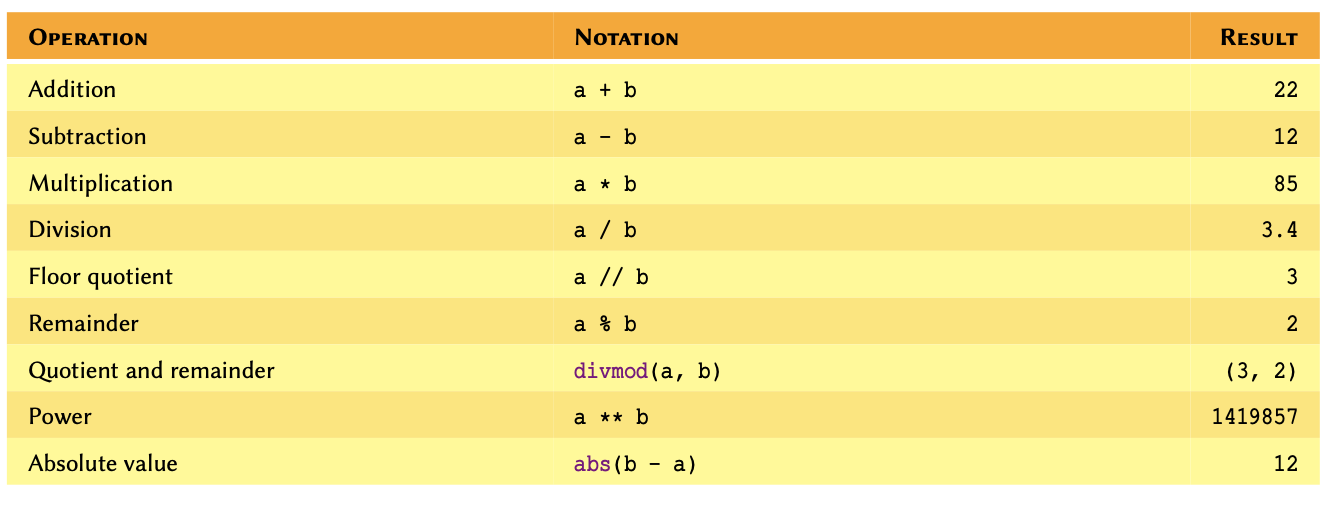
Mathematical Operations
Suppose a and b are two variables
representing integers, as follows:
a = 17
b = 5
Using a and b we can itemise built-in
mathematical operations in Python as follows:
Remember
As far as mathematical operations are concerned, variables
a and b may be an instance of any
numeric type. See Table Routine
mathematical operations in Python to find out more about numeric
types in Python.
Values of type int have been chosen in our examples to
facilitate the understanding of the results.
Practice Exercise 8
- Calculate the following and store the results in appropriately named variables:
- \(5.8 \times 3.3\)
- \(\frac{180}{6}\)
- \(35 - 3.0\)
- \(35 - 3\)
- \(2^{1000}\)
Display the result of each calculation – including the type, in the following format:
Result: X is an instance of <class 'Y'>
- Now using the results you obtained:
I. Can you explain why the result of \(35 - 3.0\) is an instance of type
float, whilst that of \(35 - 3\) is of typeint?
II. Unlike the numeric types, string values have a
length. To obtain the length of a string value, we use len().
Convert the result for \(2^{1000}\)
from int to str, then use the aforementioned
function to work out the length of the number — i.e. how many digits is
it made of?
If you feel adventurous, you can try this for \(2^{10000}\) or higher; but beware that you might overwhelm your computer and need a restart it if you go too far (i.e. above \(2^{1000000}\)). Just make sure you save everything beforehand, so you don’t accidentally lose your work.
Hint: We discuss len() in our subsection of arrays arrays lesson. However,
at this point, you should be able to use the official function
documentation to figure out how it works. To access a function’s
documentation or docstring within Jupyter Notebook, for example you can
use help(function_name) to reveal it’s documentation.
Clicking within the function (for example, placing your cursor inside
the function len) and using shift+tab can also
be an easy shortcut for viewing a function’s docstring.
OUTPUT
Result: 19.139999999999997 is an instance of <class 'float'>OUTPUT
Result: 30.0 is an instance of <class 'float'>OUTPUT
Result: 32.0 is an instance of <class 'float'>OUTPUT
Result: 32 is an instance of <class 'int'>OUTPUT
Result: 10715086071862673209484250490600018105614048117055336074437503883703510511249361224931983788156958581275946729175531468251871452856923140435984577574698574803934567774824230985421074605062371141877954182153046474983581941267398767559165543946077062914571196477686542167660429831652624386837205668069376 is an instance of <class 'int'>
In the case of \(35 - 3.0\) vs \(35 - 3\), the former includes a floating
point number. Operations involving multiple numeric types always produce
the results as an instance of the type that covers all of the operands –
i.e. float covers int, but not vice-versa.
Interesting Fact
As of Python 3.6, you can use an underscores (_)
within large numbers as a separator to make them easier to read
in your code. For instance, instead of x = 1000000, you can
write x = 1_000_000.
Shorthand:
When it comes to mathematical operations in Python, there is a frequently used shorthand method that every Python programmer should be familiar with.
Suppose we have a variable defined as total_residues = 52
and want to perform a mathematical operation on it. However, we would
like to store the result of that operation in
total_residues instead of a new variable. We can do this as
follows:
OUTPUT
60OUTPUT
50OUTPUT
100OUTPUT
25.0OUTPUT
12.0OUTPUT
2.0OUTPUT
8.0We can also perform such operations using multiple variables:
PYTHON
total_residues = 52
new_residues = 8
number_of_proteins = 3

total_residues += new_residues

print(total_residues)
OUTPUT
60OUTPUT
84Practice Exercise 9
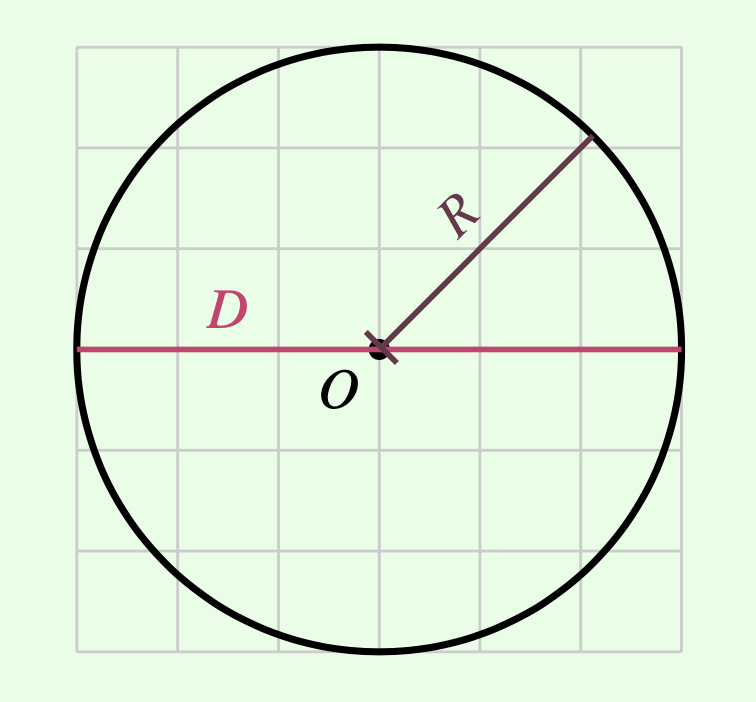
- Given:
- Circumference: \(C = 18.84956\)
- Radius: \(R = 3\)
and considering that the properties of a circle are defined as follows:
\[\pi = \frac{C}{D}\] calculate
\(\pi\) using the above equation and
store it in a variable named pi:
Then round the results to 5 decimal places and display the result in the following format:
The value of pi calculated to 5 decimal places: X.XXXXX
Note: To round floating point numbers in Python, we use the function round(). This is a built-in function that takes two input arguments: the first is the variable/value to be rounded, and the second is the number of decimal places we wish to round to. Read more about the round() function in its official documentation.
-
Now without creating a new variable, perform the following operation:
\[pi = \frac{pi}{(3 \bmod 2) - 1}\]
where the expression ’‘\(3 \bmod 2\)’’ represents the remainder for the division of 3 by 2.
Explain the output.
pi /= (3 % 2) - 1
The calculation raises a ZeroDivisionError. This is
because division by zero is mathematically impossible.
Precedence:
In mathematics and computer programming, there are a series of conventional rules on the precedence of procedures to evaluate a mathematical expression. This collection of rules is referred to as the order of operation or operator precedence.
Suppose we have a mathematical expression as follows:
\[x = 2 + 3 \times 9\]Such an expression can only be evaluated correctly if we do the multiplication first and then perform the addition. This means that the evaluation is done as follows:
\[given:3 \times 9 = 27\] \[\implies x = 2 + 27\] \[ = 29\]
For instance, in an expression such as:
\[x = 2 \times (3 + (5 - 1)^2)\]
the evaluation workflow may be described as follows:
\[x = 2 \times (3 + 4^2)\] \[ = 2 \times (3 + 16)\] \[ = 38\]The same principle applies in Python. This means that if we use Python to evaluate the above expression, the result would be identical:
OUTPUT
38Remember
Operator precedence in mathematical operations may be described as follows:
- Exponents and roots
- Multiplication and division
- Addition and subtraction
If there are any parentheses ( ) in the expression, the
expression is evaluated from the innermost parenthesis, outwards.
Practice Exercise 10
Display the result of each item in the following format:
EXPRESSION = RESULTFor example:
2 + 3 = 5- Calculate each expression without using parentheses:
- \(3 \times \frac{2}{4}\)
- \(5 + 3 \times \frac{2}{4}\)
- \(3 \times \frac{2}{4} + 5\)
- \(\frac{2}{4} \times 3\)
- Calculate these expressions using parentheses:
- \(5 + \frac{2}{4} \times 3\)
- \(5 + \frac{2 \times 3}{4}\)
- \(5 + \frac{2}{4 \times 3}\)
- Given
a = 2
b = 5
use a and b to calculate the following
expressions:
- \((a + b)^2\)
- \(a^2 + 2ab + b^2\)
OUTPUT
3 * 2 / 4 = 1.5OUTPUT
5 + 3 * 2 / 4 = 6.5OUTPUT
3 * 2 / 4 + 5 = 6.5OUTPUT
2 / 4 * 3 = 1.5Non-numeric values
It sometimes makes sense to apply some mathematical operations to non-numeric variables, too.
We can multiply strings in order to repeat them. There is no specific advantage to using multiplication instead of manually repeating characters or words, but it does make our code look cleaner, which is ideal.
We can also add string values to each other. This is called string concatenation. It is a useful method for concatenating, and provides a useful method for combining multiple strings and/or string variables.
PYTHON
SEPARATOR = '-' * 20
NEW_LINE = '\n'
SPACE = ' '

forename = 'Jane'
surname = 'Doe'
birthday = '01/01/1990'

full_name = forename + SPACE + surname

data = full_name + NEW_LINE + SEPARATOR + NEW_LINE + 'DoB: ' + birthday

print(data)
OUTPUT
Jane Doe
--------------------
DoB: 01/01/1990
Remember
New line character or '\n' is a universal directive to
induce a line-break in Unix-based operating systems (Mac OS) and Linux).
In WINDOWS, we usually us '\r' or '\r\n'
instead. These are known as escape sequences.
Practice Exercise 11
Symptomatic Huntington’s disease appears to increase in proportion to
the number of CAG trinucleotide repeats (the codon for
glutamine); once these exceed 35 repeats near the beginning of the
Huntingtin (IT15) gene, the individual is phenotypic for
the disease. These CAG repeats are also referred to as a
polyglutamine or polyQ tract.
glutamine_codon = 'CAG'- Create a polynucleotide chain representing 36 glutamine codons.
Store the result in a variable called
polyq_codons.
Display the result as:
Polyglutamine codons with 36 repeats: XXXXXXXXX...- Use len() to work out the length of
polyq_codons, and store the result in a variable calledpolyq_codons_length.
Display the result in the following format:
Number of nucleotides in a polyglutamine with 36 repeats: XXXUse len() to work out the length of
glutamine_codon, and store the result in variableamino_acids_per_codon.Divide
polyq_codons_lengthbyamino_acids_per_codonto verify that the chain contains the total codons to encode exactly 36 amino acids. Store the result in a variable titledpolyq_peptide_length.
Display the result in the following format:
Number of amino acids in a polyglutamine with 36 repeats: XXX- Determine the types for the following variable:
amino_acids_per_codon
polyq_codons_length
-
polyq_peptide_length
and display the result for each item in the following format:
Value: XXX - Type: <class 'XXXX'>Are all the variables in task #5 of the same type? Why?
Repeat from task #4, but this time use an alternative method of division as outlined in See Table Routine mathematical operations in Python.
PYTHON
print('Value:', amino_acids_per_codon, '- Type:', type(amino_acids_per_codon))

print('Value:', polyq_codons_length, '- Type:', type(polyq_codons_length))

print('Value:', polyq_peptide_length, '- Type:', type(polyq_peptide_length))
OUTPUT
Value: 3 - Type: <class 'int'>
Value: 108 - Type: <class 'int'>
Value: 36.0 - Type: <class 'float'>
No, polyq_peptide_length is an instance of type
float. This is because we used the normal division
(/) and not floor division (//}) to calculate
its value. The result of normal division is always presented as a
floating point number.
PYTHON
polyq_peptide_length = polyq_codons_length // amino_acids_per_codon

print('Number of amino acids in a polyglutamine with 36 repeats:', polyq_peptide_length)

print('Value:', amino_acids_per_codon, '- Type:', type(amino_acids_per_codon))

print('Value:', polyq_codons_length, '- Type:', type(polyq_codons_length))

print('Value:', polyq_peptide_length, '- Type:', type(polyq_peptide_length))
OUTPUT
Number of amino acids in a polyglutamine with 36 repeats: 36
Value: 3 - Type: <class 'int'>
Value: 108 - Type: <class 'int'>
Value: 36 - Type: <class 'int'>
Interesting Fact
The Boolean data type is named after the English mathematician and logician George Boole (1815–1864).
Logical Operations
An operation may sometimes involve a comparison. The result of these
operations may be either True or False. This
is known as the Boolean or bool data type. In
reality, however, computers record True and
False as 1 and 0, respectively.
Operations with Boolean results are referred to as logical operations. Testing the results of such operations is referred to as truth value testing.
Given the two variables a and b as
follows:
a = 17
b = 5
Boolean operations may be defined as outlined in this Table Routine logical operations in Python..

Practice Exercise 12
We know that in algebra, the first identity (square of a binomial) is:
\[(a + b)^2 = a^2 + 2ab + b^2\] now given:
a = 15
b = 4- Calculate
\[y_1 = (a + b)^{2}\] \[y_2 = a^2 + 2ab + b^2\]
Display the results in the following format:
y1 = XX
y2 = XX
- Determine whether or not
y_1is indeed equal toy_2. Store the result of your test in another variable calledequivalence. Display the results in the following format:
Where a = XX and b = XX: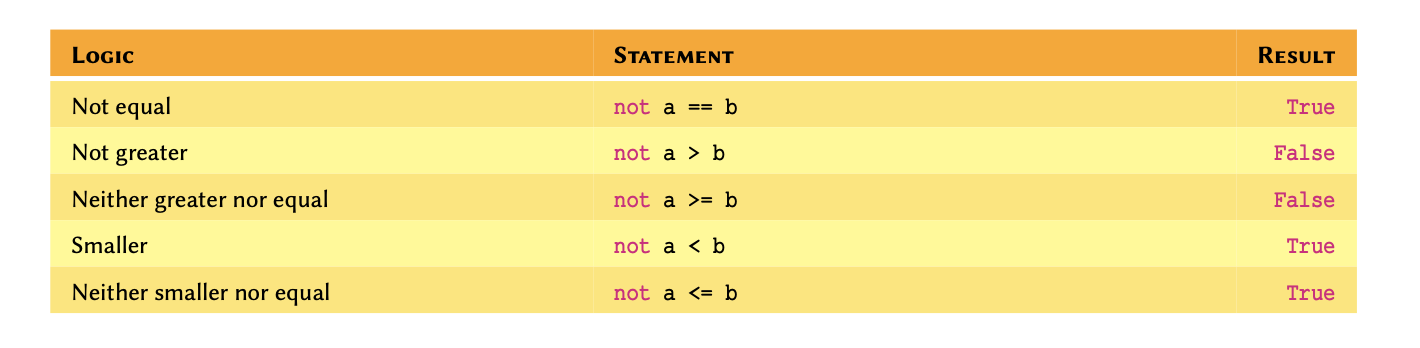
y1 is equal to y2: [True/False]Negation
We can also use negation in logical operations. Negation in Python is implemented using not:
Practice Exercise 13
Using the information from previous Practice Exercise 12:
- Without using not, determine whether or not
y_1is not equal toy_2. Display the result of your test and store it in another variable calledinequivalent.
- Negate
inequivalentand display the result.
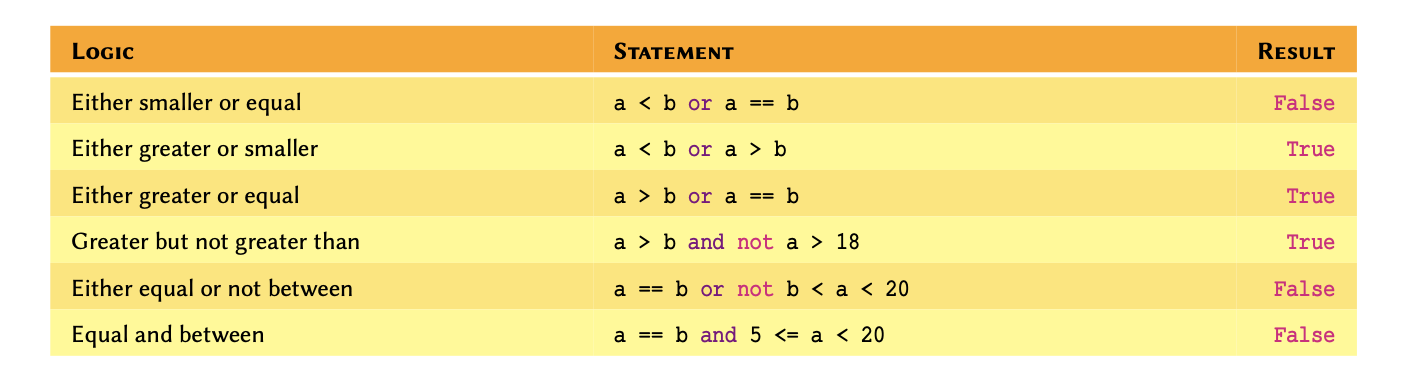
Disjunctions and Conjunctions:
Logical operations may be combined using conjunction with and and disjunction with or to create more complex logics:
Practice Exercise 14
Given
a = True
b = False
c = True
Evaluate the following statements:
- a == b
- a == c
- a
orb - a
andb - a
orbandc - (a
orb)andc -
notaor(bandc) -
notaornot(bandc) -
notaandnot(bandc) -
notaandnot(borc)
Display the results in the following format:
1. [True/False]
2. [True/False]
    ...
Given that:
Complex logical operations:
It may help to break down more complex operations, or use parentheses to make them easier to read and write:

Notice that in the last example, all notations is essentially the same, and only varies in terms of the collective results as defined using parentheses. Always remember that in a logical statement:
Logical statement
OUTPUT
TrueOUTPUT
TrueOUTPUT
TrueOUTPUT
FalseOUTPUT
TrueOUTPUT
FalseOUTPUT
TruePYTHON
# Disjunction and negated conjunction and conjunction:
# true AND NOT false AND false
a < b or not b < c and b > a
OUTPUT
FalsePYTHON
# Disjunction and negated conjunction - similar to the
# previous example: true AND NOT (false AND false)
a < b or not (b < c and b > a)
OUTPUT
TrueThese are only a few examples. There are endless possibilities, try them yourself and see how they work.
Remember
Some logical operations may be written in different ways. However, we should always use the notation that is most coherent in the context of our code. If in doubt, use the simplest or shortest notation.
To that end, you may want to use variables to break complex statements down into smaller fragments:
PYTHON
age_a, age_b = 15, 35

are_positive = age_a > 0 and age_b > 0

a_is_older = are_positive and (age_a > age_b)
b_is_older = are_positive and (age_a < age_b)

a_is_teenager = are_positive and 12 < age_a < 20
b_is_teenager = are_positive and 12 < age_b < 20

a_is_teenager and b_is_older
OUTPUT
TrueOUTPUT
FalseOUTPUT
TruePractice Exercise 15
Given
a = 3
b = 13
Test the following statements and display the results:
- \(a^2 < b\)
- \(3 - a^3 < b\)
- \(|25 - a^2| > b\)
- \(25 \bmod a^2 > b\)
- \(25 \bmod a^2 > b\) or \(25 \bmod b < a\)
- \(25 \bmod a^2 < b\) and \(25 \bmod b > a\)
- \(\frac{12}{a}\) and \(a\times4 < b\)
where “|…|” represents the absolute value, and “\(n \bmod m\)” represents the remainder for the division of \(n\) by \(m\).}
Display the results in the following format:
1. [True/False]
2. [True/False]
...Exercises
End of chapter Exercises
Write and execute a Python code to display your own name as an output in the Terminal.
Write and execute a Python code that:
- Displays the text:
Please press enter to continue..., and waits for the user to press enter. - Once the user presses enter, the program should display
Welcome to my programme!before terminating.
-
We have an enzyme whose reaction velocity is \(v=50~mol \cdot L^{-1} \cdot s^{-1}\) at the substrate concentration of \([S] = K_{m} = 2.5~mol \cdot L^{-1}\). Work out the maximum reaction velocity or \(V_{\max}\) for this enzyme using the Michaelis-Menten equation:
\[v = \frac{V_{\max} [\textrm{S}]}{K_{m} + [\textrm{S}]}\]
Key Points
- Two key functions for I/O operations are print() and input()
- Three most commonly used variables such as
int,float, andstr. - Variable scope can be local or global depending where they are being used.
- Mathematical operations follow conventional rules of precedence
- Logical operations provide results in Boolean (True or False)
Content from Conditional Statements
Last updated on 2024-08-05 | Edit this page
Download Chapter notebook (ipynb)
Overview
Questions
- What are conditional statements?
- How conditional statements are used to make decisions?
- Why indentation is so important in Python?
- Is there any hierarchical importance of conditional statements?
Objectives
- Understand the logic behind using conditional statements.
- Practice conditional statements.
- Learning structuring code using correct indentation.
- Understanding the hierarchy of conditional statements.
This chapter assumes that you are familiar with the following concepts in Python 3:
Checklist
When we construct logical expressions, we almost always do so because we need to test something. The definition of a process through which we test our logical expressions and provide directives on how to proceed is known in computer science as a conditional statement. Conditional statements are a feature of programming languages. This means that although their definitions and grammar may vary slightly from one programming language to another, their principles are almost universally identical.
Being a high-level programming language, defining conditional statements is very easy in Python. Before we start, however, let us briefly review the way conditional statements actually work. To help us with that, we use flowchart diagrams.
Remember
The term conditional statements is often used in relation to imperative programming languages. In functional programming, however, it is more common to refer to them as conditional expressions or conditional constructs. Python supports both imperative and functional programming.
EXAMPLE: Algorithms in daily life
We use algorithms in our life every day without realising it.
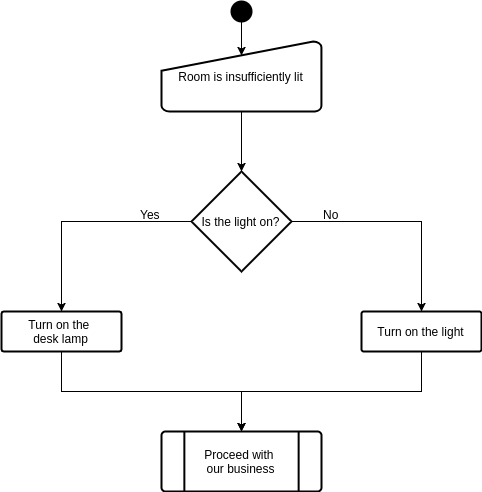
Suppose we enter a room poorly lit room to work. The first things that we notice is that the room is insufficiently lit. We check to see whether or not the light is on; if not, we find the switch to turn on the light. Likewise, if the light is on, we go ahead and turn on the desk lamp before we proceed with our business.
Processes of Algorithms
This scenario may be perceived as a set of processes. These processes include a set of procedures that may be outlined as follows:
-
Action: Enter the room. -
Input: Determine that the room is insufficiently lit. -
Condition: Is the light switched on?
- NO:
Action: turn on the lights, - YES:
Action: turn on the desk lamp.
-
Action: Proceed with our business.
Now that we know what procedures are involved, we can draw a flowchart of the process:
Programming is not merely a hard skill. It is the door to a different way of thinking that enables one to break complex procedures down to simple, stepwise components and tasks. Flowcharts help us perceive processes as computers do — that is, one task or component at a time. As we progress in programming, our brains develop the ability to think in a procedural way. This is called algorithmic thinking, and is one of the most important soft-skills that a programmer can develop.
There are international competitions and comprehensive courses dedicated to this concept. At the end of the day, however, one can only acquire a skill through practice.
Advanced Topic
If you are keen to learn more about algorithms and algorithmic thinking, or just want to try out some of the problems, you may want to look into some of the past competition papers on Computational and Algorithmic Thinking (CAT) published by the Australian Mathematics Trust.
Exercise is provided to give you an idea of the type of problems that may be tackled in a procedural way.
Practice Exercise 1
On a distant planet, the dominant carnivore, the zab, is nearing extinction. The number of zabs born in any year is one more than the (positive) difference between the number born in the previous year and the number born in the year before that.
Examples
- If 7 zabs were born last year and 5 the year before, 3 would be born this year.
- If 7 zabs were born last year and 10 the year before, 4 would be born this year.
If 2 zabs were born in the year 2000 and 9 zabs were born in 2001. What is the first year after 2000 when just 1 zab will be born?
- 2009
- 2011
- 2013
- 2015
- 2017
Credit: This question is taken from the
2011 Computational and Algorithmic Thinking (CAT) Competition held by
the Australian Mathematics Trust.}
To obtain the answer, we may write an algorithm in a pseudo-code format as follows:

  let a_total = 2

  let b_total = 9

  let current_total = absolute(a_total - b_total) + 1

  let a_total = b_total

  let b_total = current_total

  let current_year = 2002


  do {

    current_total = absolute(a_total - b_total) + 1

    a_total = b_total

    b_total = current_total

    current_year = current_year + 1

		} while current_total > 1


display current_year


Given:

  year = 2000; a_total = 2
  year = 2001; b_total= 9

the above process with repeat the section written in curly brackets for as long
as current_total > 1:

  current_year: 2002; a_total = 2, b_total = 9, current_total = 8

Is current_total > 1 ? Yes:

  current_year: 2003; a_total = 9, b_total = 8; current_total = 2

Is current_total > 1 ? Yes:

  current_year: 2004; a_total = 8; b_total = 2; current_total = 7

Is current_total > 1 ? Yes:

  current_year: 2005; a_total = 2; b_total = 7; current_total = 6

Is current_total > 1 ? Yes:

  current_year: 2006; a_total = 7; b_total = 6; current_total = 2

Is current_total > 1 ? Yes:

  current_year: 2007; a_total = 6; b_total = 2; current_total = 5

Is current_total > 1 ? Yes:

  current_year: 2008; a_total = 2; b_total = 5; current_total = 4

Is current_total > 1 ? Yes:

  current_year: 2009; a_total = 5; b_total = 4; current_total = 2

Is current_total > 1 ? Yes:

  current_year: 2010; a_total = 4; b_total = 2; current_total = 3

Is current_total > 1 ? Yes:

  current_year: 2011; a_total = 2; b_total = 3; current_total = 2

Is current_total > 1 ? Yes:

  current_year: 2012; a_total = 3; b_total = 2; current_total = 2

Is current_total > 1 ? Yes:

  current_year: 2013; a_total = 2; b_total = 2; current_total = 1

Is current_total > 1 ? No:
The correct answer is c) 2013.
If this algorithm/pseudo-code is translated to Python language, it will look like this:
PYTHON
a_total = 2

b_total = 9

current_year = 2002

current_total = abs(a_total - b_total) + 1
a_total = b_total
b_total = current_total

while (current_total > 1):
    current_total = abs(a_total - b_total) + 1
    a_total = b_total
    b_total = current_total
    current_year = current_year + 1

print(current_year)
OUTPUT
2013Remember
There is almost always more than one answer to any algorithmic problem; some answer might even be more efficient than other. The less repetition there is, the better more efficient an algorithm is considered to be.
Conditions in Python
To implement conditional statements in Python, we use 3 syntaxes:
- To initiate the statement, we use the syntax if followed by the condition and a colon;
PYTHON
students_present = 15

# Conditional statement:
if students_present > 10:  # Initiation
    # Directive (must be indented).
    print('More than 10 students are present.')
OUTPUT
More than 10 students are present.- To create an alternative condition after the first condition has been defined, we use the syntax elif followed by the new condition and a colon;
PYTHON
students_present = 5

# Conditional statement:
if students_present > 10:  # Initiation

    # Directive (must be indented).
    print('More than 10 students are present.')

elif 0 < students_present < 10:
    print('Less than 10 students are present.')
OUTPUT
Less than 10 students are present.- To introduce a default — i.e. where none of the above are
True, we use the syntax else.
PYTHON
students_present = 0

# Conditional statement:
if students_present > 10:  # Initiation
    # Directive (must be indented).
    print('More than 10 students are present.')

elif 0 < students_present < 10:  # Alternative condition
    # Alternative directive (must be indented).
    print('Less than 10 students are present.')

else:  # Default (none of the conditions are met).
    # Directive (must be indented).
    print('There is no one!')
OUTPUT
There is no one!Remember
We can use disjunctions or conjunctions, as discussed in topic Disjunctions and Conjunctions, to test for more than one condition at a time.
Indentation Rule
PEP-8: IndentationAlways use 4 spaces for indentation. Indentations are how the Python interpreter determines the code hierarchy. A consistent hierarchy is therefore essential for the interpreter to parse and execute our code.
The indented part of the code is known as a block. A block represents a part of the code that always “belongs” to (is the child process of) the first unindented (dedented) line that precedes it. In other words, the action(s) within a conditional statement (actions that are subject to a specific condition) must always be indented:
PYTHON
value = 10

# Statement A:
if value > 0:

    # First dedented line before the block.
    # This is a block, and it belongs to the
    # preceding "if" (Statement A):
    print('The value is positive.')

    # We can have nested blocks too.
    # Statement B:
    if value > 9:
    # First dedented line before the block.
    # This is another block (nested).
    # This block belongs to the preceding "if" (Statement B).
        print('The value is not a single digit.')

    # Introducing a default behaviour for Statement B:
    else:
    # This block belongs to the preceding "else".
        print('The value is a single digit.')

# Introducing an alternative condition for Statement A:
elif value < 0:
# This block belongs to the preceding "elif".
    print('The value is negative.')

# Introducing a default behaviour for Statement A:
else:
# This block belongs to the preceding "else".
    print('The value is zero.')
OUTPUT
The value is positive.
The value is not a single digit.
It is not a good practice to have too many nested indentation. This would make the code more difficult to read. A rule of thumb is that you should not need more than 4 nested indentations in your code. If you do, you should reconsider the code structure to somehow simplify the process.
On that note, where possible, it is better to use conjunctions and disjunctions, or implement alternative conditions using elif instead of creating nested conditional statements. We can therefore restructure the previous example in a better, more coherent way as follows:
PYTHON
value = 10

if value > 9:
  print('The value is positive.')
  print('The value is not a single digit.')
elif value > 0:
  print('The value is positive.')
  print('The value is a single digit.')
elif value < 0:
  print('The value is negative.')
else:
  print('The value is zero.')
OUTPUT
The value is positive.
The value is not a single digit.
It is customary and also best practice to use 4 spaces for indentation
in Python. It is also paramount that all indentations throughout the
code are consistent; that is, you may not use 4 spaces here and 3 spaces
somewhere else in your code. Doing so will cause an
IndentationError to be raised. It is recommended to
not use Tab to indent your code; it is regarded as
a bad practice in Python.
value = 10

if value > 0:
    print('The value is: ')  # Indented with 4 spaces.
   print('POSITIVE.')  # Indented with 3 spaces.
File <STDIN>, line 5
    print('POSITIVE.')  # Indented with 3 spaces.
                                                 ^
IndentationError: unindent does not match any outer indentation level
Callout
Tab indentations represent different number of spaces on
different computers and operating systems. It is therefore more than
likely that they will lead to IndentationError.
Additionally, Python 3 disallows the mixing of tab and
space indentations. Some Python IDEs such as
PyCharm automatically convert Tab indentations to
4 spaces. Some other IDEs (e.g. Jupyter) typically highlight
Tab indentations to explicitly distinguish them and thereby
notify the programmer of their existence. However, more often than not,
IDEs and text editors tend to ignore this, which amounts to
inconsistencies and subsequently IndentationError. This is
a very common difficulty that new Python programmers face, and can be
very confusing if not handled correctly.
Practice Exercise 2
In previous chapter, Practice Exercise
11, we explored the implication of CAG repeats in
Huntington’s disease. We also created a polynucleotide chain containing
36 repetition of the CAG codons.
Write a conditional statement that tests the length of a polyQ tract to determine the classification and the disease status based on the following Table:
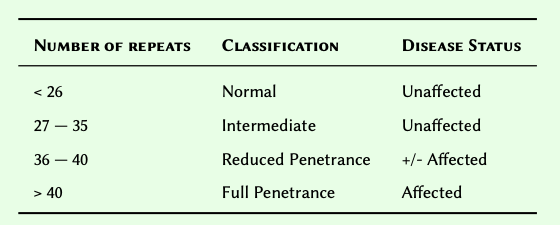
Using the technique you used in Practice Exercise 11, create 5 polyQ tracts containing 26, 15, 39, 32, 36, and 54 codons. Use these polynucleotide chains to test your conditional statement.
Display the result for each chain in the following format:
PolyQ chain with XXX number of CAG codons:
Status: XXX
Classification: XXX
Hint: The length of a polyQ tract represents the number
of nucleotides, not the number of CAG codons. See task 4 of
Practice Exercise
11 for additional information.
PYTHON
#Constructing the codons:

glutamine_codon = 'CAG'

polyq_codons = glutamine_codon * 26


#Determining the length of our codon:

signle_codon = len('CAG')

len_polyq = len(polyq_codons)

polyq = len_polyq / signle_codon

#Constructing the conditional statement:

NORMAL = 26
INTERMEDIATE = 35
REDUCED_PENETRANCE = 40

classification = str()
status = str()

if polyq < NORMAL:

    classification, status = 'Normal', 'Unaffected'

elif polyq <= INTERMEDIATE:

    classification, status = 'Intermediate', 'Unaffected'

elif polyq <= REDUCED_PENETRANCE:
    classification, status = 'Reduced Penetrance', '+/- Affected'

else:
    classification, status = 'Full Penetrance', 'Affected'


#Displaying the results:

print('PolyQ chain with', polyq, 'number of CAG codons:')
print('Classification:', classification)
print('Status:', status)

#Repeat this with 15, 39, 32, 36, and 54 codons.
OUTPUT
PolyQ chain with 26.0 number of CAG codons:
Classification: Intermediate
Status: Unaffected
Hierarchy of conditional statements
The hierarchy of conditional statement is always the same. We start the statement with an if syntax (initiation). This is the only essential part to implement a conditional statement. Other parts include the elif and the else syntaxes. These are the non-essential part, and we implement these as and when needed. It is, however, important that we adhere to the correct order when we implement these:
- Always start with the initiation syntax if.
- Where needed, implement as many alternative conditions as necessary elif.
- Where needed, implement a default behaviour using else}.
In an if...elif...else hierarchy, once one condition in the
hierarchy is True, all subsequent conditions in
that group are skipped and would no longer be checked.
In the following example, the first condition is True,
therefore its corresponding block is executed and the rest of this
conditional statement is skipped:
PYTHON
TATA_BOX = 'TATA'

promoter_region = 'GTAACTGTGGTATAATCGT'

if TATA_BOX in promoter_region:
    # This condition is "True", so this
    # and only this block is executed.
    print('There is a "TATA" box in this promoter region.')
else:
    # The last condition was "False", so this
    # block is skipped.
    print('There is no "TATA" box in this promoter region.')
OUTPUT
There is a "TATA" box in this promoter region.Remember
We already know from subsection Logical
Operations that the value of a boolean (bool)
variable is either False or True.
We have also learned that in conditional statements, we use
double equals} or ... == ... to test for
equivalence. So naturally, one could test for the truth value
of a bool variables as follows:
OUTPUT
The variable is False.
This works, and it looks simple enough. However, this is the
wrong approach for testing the value of
bool variables and should not be used. Whilst the
answer is correct in the above example, using double equals for
testing boolean variables can sometimes produce incorrect
results.
The correct way to test the truth value of a boolean variable is by using is as follows:
OUTPUT
The variable is False.and the negative test is:
OUTPUT
The variable is True.In short; as far as boolean variables are concerned, we should always use is or is not to test for their truth value in a conditional statement.
Consequently, we can now write the example algorithm (room and light) as follows:
PYTHON
light_status = False

if light_status is True:

    action = 'The light is on; you may want to turn off the desk light.'

else:
    action = 'The light is off... turn it on.'

print(action)
OUTPUT
The light is off... turn it on.There are a few very popular shorthands in Python that you should be familiar with when writing or reading conditional statements:
In an if statement, Python expects the result of the
condition to be True. As result of that, we can simplify
the above example as follows:
PYTHON
light_status = False

if light_status:

    action = 'The light is on; you may want to turn off the desk light.'

else:

    action = 'The light is off... turn it on.'

print(action)
OUTPUT
The light is off... turn it on.
Sometime, however, we might need to test for a False
outcome. To do so, we can write a negated conditions as described in
subsection Negation
instead:
PYTHON
# Note that we have changed the order of the condition
# and added a "not" before "light_status"
if not light_status:

    action = 'The light is off... turn it on.'

else:

    action = 'The light is on; you may want to turn off the desk light.'

print(action)
OUTPUT
The light is off... turn it on.EXAMPLE: A familiar scenario
Suppose we want to determine the classification of the final mark for a student.
The classification protocol is as follows:
- Above 70%: First class.
- Between 60% and 70%: Second class (upper division).
- Between 50% and 60%: Second class (lower division).
- Between 40% and 50%: Pass.
- Below 40%: Fail.
PYTHON
mark = 63

# Thresholds
first = 70
second_upper = 60
second_lower = 50
passed = 40  # "pass" is a syntax in Python.

if mark >= first:
    classification = 'First Class'
elif mark >= second_upper:
    classification = 'Second Class (upper division)'
elif mark >= second_lower:
    classification = 'Second Class (lower division)'
elif mark >= passed:
    classification = 'Pass'
else:
    classification = 'Fail'

print('The student obtained a', classification, 'in their studies.')
OUTPUT
The student obtained a Second Class (upper division) in their studies.Exercises
End of chapter Exercises
- Protein Kinases have a phosphorylation site and a consensus sequence has been determined for these sites ( Rust and Thompson, 2012 ). All the proteins incorporate either a Serine or a Threonine residue that gets phosphorylated. Naturally, the consensus sequence for each protein varies slightly from that of other proteins.
When studying a polypeptide in the lab, a colleague realised that it has a phosphorylated Serine. So they tried to sequence the polypeptide, and managed to obtain a sequence for the protein:
kinase_peptide = (
	"PVWNETFVFNLKPGDVERRLSVEVWDWDRTSRNDFMGAMSFGVSELLK"
	"APVDGWYKLLNQEEGEYYNVPVADADNCSLLQKFEACNYPLELYERVR"
	"MGPSSSPIPSPSPSPTDPKRCFFGASPGRLHISDFSFLMRRRKGSFGK"
	"VMLAERRGSDELYAIKILKKDVIVQDDDVDCTLVEKRVLALGGRGPGG"
	"RPHFLTQLHSTFQTPDRLYFVMEYVTGGDLMYHIQQLGKFKEPHAAFY"
	"AAEIAIGLFFLHNQGIIYRDLKLDNVMLDAEGHIKITDFGMCKENVF"
		)
Desperate to find a match, and knowing that we are good at doing
computer stuff, they asked us if we can help them identify
what protein kinase does the sequence correspond to?
So we extract the consensus sequence of 3 protein kinases from the paper:
- PKC-\(\eta\): either
RKGSFRRorRRRSFRR - PKC-\(\gamma\): either
RRRKGSForRRRKKSF - DMPK-E: one of
KKRRRSL,RKRRRSL,KKRRRSV, orRKRRRSV.
Now all we need is to write a conditional statement in Python to identify which of the above protein kinases, if any, does our sequence correspond to. That is, which one of the consensus peptides exists in our mystery sequence?
If there is a match, our programme should display the name of the
corresponding protein kinase; otherwise, it should say
No matches found for good measures.
Key Points
- Python used
if, elif and elseas conditional statements. - In Python, there is an indentation rule of 4 spaces.
- The hierarchy of conditional statement is always the same.
Content from Introduction to Arrays
Last updated on 2024-08-05 | Edit this page
Download Chapter notebook (ipynb)
Mandatory Lesson Feedback Survey
Overview
Questions
- What are the different types of arrays?
- How is data stored and retrieved from an array?
- What are nested arrays?
- What are tuples?
Objectives
- Understanding difference between lists and tuples.
- Understanding operations on arrays.
- Storing multidimensional data.
- Understanding the concepts of mutability and immutability.
Prerequisite
So far, we have been using variables to store individual values. In some circumstances, we may need to access multiple values in order to perform operations. On such occasions, defining a variable for every single value can become very tedious. To address this, we use arrays.
Arrays are variables that hold any number of values. Python provides
three types of built-in arrays. These are: list,
tuple, and set. There are a several common
features among all arrays in Python; however, each type of array enjoys
its own range of unique features that facilitates specific operations.
Remember
Each item inside an array may be referred to as an item or a member of that array.
Lists
Lists are the most frequently-used type of arrays in Python. It is therefore important to understand how they work, and how can we use them, and the features they offer, to our advantage.
The easiest way to imagine how a list works, is to think of
it as a table that can have any number of rows. This is akin to a
spreadsheet with one column. For instance, suppose we have a table with
four rows in a spreadsheet application, as follows:
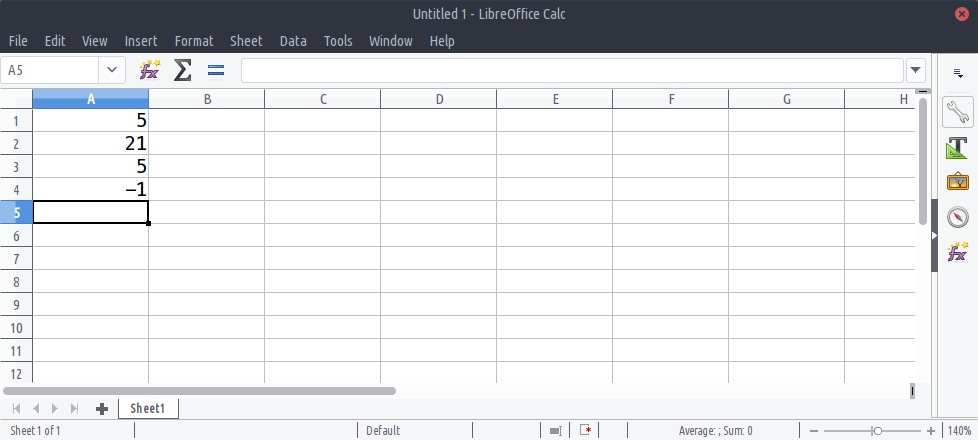
The number of rows in an array determines its length. The above table has four rows; therefore it is said to have a length of 4.
Implementation
Remember
In order to implement a list in Python, we place values
into this list and separate them from one another using commas inside
square brackets: list = [1,2,3].
OUTPUT
[5, 21, 5, -1]OUTPUT
<class 'list'>Practice Exercise 1
Implement a list array called fibonacci, whose members
represent the first 8 numbers of the Fibonacci
sequence as follows:
| FIBONACCI NUMBERS (FIRST 8) | |||||||
|---|---|---|---|---|---|---|---|
| 1 | 1 | 2 | 3 | 5 | 8 | 13 | 21 |
Indexing
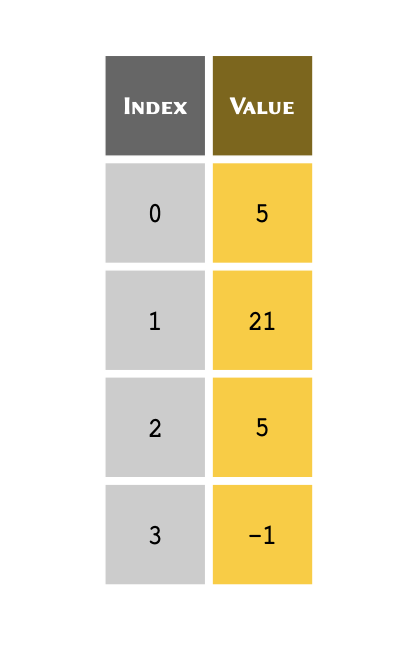
In an array, an index is an integer (whole number) that corresponds to a specific item in that array.
You can think of an index as a unique reference or key that corresponds to a specific row in a table. We don’t always write the row number when we create a table. However, we always know that the third row of a table refers to us starting from the first row (row #1), counting three rows down and there we find the third row.
Python, however, uses what we term zero-based indexing. We don’t count the first row as row #1; instead, we consider it to be row #0. As a consequence of starting from #0, we count rows in our table down to row #2 instead of #3 to find the third row. So our table may,essentially, be visualised as follows:
Remember
Python uses zero-based indexing system. This means that the first row of an array, regardless of its type, is always referred to with index #0.
With that in mind, we can use the index for each item in the list, in
order to retrieve it from a list.
Given the following list of four members stored in a
variable called table:
table = [5, 21, 5, -1]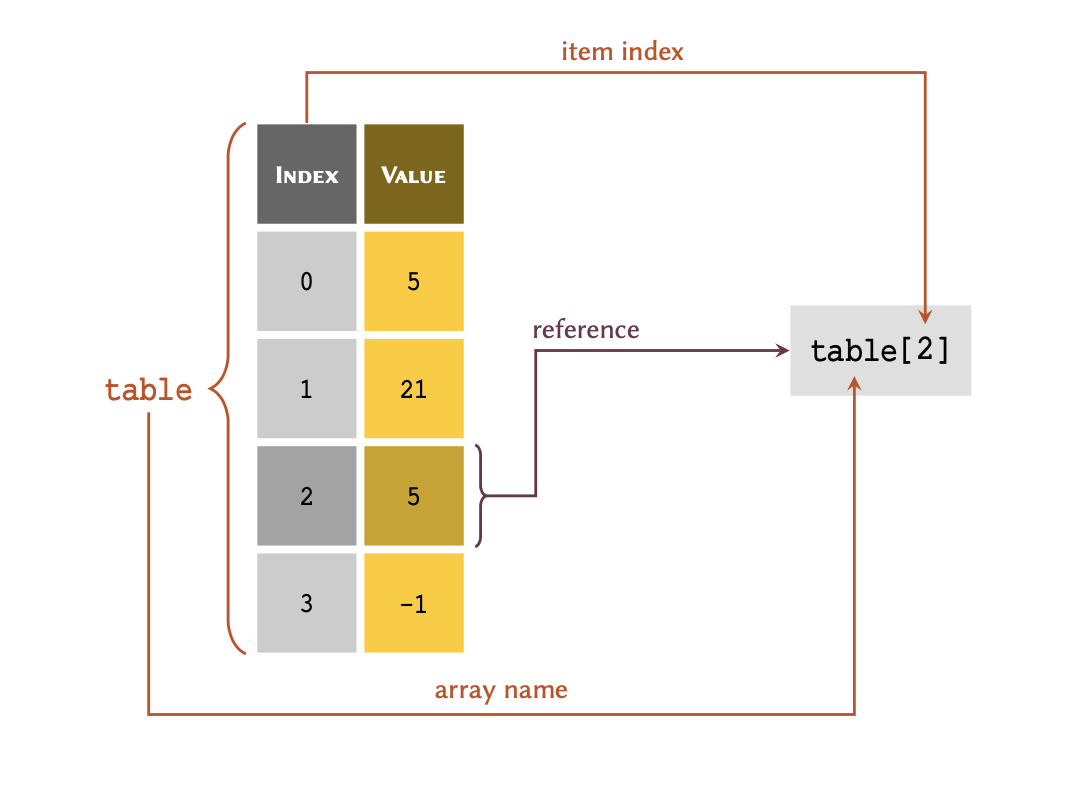
As illustrated in this figure; in order to retrieve a member of an array through its index, we write the name of the variable immediately followed by the index value inside a pair of square brackets — e.g. table[2]. Note, you may have noticed our interchangeable use of the terms ‘list’ and ‘array’. That is because a list, in Python, can be considered as a type of dynamic array (they can increase or decrease in size, as required).
OUTPUT
5OUTPUT
5OUTPUT
-1Practice Exercise 2
Retrieve and display the 5th Fibonacci number from the
list you created in the previous Practice Exercise 1.
It is sometimes more convenient to index an array, backwards — that is, to reference the members from the bottom of the array, first. This is termed negative indexing, and is particularly useful when we are dealing with lengthy arrays. The indexing system in Python support both positive and negative indexing systems.
The table above therefore may also be represented, as follows:
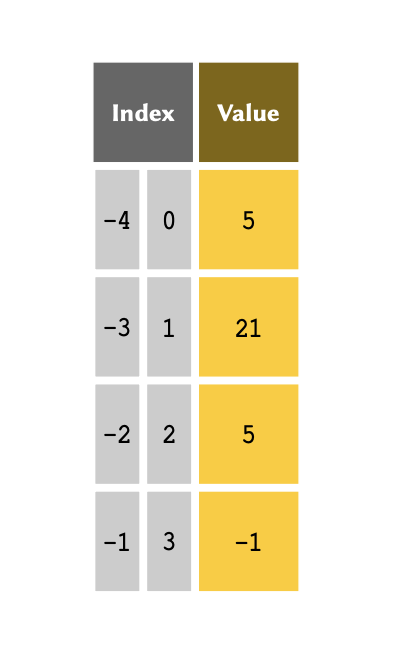
Remember
Unlike the normal indexing system, which starts from #0, negative indexes start from #-1. This serves to definitely highlight which indexing system is being used.
If the index is a negative number, the indices are counted from the
end of the list. We can implement negative indices in the
same way as positive indices:
OUTPUT
-1OUTPUT
5OUTPUT
21We know that in table, index #-3 refers the same value as index #1. So let us go ahead and test this:
OUTPUT
TrueIf the index requested is larger than the length of the
list minus one, an IndexError will be
raised:
OUTPUT
IndexError: list index out of rangeRemember
The values stored in a list may be referred to as the
members of that list.
Practice Exercise 3
Retrieve and display the last Fibonacci number from the
list you created in Practice Exercise 1.
Slicing
It is also possible that you may wish to retrieve more than one value
from a list at a time, as long as the values are in
consecutive rows. This process is is termed , and may be
visualised, as follows:
Remember
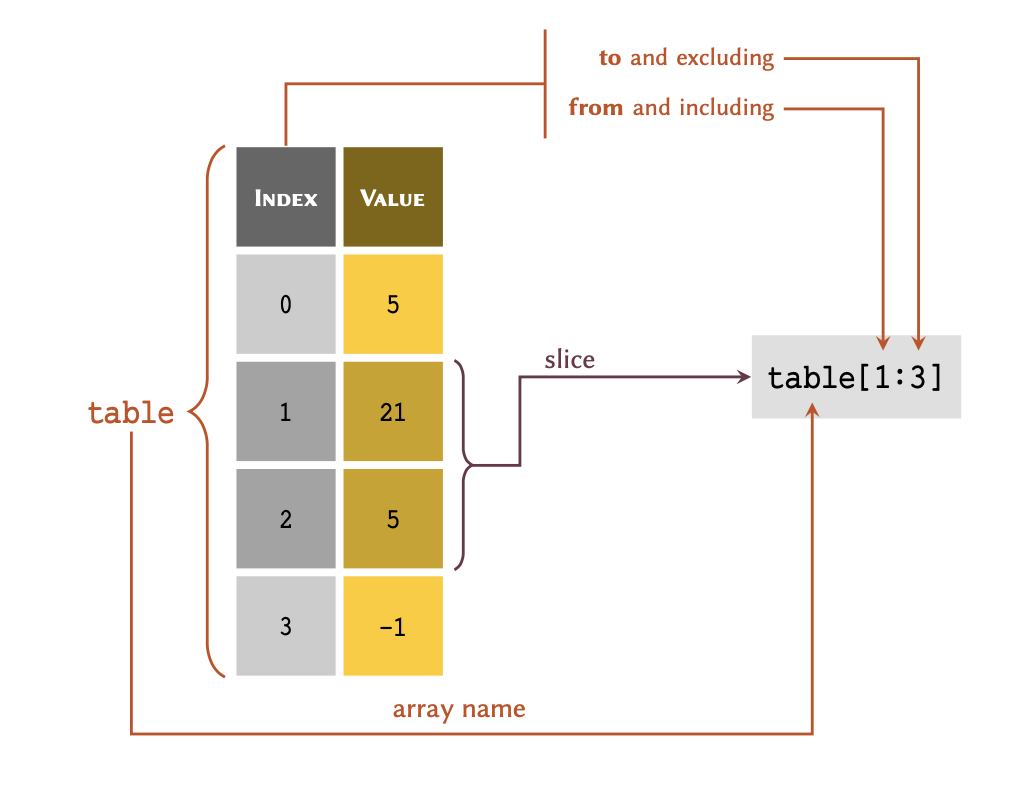
Python is a non-inclusive language. This means that in table[a:b], a slice includes all the values from, and including index a right down to, but excluding, index b.
Given a list representing the above table:
table = [5, 21, 5, -1]we may retrieve a slice of table, as follows:
OUTPUT
[21, 5]print(table[0:2])If the first index of a slice is #0, the slice may also be written as:
OUTPUT
[5, 21]Negative slicing is also possible:
PYTHON
# Retrieves every item from the first member down
# to, but excluding the last one:
print(table[:-1])
OUTPUT
[5, 21, 5]OUTPUT
[21]If the second index of a slice represents the last index of a
list, it would be written as:
OUTPUT
[5, -1]OUTPUT
[21, 5, -1]We may also store indices and slices in variables:
OUTPUT
[21, 5]The slice() function may also be used to create a slice variable:
OUTPUT
[21, 5]Practice Exercise 4
Retrieve and display a slice of Fibonacci numbers from the
list you created in Practice Exercise 1 that includes
all the members from the second number onwards — i.e. the slice
must not include the first value in the list.
Note
Methods are features of Object-Oriented
Programming (OOP) - a programming paradigm that we do not discuss in
the context of this course. You can think of a method as a
function that is associated with a specific type. The
job of a method is to provide a certain functionality unique to
the type it is associated with. In this case,
.index() is a method of type list
that, given a value, finds and produces its index from the
list.
From value to index
Given a list entitled table as:
we can also determine the index of a specific value. To do so, we use the .index() method:
OUTPUT
1OUTPUT
3If a value is repeated more than once in the list, the
index corresponding to the first instance of that value is
returned:
OUTPUT
0If a value does not exist in the list, using
.index() will raise a ValueError:
OUTPUT
ValueError: 9 is not in listPractice Exercise 5
Find and display the index of these values from the list
of Fibonacci numbers that you created in Practice Exercise 1:
- 1
- 5
- 21
Mutability
Mutability is a term that we use to refer to a structure’s capability of
being change, once it is created. Arrays of type list are
modifiable. That is, we can add new values, change the existing
ones or remove them from the array, altogether. Variable types that
allow their contents to be modified are referred to as mutable
types in programming.
Addition of new members
Given a list called table, we can add new values to
it using .append():
OUTPUT
[5, 21, 5, -1, 29]OUTPUT
[5, 21, 5, -1, 29, 'a text']
Sometimes, it may be necessary to insert a value at a specific position
or index in a list. To do so, we may use
.insert(), which takes two input arguments; the first
representing the index, and the second the value to be inserted:
OUTPUT
[5, 21, 5, 56, -1, 29, 'a text']Practice Exercise 6
Given fibonacci - the
list representing the first 8 numbers in the Fibonacci
sequence that you created in Practice Exercise 1:
The 10th number in the Fibonacci sequence is 55. Add this value to fibonacci.
Now that you have added 55 to the
list, it no longer provides a correct representation of the Fibonacci sequence. Alter fibonacci and insert the missing number such that the list correctly represents the first 10 numbers in the Fibonacci sequence, as follows:
| FIBONACCI NUMBERS (FIRST 8) | |||||||||
|---|---|---|---|---|---|---|---|---|---|
| 1 | 1 | 2 | 3 | 5 | 8 | 13 | 21 | 34 | 55 |
Modification of members
Given a list as:
we can also modify the exiting value or values inside a
list. This process is sometimes referred to as item
assignment:
OUTPUT
[5, 174, 5, 56, -1, 29, 'a text']OUTPUT
[5, 174, 5, 19, -1, 29, 'a text']It is also possible to perform item assignment over a slice containing any number of values. Note that when modifying a slice, the replacement values must be the same length as the slice we are trying to replace:
PYTHON
print('Before:', table)

replacement = [-38, 0]

print('Replacement length:', len(replacement))
print('Replacement length:', len(table[2:4]))

# The replacement process:
table[2:4] = replacement

print('After:', table)
OUTPUT
Before: [5, 174, 5, 19, -1, 29, 'a text']
Replacement length: 2
Replacement length: 2
After: [5, 174, -38, 0, -1, 29, 'a text']OUTPUT
[5, 174, 12, 0, -1, 29, 'a text']Practice Exercise 7
Create a list containing the first 10 prime numbers
as:
primes = [2, 3, 5, 11, 7, 13, 17, 19, 23, 29]
Values 11 and 7, however, have been misplaced in the sequence. Correct the order by replacing the slice of primes that represents [11, 7] with [7, 11].
Removal of members
When removing a value from a list, we have two options
depending on our needs: we either remove the member and retain the value
in another variable, or we remove it and dispose of the value,
completely.
To remove a value from a list without retaining it, we use
.remove(). The method takes one input argument, which is the
value we would like to remove from our list:
OUTPUT
[5, 12, 0, -1, 29, 'a text']Alternatively, we can use del; a Python syntax that we can use, in this context, to delete a specific member using its index:
OUTPUT
[5, 12, 0, -1, 29]As established above, we can also delete a member and retain its value. Of course we can do so by holding the value inside another variable before deleting it.
Whilst this is a valid approach, Python’s list provide us
with .pop() to simplify the process even further. The method
takes one input argument for the index of the member to be removed. It
removes the member from the list and returns its value, so
that we can retain it in a variable:
OUTPUT
Removed value: 0
[5, 12, -1, 29]
Practice Exercise 8
We know that the nucleotides of DNA include Adenosine, Cytosine, Threonine and Glutamine: A, C, T, and G.
Given a list representing a nucleotide sequence:
strand = ['A', 'C', 'G', 'G', 'C', 'M', 'T', 'A']Find the index of the invalid nucleotide in strand.
Use the index you found to remove the invalid nucleotide from strand and retain the value in another variable. Display the result as:
Removed from the strand: X
New strand: [X, X, X, ...]- What do you think happens once we run the following code, and why? What would be the final result displayed on the screen?
strand.remove('G')

print(strand)One of the two G nucleotides, the one at index 2 of the original array, is removed. This means that the .remove() method removes only first instance of a member in an array. The output would therefore be:
['A', 'C', 'G', 'C', 'M', 'T', 'A']Method–mediated operations
We already know that methods are akin to functions that are associated with a specific type. In this subsection, we will be looking at how operations are performed using methods. We will not be introducing anything new, but will recapitulate what we already know from, but from different perspectives.
So far in this chapter, we have learned how to perform different
operations on list arrays in Python. You may have noticed
that some operations return a result that we can store in a variable,
while others change the original value.
With that in mind, we can divide operations performed using methods into two general categories:
- Operations that return a result without changing the original array:
OUTPUT
2
[1, 2, 3, 4]- Operations that use specific methods to change the original array, but do not necessarily return anything (in-place operations):
OUTPUT
[1, 2, 3, 4, 5]If we attempt to store the output of an operation that does not a
return result, and store this into a variable, the variable will be
created, but its value will be set to None, by default:
OUTPUT
None
[1, 2, 3, 4, 5, 6]
It is important to know the difference between these types of operations. So as a rule of thumb, when we use methods to perform an operation, we can only change the original value if it is an instance of a mutable type. See Table to find out which of Python’s built-in types are mutable.
The methods that are associated with immutable objects always return the results and do not provide the ability to alter the original value:
- In-place operation on a mutable object of type
list:
OUTPUT
[5, 7]- In-place operation on an immutable object of type
str:
OUTPUT
AttributeError: 'str' object has no attribute 'remove'OUTPUT
567- Normal operation on a mutable object of type
list:
OUTPUT
1- Normal operation on a mutable object of type
list:
OUTPUT
1List members
A list is a collection of members that are independent of
each other. Each member has its own type, and is therefore subject
to the properties and limitations of that type:
OUTPUT
<class 'int'>
<class 'float'>
<class 'str'>
For instance, mathematical operations may be considered a feature of all
numeric types demonstrated in Table. However, unless
in specific circumstance described in subsection Non-numeric
values, such operations do not apply to instance of type
str.
OUTPUT
[2, 2.1, 'abcdef']
A list in Python plays the role of a container that may
incorporate any number of values. Thus far, we have learned how
to handle individual members of a list. In this subsection,
we will be looking at several techniques that help us address different
circumstances where we look at a list from a ‘wholist’
perspective; that is, a container whose members are unknown to us.
Membership test
Membership test operations [advanced]
We can check to see whether or not a specific value is a member of a
list using the operator syntax in:
OUTPUT
TrueOUTPUT
FalseThe results may be stored in a variable:
OUTPUT
TrueSimilar to any other logical expression, we can negate membership tests by using :
OUTPUT
TrueOUTPUT
FalseFor numeric values, int and float
may be used interchangeably:
OUTPUT
TrueOUTPUT
TrueSimilar to other logical expression, membership tests may be incorporated into conditional statements:
OUTPUT
Hello JohnPractice Exercise 9
Given a list of randomly generated peptide sequences
as:
PYTHON
peptides = [
  'FAEKE', 'DMSGG', 'CMGFT', 'HVEFW', 'DCYFH', 'RDFDM', 'RTYRA',
  'PVTEQ', 'WITFR', 'SWANQ', 'PFELC', 'KSANR', 'EQKVL', 'SYALD',
  'FPNCF', 'SCDYK', 'MFRST', 'KFMII', 'NFYQC', 'LVKVR', 'PQKTF',
  'LTWFQ', 'EFAYE', 'GPCCQ', 'VFDYF', 'RYSAY', 'CCTCG', 'ECFMY',
  'CPNLY', 'CSMFW', 'NNVSR', 'SLNKF', 'CGRHC', 'LCQCS', 'AVERE',
  'MDKHQ', 'YHKTQ', 'HVRWD', 'YNFQW', 'MGCLY', 'CQCCL', 'ACQCL'
  ]
Determine whether or not each of the following sequences exist in peptides; and if so, what is their corresponding index:
- IVADH
- CMGFT
- DKAKL
- THGYP
- NNVSR
Display the results in the following format:
Sequence XXXXX was found at index XXLength
Built-in functions: len
The number of members contained within a list defines its
length. Similar to the length of str values as discussed in
mathematical operations Practice Exercise 8 and Practice Exercise
11, we use the built-in function len() also to determine
the length of a list:
OUTPUT
5OUTPUT
3
The len() function always returns an integer value
(int) equal to, or greater than, zero. We can store the
length in a variable and use it in different mathematical or logical
operations:
PYTHON
table = [1, 2, 3, 4]
items_length = len(items)
table_length = len(table)

print(items_length + table_length)
OUTPUT
9OUTPUT
TrueWe can also use the length of an array in conditional statements:
PYTHON
students = ['Julia', 'John', 'Jane', 'Jack']
present = ['Julia', 'John', 'Jane', 'Jack', 'Janet']

if len(present) == len(students):
    print('All the students are here.')
else:
    print('One or more students are not here yet.')
OUTPUT
One or more students are not here yet.Remember
Both in and len() may be used in reference to any type of array or sequence in Python.
See Table to find out which of Python’s built-in types are regarded as a sequence.
Practice Exercise 10
Given the list of random peptides defined in Practice Exercise 9:
- Define a
listcalled overlaps, containing the sequences whose presence in peptides you previously confirmed in Practice Exercise 9. - Determine the length of peptides.
- Determine the length of overlaps.
Display yours results as follows:
overlaps = ['XXXXX', 'XXXXX', ...]
Length of peptides: XX
Length of overlaps: XXPYTHON
overlaps = list()

sequence = "IVADH"
if sequence in peptides:
    overlaps.append(sequence)

sequence = "CMGFT"
if sequence in peptides:
    overlaps.append(sequence)

sequence = "DKAKL"
if sequence in peptides:
    overlaps.append(sequence)

sequence = "THGYP"
if sequence in peptides:
    overlaps.append(sequence)

sequence = "NNVSR"
if sequence in peptides:
    overlaps.append(sequence)

print('overlaps:', overlaps)
OUTPUT
overlaps: ['CMGFT', 'NNVSR']Weak References and Copies
In our discussion on mutability, we also explored some
of the in-place operations such as .remove() and
.append(), that we can use to modify an existing
list. The use of these operations gives rise the following
question: What if we need to perform an in-place operation, but also
want to preserve the original array?
In such cases, we create a deep copy of the original array before we call the method and perform the operation.
Suppose we have:
A weak reference for table_a, also referred to as an alias or a symbolic link, may be defined as follows:
OUTPUT
[1, 2, 3, 4] [1, 2, 3, 4]Now if we perform an in-place operation on only one of the two variables (the original or the alias) as follows:
we will effectively change both of them:
OUTPUT
[1, 2, 3, 4, 5] [1, 2, 3, 4, 5]This is useful if we need to change the name of a variable under certain conditions to make our code more explicit and legible; however, it does nothing to preserve an actual copy of the original data.
To retain a copy of the original array, however, we must perform a deep copy as follows:
OUTPUT
[1, 2, 3, 4, 5] [1, 2, 3, 4, 5]where table_c represents a deep copy of table_b.
In this instance, performing an in-place operation on one variable would not have any impacts on the other:
OUTPUT
[1, 2, 3, 4, 5, 6] [1, 2, 3, 4, 5, 6] [1, 2, 3, 4, 5]where both the original array and its weak reference (table_a and table_b) changed without influencing the deep copy (table_c).
There is also a shorthand for the .copy() method to create
a deep copy. As far as arrays of type list are
concerned, writing:
new_table = original_table[:]is exactly the same as writing:
new_table = original_table.copy()Here is an example:
PYTHON
table_a = ['a', 3, 'b']
table_b = table_a
table_c = table_a.copy()
table_d = table_a[:]

table_a[1] = 5

print(table_a, table_b, table_c, table_d)
OUTPUT
['a', 5, 'b'] ['a', 5, 'b'] ['a', 3, 'b'] ['a', 3, 'b']Whilst both the original array and its weak reference (table_a and table_b) changed in this example; the deep copies (table_c and table_d) have remained unchanged.
Practice Exercise 11
When defining a consensus sequence, it is common to include annotations to represent ambiguous amino acids. Four such annotations are as follows:
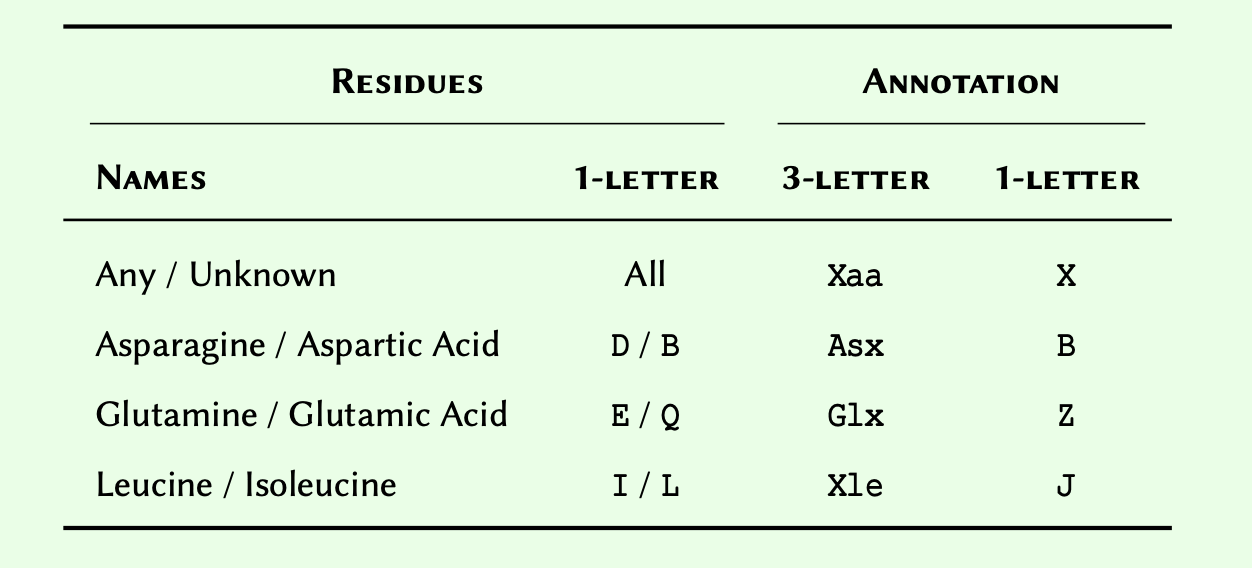
Given a list of amino acids as:
PYTHON
amino_acids = [
    'A', 'R', 'N', 'D', 'C', 'E', 'Q', 'G', 'H', 'I',
    'L', 'K', 'M', 'F', 'P', 'S', 'T', 'W', 'Y', 'V'
  ]
- Use amino_acids to
create an independent
listcalled amino_acids_annotations that contains all the standard amino acids.
- Add to amino_acids_annotations the 1-letter annotations for the ambiguous amino acids, as outlined in the table.
- Evaluate the lengths for amino_acids and amino_acids_annotations and
retain the result in a new
listcalled lengths.
- Using logical
operations, test the two values stored in lengths for equivalence and
display the result as a boolean (
TrueorFalse) output.
Conversion to list
As highlighted earlier in this section, arrays in Python can contain any value - regardless of type. We can exploit this feature to extract some interesting information about the data we store in an array.
To that end, we can convert any sequence
to a list. See Table to find out which
of the built-in types in Python are considered to be a sequence.
Suppose we have the sequence for Protein Kinase A Gamma (catalytic) subunit for humans as follows:
PYTHON
# Multiple lines of text may be split into
# several lines inside parentheses:

human_pka_gamma = (
  'MAAPAAATAMGNAPAKKDTEQEESVNEFLAKARGDFLYRWGNPAQNTASSDQFERLRTLGMGSFGRVMLV'
  'RHQETGGHYAMKILNKQKVVKMKQVEHILNEKRILQAIDFPFLVKLQFSFKDNSYLYLVMEYVPGGEMFS'
  'RLQRVGRFSEPHACFYAAQVVLAVQYLHSLDLIHRDLKPENLLIDQQGYLQVTDFGFAKRVKGRTWTLCG'
  'TPEYLAPEIILSKGYNKAVDWWALGVLIYEMAVGFPPFYADQPIQIYEKIVSGRVRFPSKLSSDLKDLLR'
  'SLLQVDLTKRFGNLRNGVGDIKNHKWFATTSWIAIYEKKVEAPFIPKYTGPGDASNFDDYEEEELRISIN'
  'EKCAKEFSEF'
	)

print(type(human_pka_gamma))
OUTPUT
<class 'str'>We can now convert our sequence from its original type of
str to list by using list() as a
function. Doing so will automatically decompose the text down
into individual characters:
PYTHON
# The function "list" may be used to convert string
# variables into a list of characters:
pka_list = list(human_pka_gamma)

print(pka_list)
OUTPUT
['M', 'A', 'A', 'P', 'A', 'A', 'A', 'T', 'A', 'M', 'G', 'N', 'A', 'P', 'A', 'K', 'K', 'D', 'T', 'E', 'Q', 'E', 'E', 'S', 'V', 'N', 'E', 'F', 'L', 'A', 'K', 'A', 'R', 'G', 'D', 'F', 'L', 'Y', 'R', 'W', 'G', 'N', 'P', 'A', 'Q', 'N', 'T', 'A', 'S', 'S', 'D', 'Q', 'F', 'E', 'R', 'L', 'R', 'T', 'L', 'G', 'M', 'G', 'S', 'F', 'G', 'R', 'V', 'M', 'L', 'V', 'R', 'H', 'Q', 'E', 'T', 'G', 'G', 'H', 'Y', 'A', 'M', 'K', 'I', 'L', 'N', 'K', 'Q', 'K', 'V', 'V', 'K', 'M', 'K', 'Q', 'V', 'E', 'H', 'I', 'L', 'N', 'E', 'K', 'R', 'I', 'L', 'Q', 'A', 'I', 'D', 'F', 'P', 'F', 'L', 'V', 'K', 'L', 'Q', 'F', 'S', 'F', 'K', 'D', 'N', 'S', 'Y', 'L', 'Y', 'L', 'V', 'M', 'E', 'Y', 'V', 'P', 'G', 'G', 'E', 'M', 'F', 'S', 'R', 'L', 'Q', 'R', 'V', 'G', 'R', 'F', 'S', 'E', 'P', 'H', 'A', 'C', 'F', 'Y', 'A', 'A', 'Q', 'V', 'V', 'L', 'A', 'V', 'Q', 'Y', 'L', 'H', 'S', 'L', 'D', 'L', 'I', 'H', 'R', 'D', 'L', 'K', 'P', 'E', 'N', 'L', 'L', 'I', 'D', 'Q', 'Q', 'G', 'Y', 'L', 'Q', 'V', 'T', 'D', 'F', 'G', 'F', 'A', 'K', 'R', 'V', 'K', 'G', 'R', 'T', 'W', 'T', 'L', 'C', 'G', 'T', 'P', 'E', 'Y', 'L', 'A', 'P', 'E', 'I', 'I', 'L', 'S', 'K', 'G', 'Y', 'N', 'K', 'A', 'V', 'D', 'W', 'W', 'A', 'L', 'G', 'V', 'L', 'I', 'Y', 'E', 'M', 'A', 'V', 'G', 'F', 'P', 'P', 'F', 'Y', 'A', 'D', 'Q', 'P', 'I', 'Q', 'I', 'Y', 'E', 'K', 'I', 'V', 'S', 'G', 'R', 'V', 'R', 'F', 'P', 'S', 'K', 'L', 'S', 'S', 'D', 'L', 'K', 'D', 'L', 'L', 'R', 'S', 'L', 'L', 'Q', 'V', 'D', 'L', 'T', 'K', 'R', 'F', 'G', 'N', 'L', 'R', 'N', 'G', 'V', 'G', 'D', 'I', 'K', 'N', 'H', 'K', 'W', 'F', 'A', 'T', 'T', 'S', 'W', 'I', 'A', 'I', 'Y', 'E', 'K', 'K', 'V', 'E', 'A', 'P', 'F', 'I', 'P', 'K', 'Y', 'T', 'G', 'P', 'G', 'D', 'A', 'S', 'N', 'F', 'D', 'D', 'Y', 'E', 'E', 'E', 'E', 'L', 'R', 'I', 'S', 'I', 'N', 'E', 'K', 'C', 'A', 'K', 'E', 'F', 'S', 'E', 'F']Practice Exercise 12
Ask the user to enter a sequence of single-letter amino acids in
lower case. Convert the sequence to list and:
- Count the number of serine and threonine residues and display the result in the following format:
Total number of serine residues: XX
Total number of threonine residues: XX- Check whether or not the sequence contains both serine and threonine residues:
- If it does, display:
The sequence contains both serine and threonine residues.- if it does not, display:
The sequence does not contain both serine and threonine residues.sequence_str = input('Please enter a sequence of signle-letter amino acids in lower-case: ')
sequence = list(sequence_str)
ser_count = sequence.count('s')
thr_count = sequence.count('t')
print('Total number of serine residues:', ser_count)
print('Total number of threonine residues:', thr_count)if ser_count > 0 and thr_count > 0:
response_state = ''
else:
response_state = 'not'
print(
'The sequence does',
'response_state',
'contain both serine and threonine residues.'
)Advanced Topic
Generators represent a specific type in Python whose results are not immediately evaluated. A generator is a specific type of iterable (an object capable of returning elements, one at a time), that can return its items, lazily. This means that it generates values on the fly, and only as and when required in your program. Generators can be particularly useful when working with large datasets, where loading all the data into memory can be computationally expensive. Using genarators with such data, can help to process it in more manageable units.
Generators’ lazy evaluation in functional
programming is often used in the context of a for-loop:
which we will explore in a later L2D lesson on iterations. We do not
further explore generators on this course, but if you are interested to
learn more, you can find plenty of information in the following
official documentation.
Useful methods
Data Structures: More on Lists
In this subsection, we will be reviewing some of the useful and
important methods that are associated with object of type
list. We will make use of snippets of code that exemplify
such methods, in practice. The linked cheatsheet of the methods associated
with the built-in arrays in Python can be helpful.
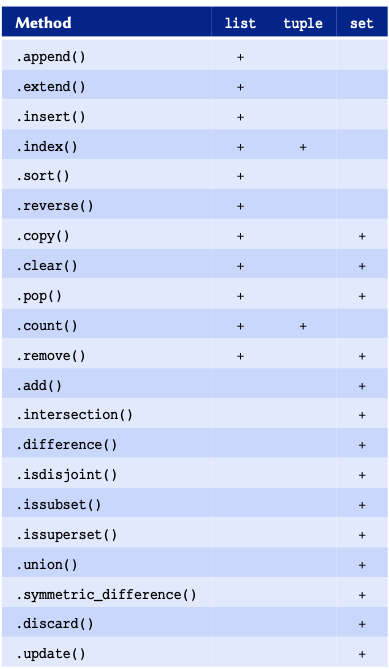
The methods outlined here are not individually described; however, at this point, you should be able to work out what they do by looking at their names and respective examples.
Count a specific value within a list:
OUTPUT
3Extend a list:
PYTHON
table_a = [1, 2, 2, 2]
table_b = [15, 16]

table_c = table_a.copy()  # deep copy.
table_c.extend(table_b)

print(table_a, table_b, table_c)
OUTPUT
[1, 2, 2, 2] [15, 16] [1, 2, 2, 2, 15, 16]Extend a list by adding two lists to each other. Note:
adding two lists to each other is not considered an in-place
operation:
PYTHON
table_a = [1, 2, 2, 2]
table_b = [15, 16]

table_c = table_a + table_b

print(table_a, table_b, table_c)
OUTPUT
[1, 2, 2, 2] [15, 16] [1, 2, 2, 2, 15, 16]PYTHON
table_a = [1, 2, 2, 2]
table_b = [15, 16]

table_c = table_a.copy()  # deep copy.
table_d = table_a + table_b

print(table_c == table_d)
OUTPUT
False
We can also reverse the values in a list. There are two
methods for doing so. Being a generator means that the output of the
function is not evaluated immediately; and instead, we get a generic
output. The first of these two methods is:
- Through an in-place operation using .reverse()
OUTPUT
Reversed: [16, 15, 2, 2, 2, 1]- And secondly, using reversed() - which is a built-in generator function.
PYTHON
table = [1, 2, 2, 2, 15, 16]
table_rev = reversed(table)

print("Result:", table_rev)
print("Type:", type(table_rev))
OUTPUT
Result: <list_reverseiterator object at 0x7f951f886590>
Type: <class 'list_reverseiterator'>
We can, however, force the evaluation process by converting the
generator results into a list:
OUTPUT
Evaluated: [16, 15, 2, 2, 2, 1]Members of a list may also be sorted in-place, as
follows:
OUTPUT
Sorted (ascending): [1, 2, 2, 2, 15, 16]Advanced Topic
There is also a further function built into Python: sorted(). This works in a similar manner to reversed(). Also a generator function, it offers more advanced features that are beyond the scope of this course. You can find out more about it from the official documentation and examples.
The .sort() method takes an optional keyword argument
entitled reverse (default: False). If set to
True, the method will perform a descending sort:
OUTPUT
Sorted (descending): [16, 15, 2, 2, 2, 1]We can also create an empty list, so that we can add
members to it later in our code using .append(), or
.extend() or other tools:
OUTPUT
[]OUTPUT
[5]OUTPUT
['Jane', 'Janette']Practice Exercise 13
Create a list, and experiment with each of the methods
provided in the above example. Try including members of different
types in your list, and see how each of these
methods behave.
This practice exercise was intended to encourage you to experiment with the methods outlined.
Nested Arrays
At this point, you should be comfortable with creating, handling and
manipulating arrays of type list, in Python. It is
important to have a foundational understanding of the principles
outlined in this section so far, before starting to learn about
nested arrays.
We have already established that arrays can contain any value - regardless of type. This means that they can also contain other arrays. An array that includes at least one member that is, itself, an array is referred to as a nested array. This can be thought of as a table with more than one column:
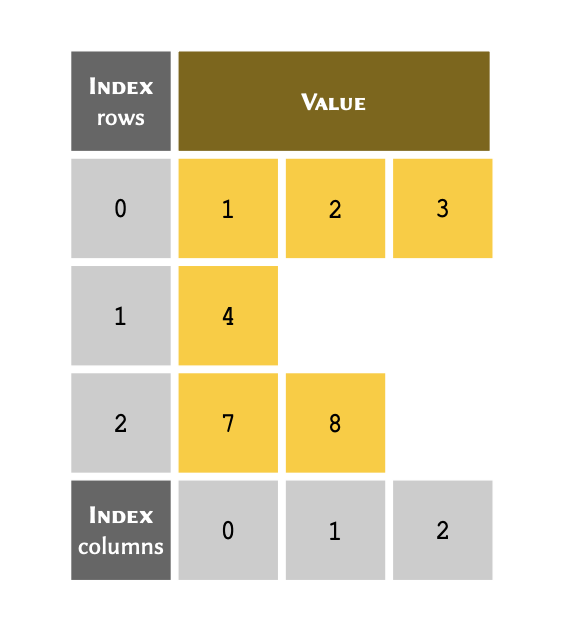
Remember
Arrays can contain values of any type. This rule applies to
nested arrays too. We have exclusively included int numbers
in our table in order to simplify the above example.
Implementation
The table can be written in Python as a nested array:
PYTHON
# The list has 3 members, 2 of which
# are arrays of type list:
table = [[1, 2, 3], 4, [7, 8]]
print(table)OUTPUT
[[1, 2, 3], 4, [7, 8]]Indexing
The indexing principles for nested arrays are slightly different to
those we have familiarised with, up to this point. To retrieve an
individual member in a nested list, we always reference the
row index, followed by the column index.
We may visualise the process as follows:
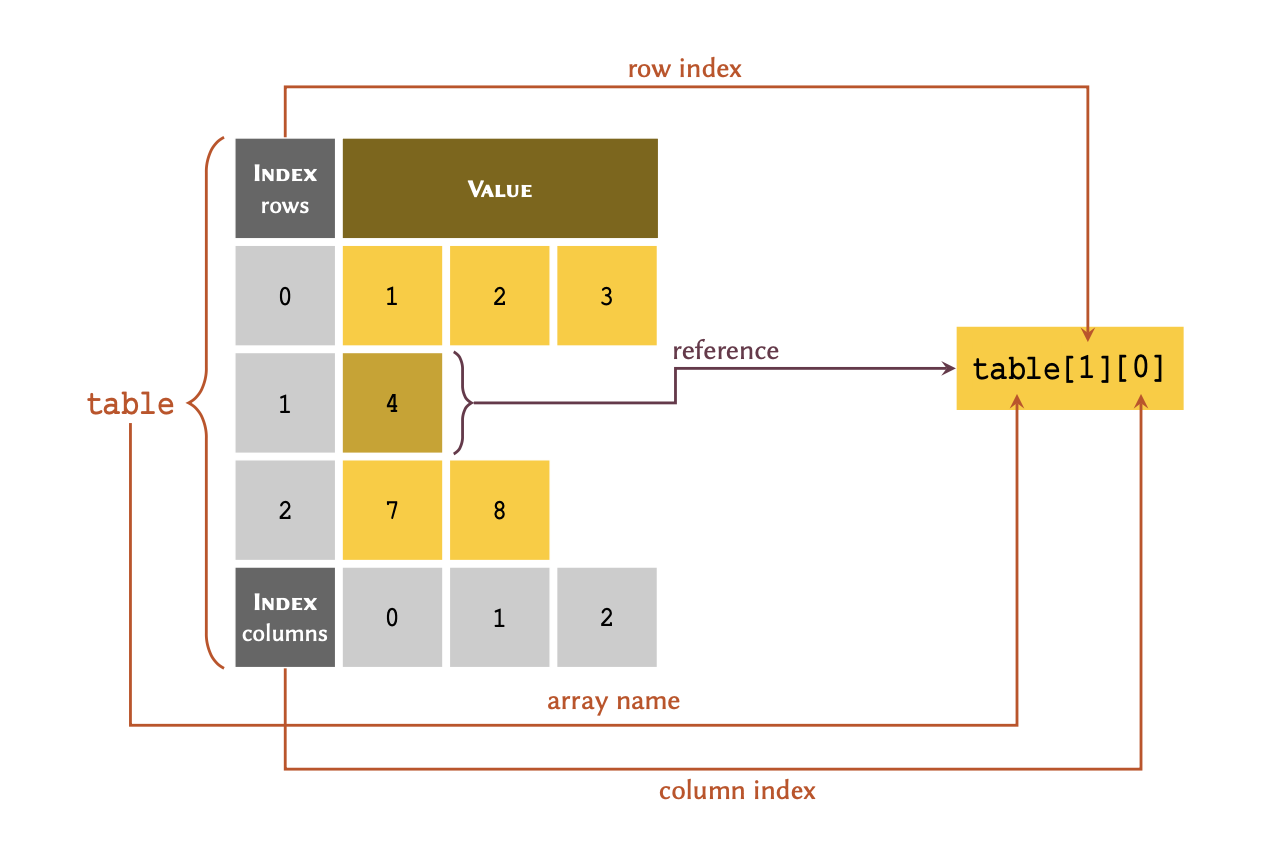
To retrieve an entire row, we only need to include the reference for that row. All the values within the row are referenced, implicitly:
OUTPUT
[1, 2, 3]and to retrieve a specific member, we include the reference for both the row and column:
OUTPUT
2We may also extract slices from a nested array. The protocol is identical to normal arrays, described in the previous section of this lesson on slicing. In nested arrays, however, we may take slices from the columns as well as the rows:
OUTPUT
[[1, 2, 3], 4]OUTPUT
[1, 2]Note that only 2 of the 3 members in table are arrays of type
list:
OUTPUT
[1, 2, 3] <class 'list'>OUTPUT
[7, 8] <class 'list'>However, there is another member that is not an array:
OUTPUT
4 <class 'int'>In most circumstances, we would want all the members in an array to be homogeneous in type — i.e. we want them all to have the same type. In such cases, we can implement the table as:
OUTPUT
[4] <class 'list'>An array with only one member — e.g. [4], is sometimes referred to as a singleton array.
Practice Exercise 14
Given the following Table of pathogens and their corresponding diseases:
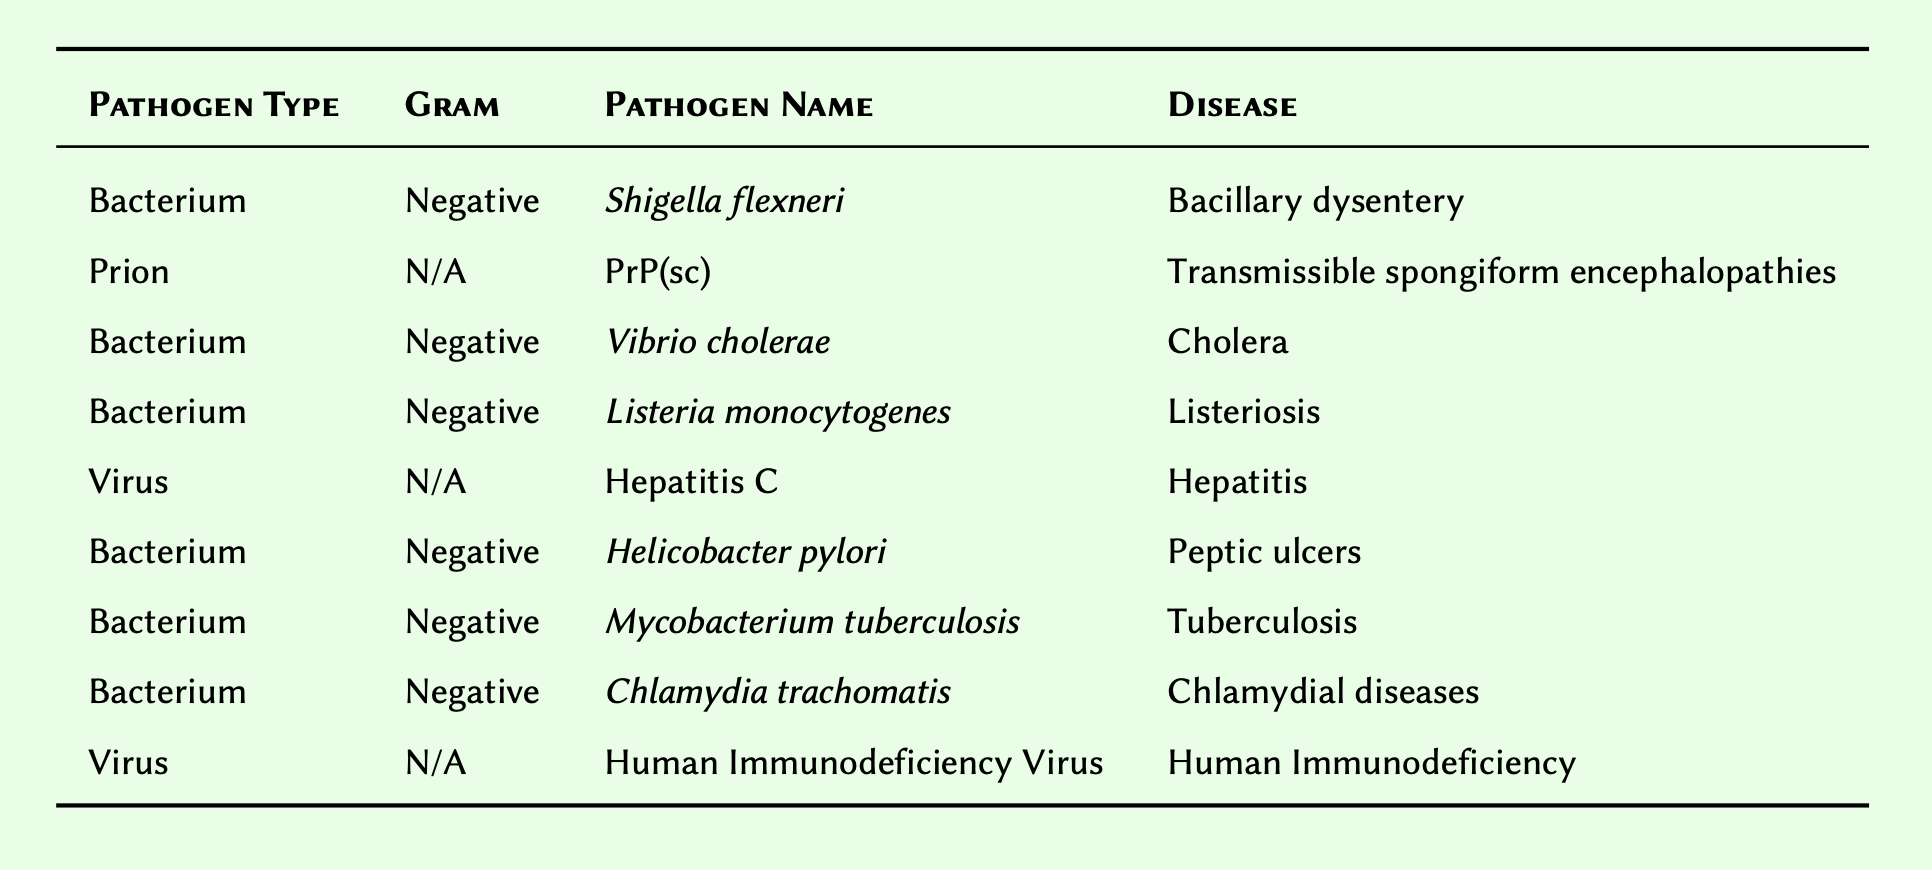
- Substitute N/A for
None, and create an array to represent the table in its presented order. Retain the array in a variable, and display the result.
- Modify the array you created so that its members are sorted descendingly, and display the result.
PYTHON
disease_pathogen = [
["Bacterium", "Negative", "Shigella flexneri" , "Bacillary dysentery"],
["Prion", None, "PrP(sc)", "Transmissible spongiform encephalopathies"],
["Bacterium", "Negative", "Vibrio cholerae", "Cholera"],
["Bacterium", "Negative", "Listeria monocytogenes", "Listeriosis"],
["Virus", None, "Hepatitis C", "Hepatitis"],
["Bacterium", "Negative", "Helicobacter pylori", "Peptic ulcers"],
["Bacterium", "Negative", "Mycobacterium tuberculosis", "Tuberculosis"],
["Bacterium", "Negative", "Chlamydia trachomatis", "Chlamydial diseases"],
["Virus", None, "Human Immunodeficiency Virus", "Human Immunodeficiency"]
]
print(disease_pathogen)OUTPUT
[['Bacterium', 'Negative', 'Shigella flexneri', 'Bacillary dysentery'], ['Prion', None, 'PrP(sc)', 'Transmissible spongiform encephalopathies'], ['Bacterium', 'Negative', 'Vibrio cholerae', 'Cholera'], ['Bacterium', 'Negative', 'Listeria monocytogenes', 'Listeriosis'], ['Virus', None, 'Hepatitis C', 'Hepatitis'], ['Bacterium', 'Negative', 'Helicobacter pylori', 'Peptic ulcers'], ['Bacterium', 'Negative', 'Mycobacterium tuberculosis', 'Tuberculosis'], ['Bacterium', 'Negative', 'Chlamydia trachomatis', 'Chlamydial diseases'], ['Virus', None, 'Human Immunodeficiency Virus', 'Human Immunodeficiency']]OUTPUT
[['Virus', None, 'Human Immunodeficiency Virus', 'Human Immunodeficiency'], ['Virus', None, 'Hepatitis C', 'Hepatitis'], ['Prion', None, 'PrP(sc)', 'Transmissible spongiform encephalopathies'], ['Bacterium', 'Negative', 'Vibrio cholerae', 'Cholera'], ['Bacterium', 'Negative', 'Shigella flexneri', 'Bacillary dysentery'], ['Bacterium', 'Negative', 'Mycobacterium tuberculosis', 'Tuberculosis'], ['Bacterium', 'Negative', 'Listeria monocytogenes', 'Listeriosis'], ['Bacterium', 'Negative', 'Helicobacter pylori', 'Peptic ulcers'], ['Bacterium', 'Negative', 'Chlamydia trachomatis', 'Chlamydial diseases']]Dimensions
A nested array is considered two-dimensional or 2D when:
All of its members in a nested array are arrays, themselves;
All sub-arrays are of equal length — i.e. all the columns in the table are filled and have the same number of rows; and,
All members of the sub-arrays are homogeneous in type — i.e. they all have the same type (e.g.
int).
A two dimensional arrays may be visualised as follows: 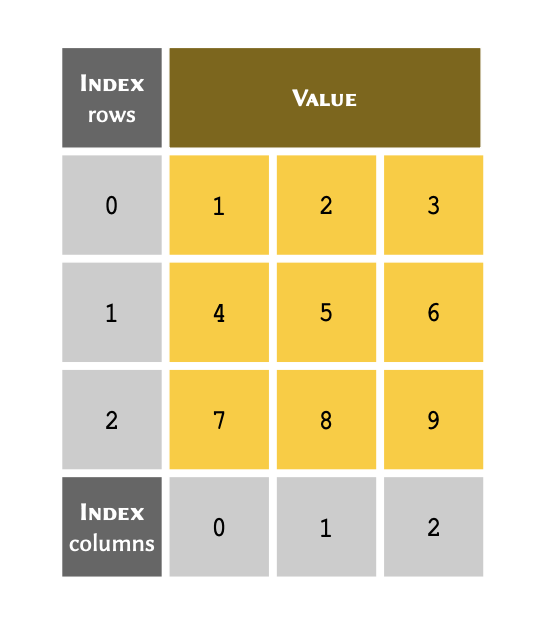
Advanced Topic
Nested arrays may, themselves, be nested. This means that, if needed, we can have 3, 4 or n dimensional arrays, too. Analysis and organisation of such arrays is an important part of a field known as optimisation in computer science and mathematics. Optimisation is the cornerstone of machine learning, and addresses the problem known as curse of dimensionality.
Such arrays are referred to in mathematics as a matrix. We can therefore represent a two-dimensional array as a mathematical matrix. To that end, the above array would translate to the annotation displayed in equation below.
\[table=\begin{bmatrix} 1&2&3\\ 4&5&6\\ 7&8&9\\ \end{bmatrix}\]
The implementation of these arrays is identical to the implementation of other nested arrays. We can therefore code our table in Python as:
OUTPUT
[[1, 2, 3], [4, 5, 6], [7, 8, 9]]OUTPUT
[7, 8, 9]OUTPUT
4OUTPUT
[[1, 2, 3], [4, 5, 6]]Practice Exercise 15
Computers see images as multidimensional arrays (matrices). In its simplest form, an image is a two-dimensional array containing only two colours.
Given the following black and white image:
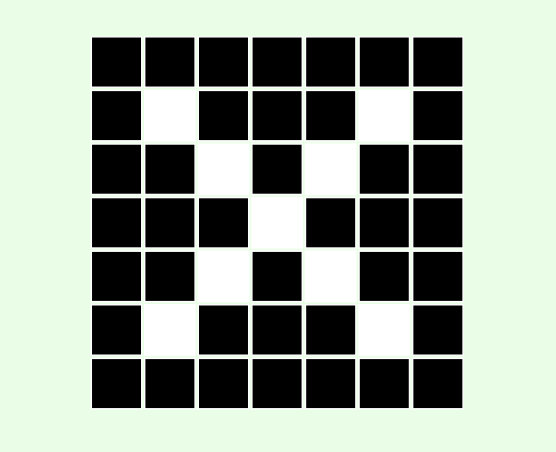
- Considering that black and white squares represent zeros and ones respectively, create a two-dimensional array to represent the image. Display the results.
- Create a new array, but this time use
FalseandTrueto represent black and white respectively.
Display the results.
PYTHON
cross = [
[0, 0, 0, 0, 0, 0, 0],
[0, 1, 0, 0, 0, 1, 0],
[0, 0, 1, 0, 1, 0, 0],
[0, 0, 0, 1, 0, 0, 0],
[0, 0, 1, 0, 1, 0, 0],
[0, 1, 0, 0, 0, 1, 0],
[0, 0, 0, 0, 0, 0, 0]
]
print(cross)OUTPUT
[[0, 0, 0, 0, 0, 0, 0], [0, 1, 0, 0, 0, 1, 0], [0, 0, 1, 0, 1, 0, 0], [0, 0, 0, 1, 0, 0, 0], [0, 0, 1, 0, 1, 0, 0], [0, 1, 0, 0, 0, 1, 0], [0, 0, 0, 0, 0, 0, 0]]PYTHON
cross_bool = [
[False, False, False, False, False, False, False],
[False, True, False, False, False, True, False],
[False, False, True, False, True, False, False],
[False, False, False, True, False, False, False],
[False, False, True, False, True, False, False],
[False, True, False, False, False, True, False],
[False, False, False, False, False, False, False]
]
print(cross_bool)OUTPUT
[[False, False, False, False, False, False, False], [False, True, False, False, False, True, False], [False, False, True, False, True, False, False], [False, False, False, True, False, False, False], [False, False, True, False, True, False, False], [False, True, False, False, False, True, False], [False, False, False, False, False, False, False]]Summary
At this point, you should be familiar with arrays and how they work,
in general. Throughout this section, we extensively covered the Python
list, which is one of the language’s most popular types of
built-in arrays. We also learned:
How to
listfrom the scratch;How to manipulate a
listusing different methods;How to use indexing and slicing techniques to our advantage;
Mutability — a concept we revisit in the forthcoming lessons;
In-place operations, and the difference between weak references and deep copies;
Nested and multi-dimensional arrays; and,
How to convert other sequences (e.g.
str) tolist.
Tuple
Data Structures: Tuples and Sequences
Another of Python’s built-in array types is called a tuple.
A tuple is an immutable alternative to list. That is, once
a tuple has been created, its contents cannot be modified in any way.
Tuples are often used in applications where it is imperative that the
contents of an array cannot be changed.
For instance, we know that in the Wnt signaling pathway, there are two co-receptors. This is final, and would not change at any point in our program.
Remember
The most common way to implement a tuple in Python, is
to place our comma-separated values inside round parentheses: (1, 2, 3, …). While there is no
specific theoretical term for a tuple instantiated with round
parentheses, we can refer to this type of tuple as an explicit
tuple.
You can also instantiate a tuple without parentheses, as well: (1, 2, 3, …). In this case, Python acknowledges that a tuple is implied, and is therefore assumed. Thus, we often refer to this type of tuple as an implicit tuple, and these are created using an operation called packing.
For the time being, we will be making use of explicit tuples, as they are the clearest and most explicit in annotation, and therefore easiest to program with and recognise.
Similarly, we can briefly demonstrate that removing round parentheses, or instantiating a implicit tuple, is categorised in the same way, in Python:
OUTPUT
<class 'tuple'>OUTPUT
('Frizzled', 'LRP')OUTPUT
<class 'tuple'>OUTPUT
('Wnt Signaling', ('Frizzled', 'LRP'))OUTPUT
Wnt Signaling
Indexing and slicing principles for a tuple are identical
to those of a list, aforementioned in this lesson’s
subsections on indexing and slicing.
Conversion to tuple
Similar to list, we can convert other sequences to
tuple:
OUTPUT
<class 'list'>OUTPUT
(1, 2, 3, 4, 5)OUTPUT
<class 'tuple'>OUTPUT
<class 'str'>OUTPUT
('T', 'h', 'i', 's', ' ', 'i', 's', ' ', 'a', ' ', 's', 't', 'r', 'i', 'n', 'g', '.')OUTPUT
<class 'tuple'>Immutability
In contrast with list, however, if we attempt to change
the contents of a tuple, a TypeError is
raised:
OUTPUT
TypeError: 'tuple' object does not support item assignmentEven though tuple is an immutable type, it can contain
both mutable and immutable objects:
PYTHON
# (immutable, immutable, immutable, mutable)
mixed_tuple = (1, 2.5, 'abc', (3, 4), [5, 6])
print(mixed_tuple)OUTPUT
(1, 2.5, 'abc', (3, 4), [5, 6])and mutable objects inside a tuple may still be
changed:
OUTPUT
(1, 2.5, 'abc', (3, 4), [5, 6]) <class 'tuple'>OUTPUT
[5, 6] <class 'list'>Advanced Topic
Why and how can we change mutable objects inside a tuple,
when a tuple is considered to be an immutable data
structure:
Members of a tuple are not directly stored in memory. An
immutable value (e.g. an integer: int) has an
existing, predefined reference, in memory. When used in a
tuple, it is this reference that is associated
with the tuple, and not the value itself. On the other
hand, a mutable object does not have a predefined reference in memory,
and is instead created on request somewhere in your computer’s memory
(wherever there is enough free space).
tuple, remains identical. In Python, it is possible to
discover the reference an object is using, with the function
id(). Upon experimenting with this function, you will
notice that the reference to an immutable object (e.g. an
int value) will never change, no matter how many times you
define it in a different context or variable. In contrast, the reference
number to a mutable object (e.g. a list) is
changed every time it is defined, even if it contains exactly the same
values.
OUTPUT
(1, 2.5, 'abc', (3, 4), [5, 15])OUTPUT
(1, 2.5, 'abc', (3, 4), [5, 15, 25])PYTHON
# We cannot remove the list from the tuple,
# but we can empty it by clearing its members:
mixed_tuple[4].clear()
print(mixed_tuple)OUTPUT
(1, 2.5, 'abc', (3, 4), [])Tuples may be empty or have a single value (singleton):
OUTPUT
() <class 'tuple'> 0PYTHON
# Empty parentheses also generate an empty tuple.
# Remember: we cannot add values to an empty tuple, later.
member_b = ()
print(member_b, type(member_b), len(member_b))OUTPUT
() <class 'tuple'> 0PYTHON
# Singleton - Note that it is essential to include
# a comma after the value in a single-member tuple:
member_c = ('John Doe',)
print(member_c, type(member_c), len(member_c))OUTPUT
('John Doe',) <class 'tuple'> 1PYTHON
# If the comma is not included, a singleton tuple
# is not constructed:
member_d = ('John Doe')
print(member_d, type(member_d), len(member_d))OUTPUT
John Doe <class 'str'> 8Packing and unpacking
As previously discussed, a tuple may also be constructed
without parentheses. This is an implicit operation and is known as
packing.
Remember
Implicit processes must be used sparingly. As always, the more coherent the code, the better it is.
OUTPUT
(1, 2, 3, 5, 7, 11) <class 'tuple'> 6PYTHON
# Note that for a singleton, we still need to
# include the comma.
member = 'John Doe',
print(member, type(member), len(member))OUTPUT
('John Doe',) <class 'tuple'> 1The reverse of this process is known as unpacking. Unpacking is no longer considered an implicit process because it replaces unnamed values inside an array, with named variables:
OUTPUT
14OUTPUT
14 17PYTHON
member = ('Jane Doe', 28, 'London', 'Student', 'Female')
name, age, city, status, gender = member
print('Name:', name, '- Age:', age)OUTPUT
Name: Jane Doe - Age: 28Note
There is another type of tuple in Python referred to as a
namedtuple. This allows for the members of a
tuple to be named independently (e.g.
member.name or member.age), and thereby
eliminates the need for unpacking. It was originally implemented by Raymond Hettinger, one of
Python’s core developers, for Python 2.4 (in 2004) but was neglected at
the time. It has since gained popularity as a very useful tool.
namedtuple is not a built-in tool, so it is not discussed
here. However, it is included in the default library and is installed as
a part of Python. If you are feeling ambitious and would like to learn
more, please take a look at the official
documentations and examples. Raymond is also a regular speaker at
PyCon (International Python Conferences), recordings of which are
available online. He also often uses his Twitter/X account to talk about
small, but important features in Python; which could be worth throwing
him a follow.
Summary
In this section of our Basic Python 2 lesson, we learned about
tuple - another type of built-in array within Python, and
one which is immutable. This means that once it is created, the
array can no longer be altered. We saw that trying to change the value
of a tuple raises a TypeError. We also
established that list and tuple follow an
identical indexing protocol, and that they have 2 methods in common:
.index()() and .count(). Finally, we talked about
packing and unpacking techniques, and how they improve
the quality and legibility of our code.
If you are interested in learning about list and
tuple in more depth, have a look at the official
documentation of Sequence Types – list, tuple, range.
Interesting Fact
Graph theory was initially developed by the renowned Swiss mathematician and logician Leonhard Euler (1707 – 1783). Howeve graphs, in the sense discussed here, were introduced by the English mathematician James Joseph Sylvester (1814 – 1897).
Exercises
End of chapter Exercises
- We have
table = [[1, 2, 3], ['a', 'b'], [1.5, 'b', 4], [2]]What is the length of table and why?
Store your answer in a variable and display it using print().
- Given the sequence for the Gamma (catalytic) subunit of the Protein Kinase A as:
human_pka_gamma = (
'MAAPAAATAMGNAPAKKDTEQEESVNEFLAKARGDFLYRWGNPAQNTASSDQFERLRTLGMGSFGRVML'
'VRHQETGGHYAMKILNKQKVVKMKQVEHILNEKRILQAIDFPFLVKLQFSFKDNSYLYLVMEYVPGGEM'
'FSRLQRVGRFSEPHACFYAAQVVLAVQYLHSLDLIHRDLKPENLLIDQQGYLQVTDFGFAKRVKGRTWT'
'LCGTPEYLAPEIILSKGYNKAVDWWALGVLIYEMAVGFPPFYADQPIQIYEKIVSGRVRFPSKLSSDLK'
'DLLRSLLQVDLTKRFGNLRNGVGDIKNHKWFATTSWIAIYEKKVEAPFIPKYTGPGDASNFDDYEEEEL'
'RISINEKCAKEFSEF'
)Using the sequence;
Work out and display the number of Serine (S) residues.
Work out and display the number of Threonine (T) residues.
Calculate and display the total number of Serine and Threonine residues in the following format:
Serine: X
Threonine: X- Create a nested array to represent the following table, and call it :
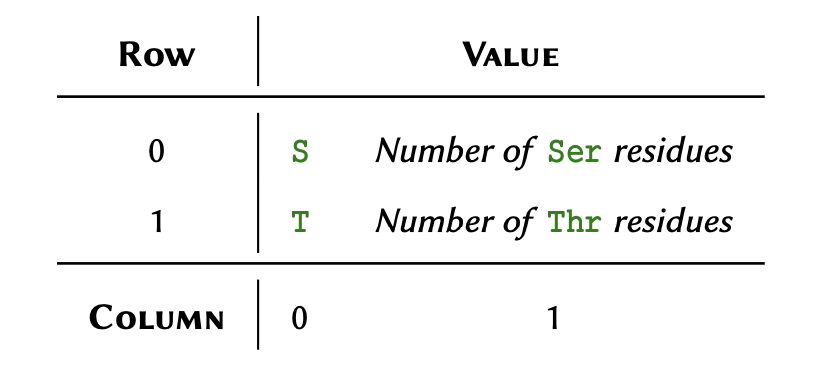
Explain why in the previous question, we used the term nested instead of two-dimensional in reference to the array? Store your answer in a variable and display it using print().
Graph theory is a prime object of discrete mathematics utilised for the non-linear analyses of data. The theory is extensively used in systems biology, and is gaining momentum in bioinformatics too. In essence, a graph is a structure that represents a set of object (nodes) and the connections between them (edges).
The aforementioned connections are described using a special binary (zero and one) matrix known as the adjacency matrix. The elements of this matrix indicate whether or not a pair of nodes in the graph are adjacent to one another.
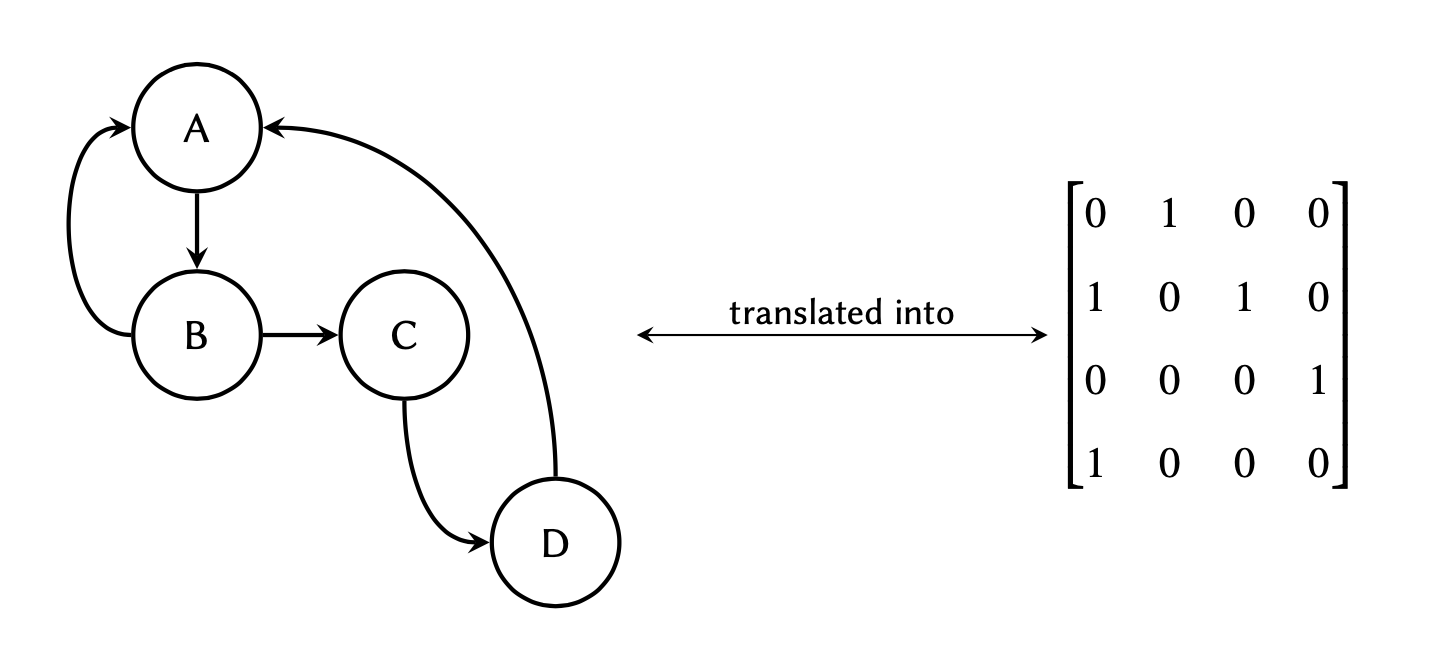 where each row in the matrix
represents a node of origin in the graph, and each column a node of
destination:
where each row in the matrix
represents a node of origin in the graph, and each column a node of
destination:
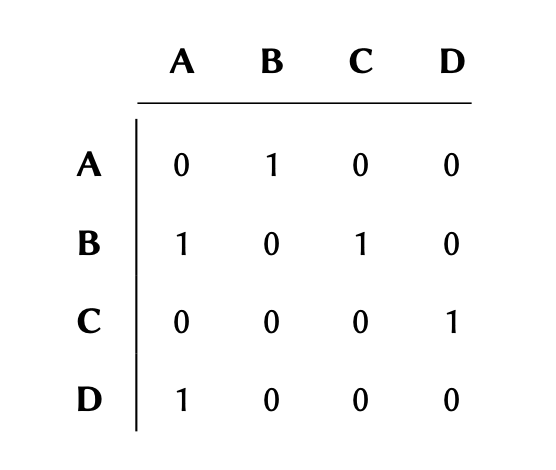 If the graph maintains a
connection (edge) between two nodes (e.g. between nodes A and B in the graph above), the
corresponding value between those nodes would be #1 in the matrix, and
if there are no connections, the corresponding value would #0.
If the graph maintains a
connection (edge) between two nodes (e.g. between nodes A and B in the graph above), the
corresponding value between those nodes would be #1 in the matrix, and
if there are no connections, the corresponding value would #0.
Given the following graph: 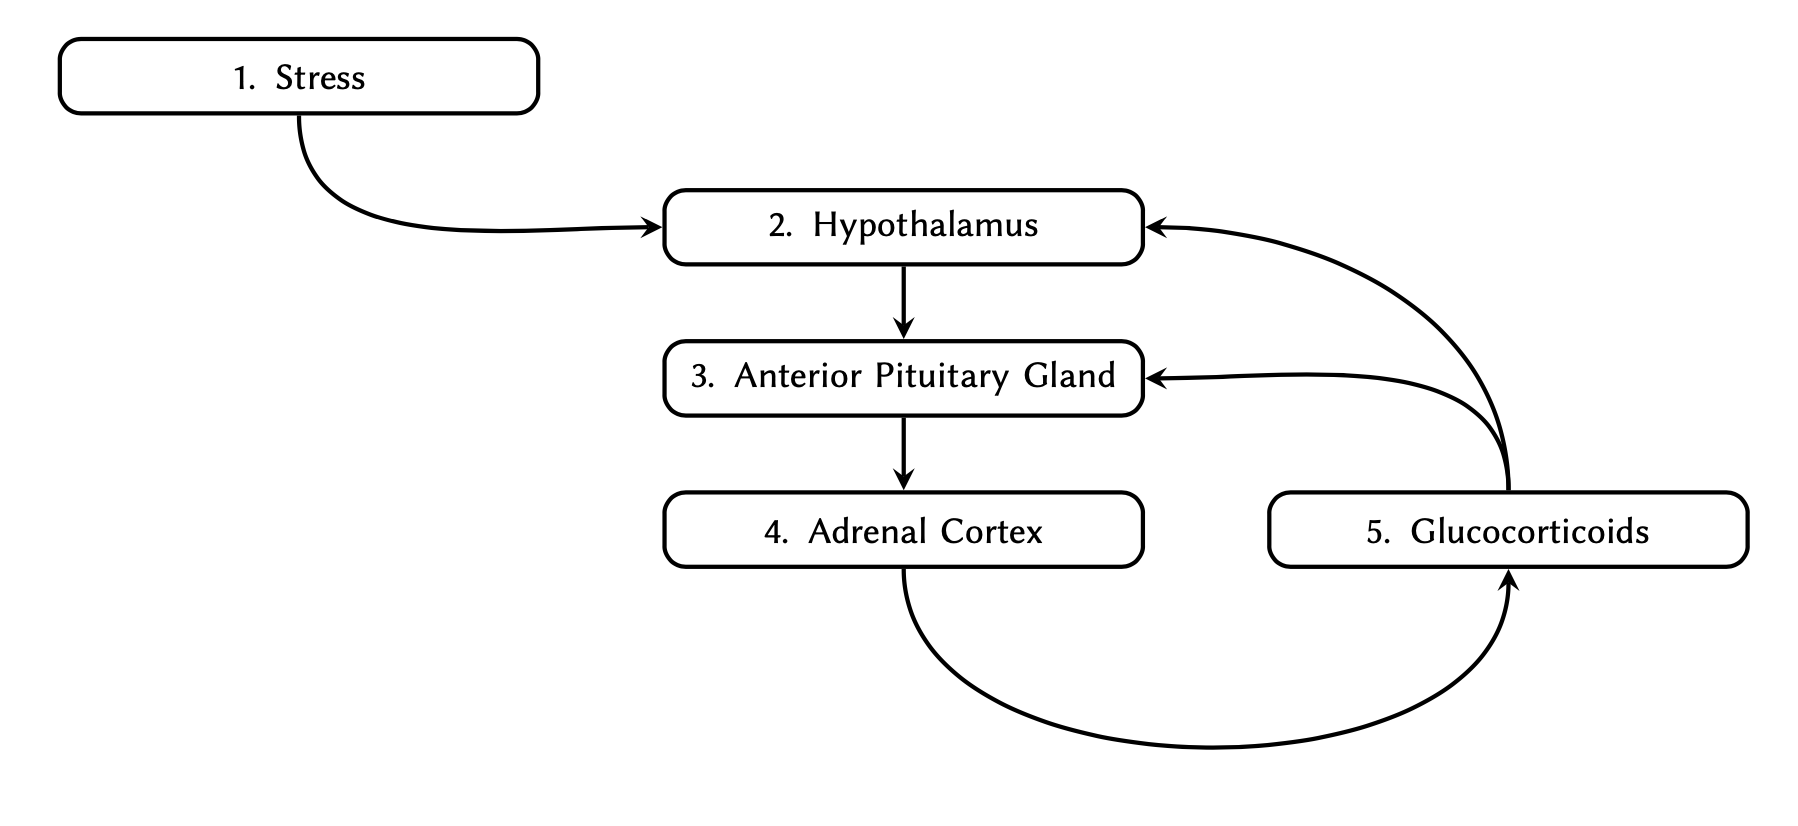
Determine the adjacency matrix and implement it as a two-dimensional array in Python. Display the final array.
Key Points
-
listsandtuplesare 2 types of arrays. - An index is a unique reference to a specific value and Python uses a zero-based indexing system.
-
listsare mutable because their contents can be modified. - slice(), .pop(), .index(), .remove() and .insert() are some of the key functions used in mutable arrays.
-
tuplesare immutable, which means that their contents cannot be modified.
Content from Iterations
Last updated on 2024-08-09 | Edit this page
Download Chapter notebook (ipynb)
Mandatory Lesson Feedback Survey
Overview
Questions
- What do we mean by iterations and loops?
- How are
for-loops implemented? - Can conditional statements be used in iterations?
- What are
while-loops, and how these used?
Objectives
- Understanding the concepts behind iterations and loops.
- Learning the processes involved in
for-loops implementation. - Building conditional statements into loops.
- Understanding the concept of
while-loops, and when to use them.
This chapter assumes that you are familiar with the following
concepts in Python:
Additionally, make sure that you are comfortable with the principles of indexing in arrays before commencing this lesson. It is very important that you have a good understanding of arrays and sequences, because the concept of iteration in programming deals almost exclusively with these subjects.
Note
You can practice everything in this lesson as you have been doing so far. However, if you find it hard to grasp some of the concepts, do not worry. It takes practice. To help you with that, Philip Guo from UC San Diego (Calif., USA) has developed PythonTutor.com - an excellent online tool for learning Python. On that website, write, or paste your code into the editor, and click Visualize Execution. In the new page, use the forward and back buttons to see a step-by-step graphical visualisation of the processes that occur during the execution of your code. Try it on the examples in this section.
The concept
We make use of iterations and loops in programming to perform repetitive operations. A repetitive operation is where one or several defined operations that are repeated multiple times.
For instance, suppose we have a list of 5 numbers as
follows:
numbers = [-3, -2, 5, 0, 12]Now we would like to multiply each number by 2. Based on what we have learned thus far, this is how we would approach this problem:
PYTHON
numbers = [-3, -2, 5, 0, 12]
numbers[0] *= 2
numbers[1] *= 2
numbers[2] *= 2
numbers[3] *= 2
numbers[4] *= 2
print(numbers)OUTPUT
[-6, -4, 10, 0, 24]Whilst this does the job, it is clearly very tedious. Furthermore, if we have an array of several thousand members, this approach quickly becomes infeasible.
The process of multiplying individual members of our array by 2 is a very simple example of a repetitive operations.
Remember
In programming, there is a universally appreciated golden principle known as the DRY rule; and this is what it stands for:
Don’t Repeat Yourself
So if you find yourself doing something again and again, it is fair to assume that there might a better way of getting the results you’re looking for.
Some programmers (with questionable motives) have created WET rule too. Find out more about DRY and WET from Wikipedia.
There are some universal tools for iterations that exist in all programming languages — e.g. for and while-loops. There are also other tools such as vectorisation or generators, that are often unique to one or several specific programming languages.
In this section of the lesson, we will discuss iterations via for and while-loops, and review some real-world examples that may only be addressed using iterative processes.
for-loops
There is evidence that up to 80% of all conventional iterations are implemented as for-loops. Whether or not it is the best choice in of all these cases is subject to opinion. What is important, however, is to learn the difference between the two methods, and feel comfortable with how they work.
Implementation of for-loops in Python is simple compared to other programming languages. It essentially iterates through an existing iterable variable — (such as an array) and retrieves the values from it one by one, from the beginning through to the end.
Remember
In Python, iterable is a term used to refer to a variable that can be iterated through. Any variable type that can be used in a for-loop without any modifications, is therefore considered an iterable.
Most arrays and sequences are iterable. See Table to find out which
native types in Python are iterable. A rule of thumb is that if an array
or a sequence is numerically indexed (e.g. list,
tuple, or str), then it is considered an
iterable.
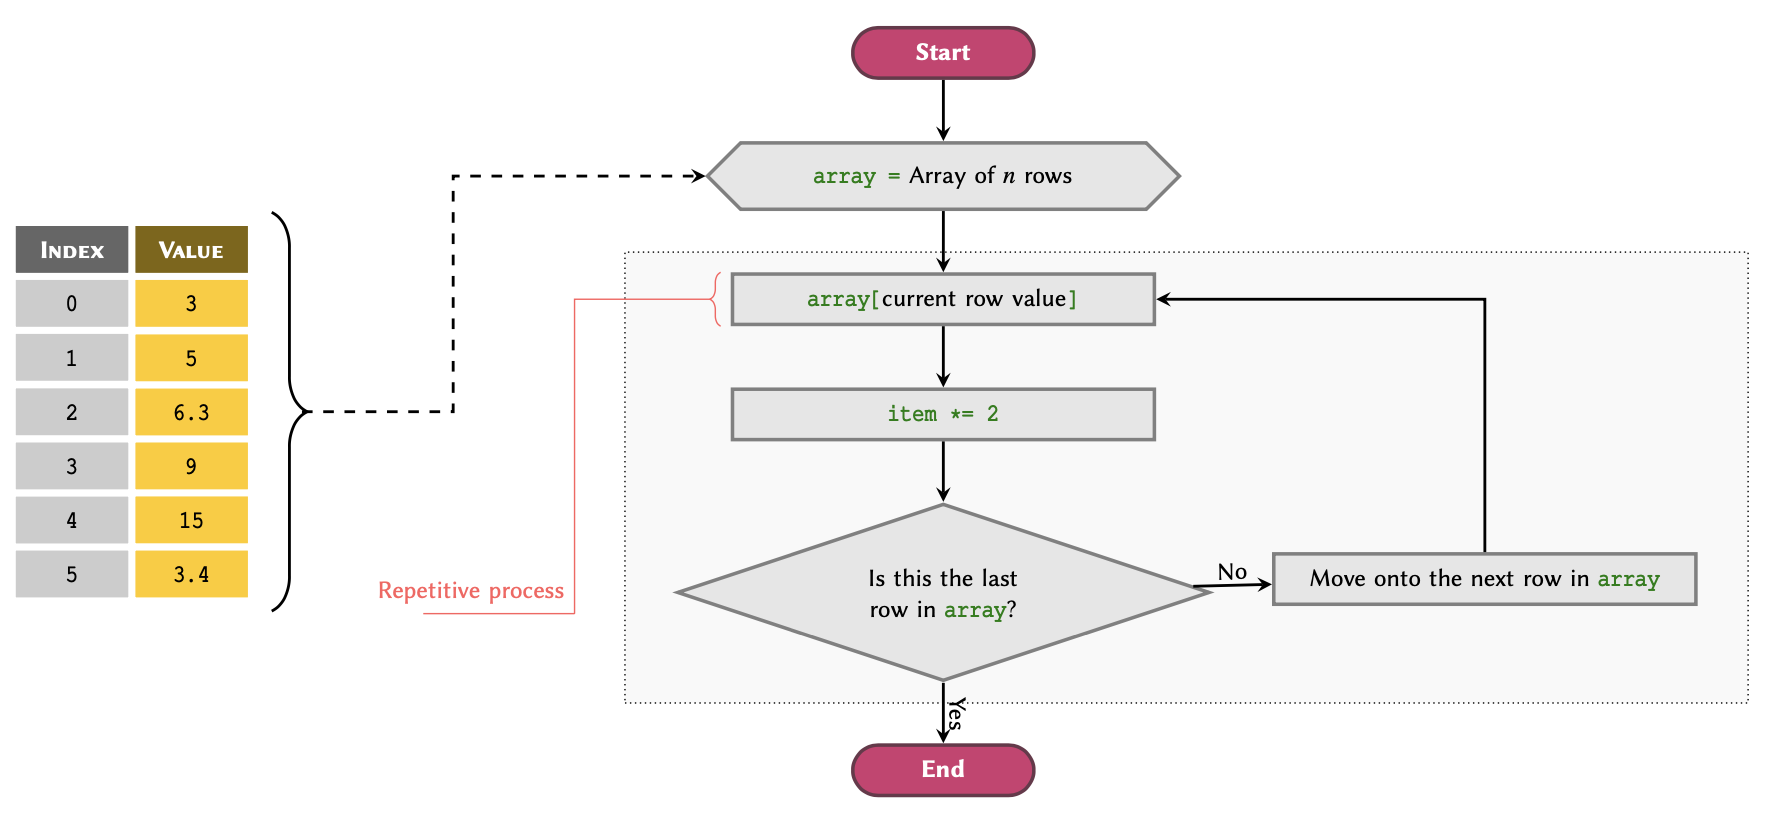
for–loop workflow
applied to a list array.Figure illustrates a flowchart to visualise the workflow of an iterative process using for-loops in Python. The process depicted in the flowchart may be described as follows:
Process
A
for-loop is initialised using an array or a sequence, and begins its process by sequentially going through the values, starting at the array’s first row.Iterative Process: The value of the current row is retrieved and given the alias item, which now represents a single variable within the context of the loop.
-
Repetitive Operation(s): Designated operations are performed using the value of item:
- item *= 2
-
Loop Condition: The for-loop automatically checks whether or not it has reached the last row of the sequence. Depending on the outcome of this check:
- NO (last value not reached): Move onto the next row and repeat the process from step 2.
- YES (last value reached): Exit the loop.
We write this process in Python as follows:
PYTHON
numbers = [3, 5, 6.3, 9, 15, 3.4]
for item in numbers:
item *= 2
# Display the item to see the results:
print(item)OUTPUT
6
10
12.6
18
30
6.8We can see that the result for each iteration is displayed on a new line. Example outlines other such applications and expands on repetitive operations that may be simplified using for-loops.
Advanced Topic
An iterable is a Python variable that contains the built–in method
.__iter__(). Methods starting and ending with two
underscores (dunderscores) are also known as magic methods in
Python. See the official Python
documentations for additional information.
Remember
A for-loop is always initialised as:
for variable_name in an_array:
# An indented block of processes
# we would like to perform on the
# members of our array one by one.
where an_array is an iterable variable, and
variable_name is the name of the variable we temporarily
assign to a member of an_array that corresponds to the
current loop cycle (iteration). The number of loop cycles performed by a
for-loop is equal to the length (number of members) of the
array that we are iterating through, which in this case is called
an_array.
You can think of each iteration cycle as pulling out a row from the table that is our array (as exemplified in the lesson on arrays) and temporarily assigning its corresponding value to a variable until the next iteration cycle.
See subsection List Members to find the length of an array.
PYTHON
for sequence in peptides:
length = len(sequence)
index = peptides.index(sequence)
print('Peptide', sequence, 'at index', index, 'contains', length, 'amino acids.')OUTPUT
Peptide GYSAR at index 0 contains 5 amino acids.
Peptide HILNEKRILQAID at index 1 contains 13 amino acids.
Peptide DNSYLY at index 2 contains 6 amino acids.Extended example of iterations using
for-loops
When using a for-loop, we can also reference other variables that have already been defined outside of the loop block:
PYTHON
numbers = [3, 5, 6.3, 9, 15, 3.4]
counter = 0
for item in numbers:
item *= 2
# Display the item to see the results:
print('Iteration number', counter, ':', item)
counter += 1OUTPUT
Iteration number 0 : 6
Iteration number 1 : 10
Iteration number 2 : 12.6
Iteration number 3 : 18
Iteration number 4 : 30
Iteration number 5 : 6.8It is also possible to define new variables inside the loop, but remember that the value of any variables defined inside a loop is reset with each iteration cycle:
PYTHON
numbers = [3, 5, 6.3, 9, 15, 3.4]
counter = 0
for item in numbers:
new_value = item * 2
# Display the item to see the results:
print('Iteration number', counter, ':', item, '* 2 =', new_value)
counter += 1OUTPUT
Iteration number 0 : 3 * 2 = 6
Iteration number 1 : 5 * 2 = 10
Iteration number 2 : 6.3 * 2 = 12.6
Iteration number 3 : 9 * 2 = 18
Iteration number 4 : 15 * 2 = 30
Iteration number 5 : 3.4 * 2 = 6.8Retaining the new values
It is nice to be able to manipulate and display the values of an array but in the majority of cases, we need to retain the new values and use them later.
In such cases, we have two options:
- Create a new array to store our values.
- Replace the existing values with the new ones by overwriting them in the same array.
Creating a new array to store our values is very easy. We must firstly
create a new list and add values to it with each iteration.
In other words, we start off by creating an empty list; to
which we then iteratively add members using the .append()
method inside our for-loop. The process of creating a new
list and using the .append() method to values to
an existing list are discussed in Useful
Methods and mutability,
respectively.
PYTHON
numbers = [-4, 0, 0.3, 5]
new_numbers = list()
for value in numbers:
squared = value ** 2
new_numbers.append(squared)
print('numbers:', numbers)OUTPUT
numbers: [-4, 0, 0.3, 5]OUTPUT
new_numbers: [16, 0, 0.09, 25]The replacement method uses a slightly different approach. Essentially, what we are trying to achieve is:
- Read the value of an item in an array;
- Manipulate the value via operations;
- Return the value back into the original array through item assignment, thereby replacing the existing value.
We learned about modifying an existing value in a list in
our discussion of mutability, where we
discussed the concept of item assignment. The process of
replacing the original values of an array in a for-loop is
identical. An important point to be aware of, however, is that we make
use of the correct index for the specific item in the array
that we are trying to modify. Additionally, don’t forget that item
assignment is only possible in mutable arrays such as
list. See Table to see which types
of array are mutable in Python.
To perform item assignment; we can use a variable to represent the current iteration cycle in our for-loop. We do so by initialising the variable with a value of 0, and adding 1 to its value at the end of each cycle. We can then use that variable as an index in each iteration cycle:
PYTHON
numbers = [-4, 0, 0.5, 5]
# Variable representing the
# index (iteration cycle):
index = 0
for value in numbers:
new_value = value ** 5
# Putting it back into
# the original array:
numbers[index] = new_value
# Adding one to the index for
# the next iteration cycle:
index += 1
print(numbers)OUTPUT
[-1024, 0, 0.03125, 3125]Advanced Topic
The enumerate() function actually returns a
generator of tuple items each time it is called in
the context of a for-loop. A generator is, in principle,
similar to a normal array; however, unlike an array, the values of a
generator are not evaluated by the computer until the exact time at
which they are going to be used. This is an important technique in
functional programming known as lazy evaluation. It is
primarily utilised to reduce the workload on the computer (both the
processor and the memory) by preventing the execution of processes that
could otherwise be delayed to a later time. In the case of the
enumerate() function, the values are evaluated at the
beginning of each iteration cycle in a for-loop. Learn more
about lazy evaluation in Wikipedia or
read more on generators in Python in the official
documentations.
This is a perfectly valid approach and it is used in many programming languages. However, Python makes this process even easier by introducing the function enumerate(). We often use this function at the initiation of a for-loop. The function takes an array as an input and as the name suggests, enumerates them; thereby simplifying the indexing process. The previous example may, therefore, be written more concisely in Python, as follows:
PYTHON
numbers = [-4, 0, 0.5, 5]
for index, value in enumerate(numbers):
# Manipulating the value:
new_value = value ** 5
numbers[index] = new_value
print(numbers)OUTPUT
[-1024, 0, 0.03125, 3125]for-loop and conditional statements
We can use conditional statements within for-loops to account for and handle different situations.
Suppose we want to find the smallest value (the minimum) within a
list of numbers using a for-loop. The workflow
of this process is displayed as a flowchart diagram in figure below.
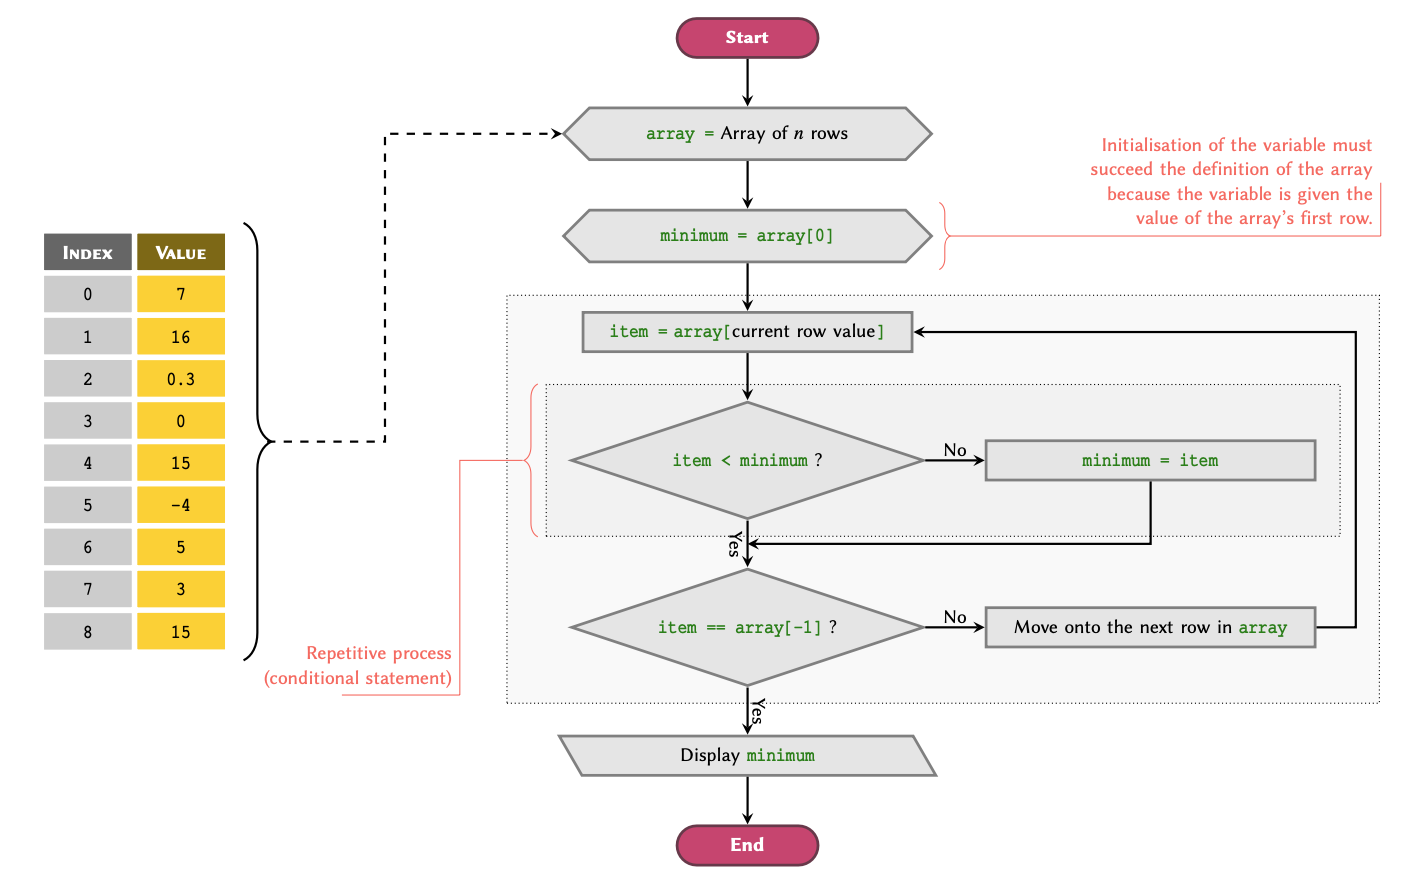
Given an array, we can break down the problem as follows:
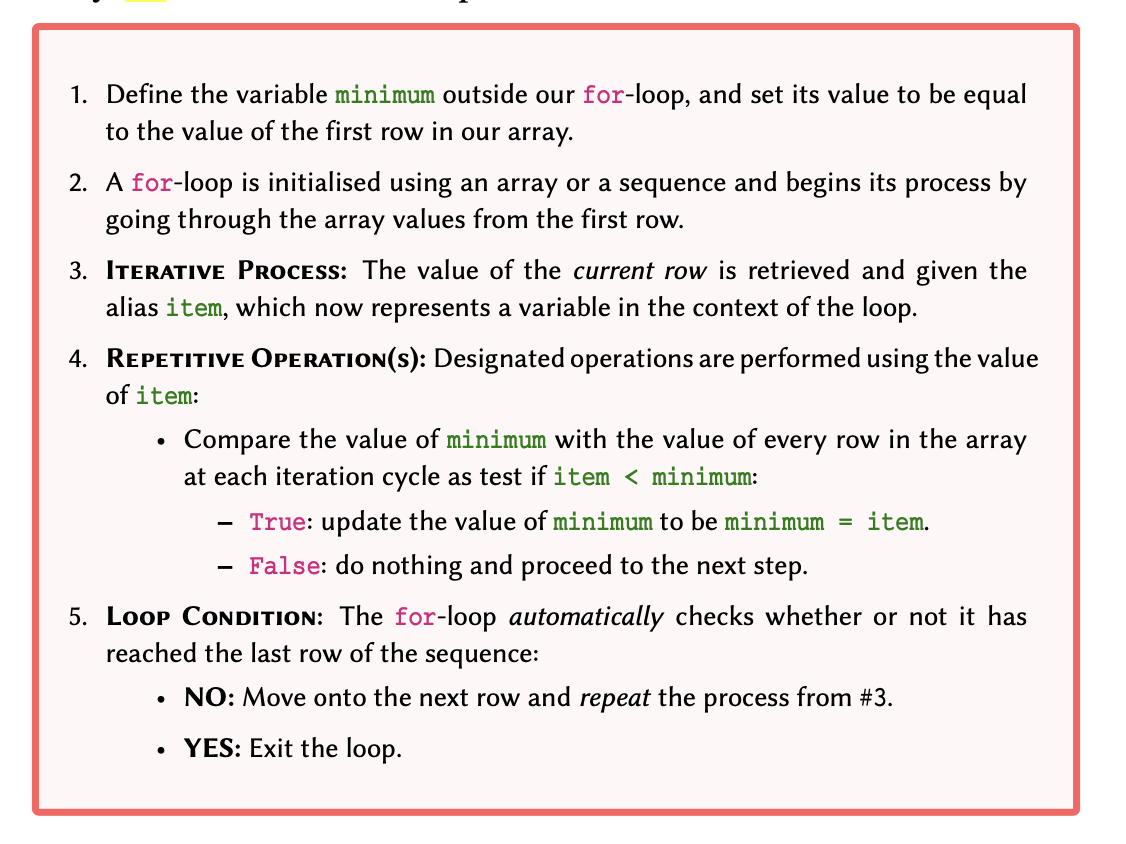
Finally, we can implement the process displayed in figure as follows:
PYTHON
numbers = [7, 16, 0.3, 0, 15, -4, 5, 3, 15]
minimum = numbers[0]
for value in numbers:
if value < minimum:
minimum = value
print('The minimum value is:', minimum)OUTPUT
The minimum value is: -4Practice Exercise 5
Given:
PYTHON
peptides = [
'FAEKE',
'CDYSK',
'ATAMGNAPAKKDT',
'YSFQW',
'KRFGNLR',
'EKKVEAPF',
'GMGSFGRVML',
'YSFQMGSFGRW',
'YSFQMGSFGRW'
]Using a for-loop and a conditional statement, find and
display the sequences in peptides that contain the amino
acid serine (S) in the
following format:
Found S in XXXXX.Sequence of numbers in for-loops
In order to produce a sequence of int numbers for use in a
for-loop, we can use the built-in range()
function. The function takes in three positional arguments representing
start, stop, and step. Note that
range() is only capable of producing a sequence of
integer numbers.
Remember
The range() function does not create the sequence of numbers immediately. Rather, it behaves in a similar way to the enumerate() function does (as a generator).
Displaying the output of the range() function is not an array of numbers, as you might expect:
OUTPUT
range(0, 10, 2)It is, however, possible to evaluate the values outside of a
for-loop. To do so, we need to convert the output of the
function to list or a tuple:
OUTPUT
[0, 2, 4, 6, 8]Remember
The range() function is non-inclusive. That is, it
creates a sequence that starts from and includes the value given as the
start argument, up to but excluding the value of the
end argument. For instance, range(1, 5, 1) creates
a sequence starting from 1, which is then incremented
1 step at a time right up
to 5, resulting in a
sequence that includes the following numbers: 1, 2, 3, 4
Example: Sequence comparison, dot plots and
for loops
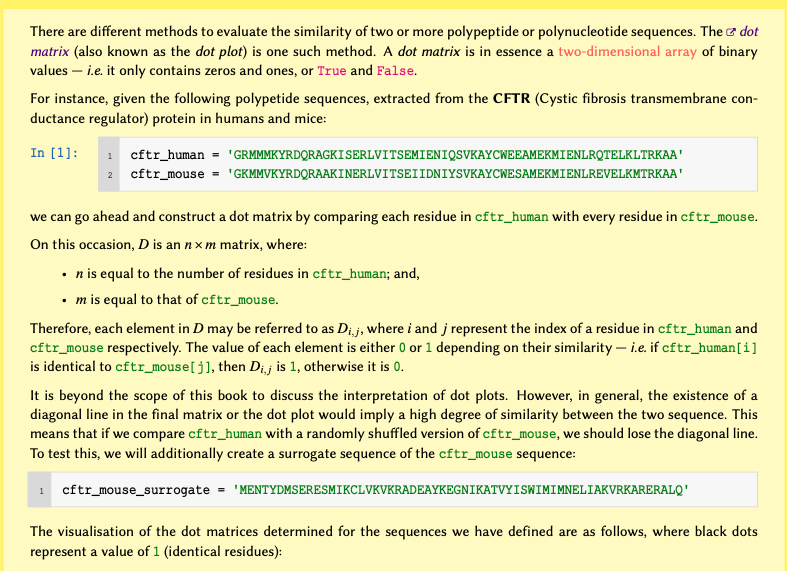
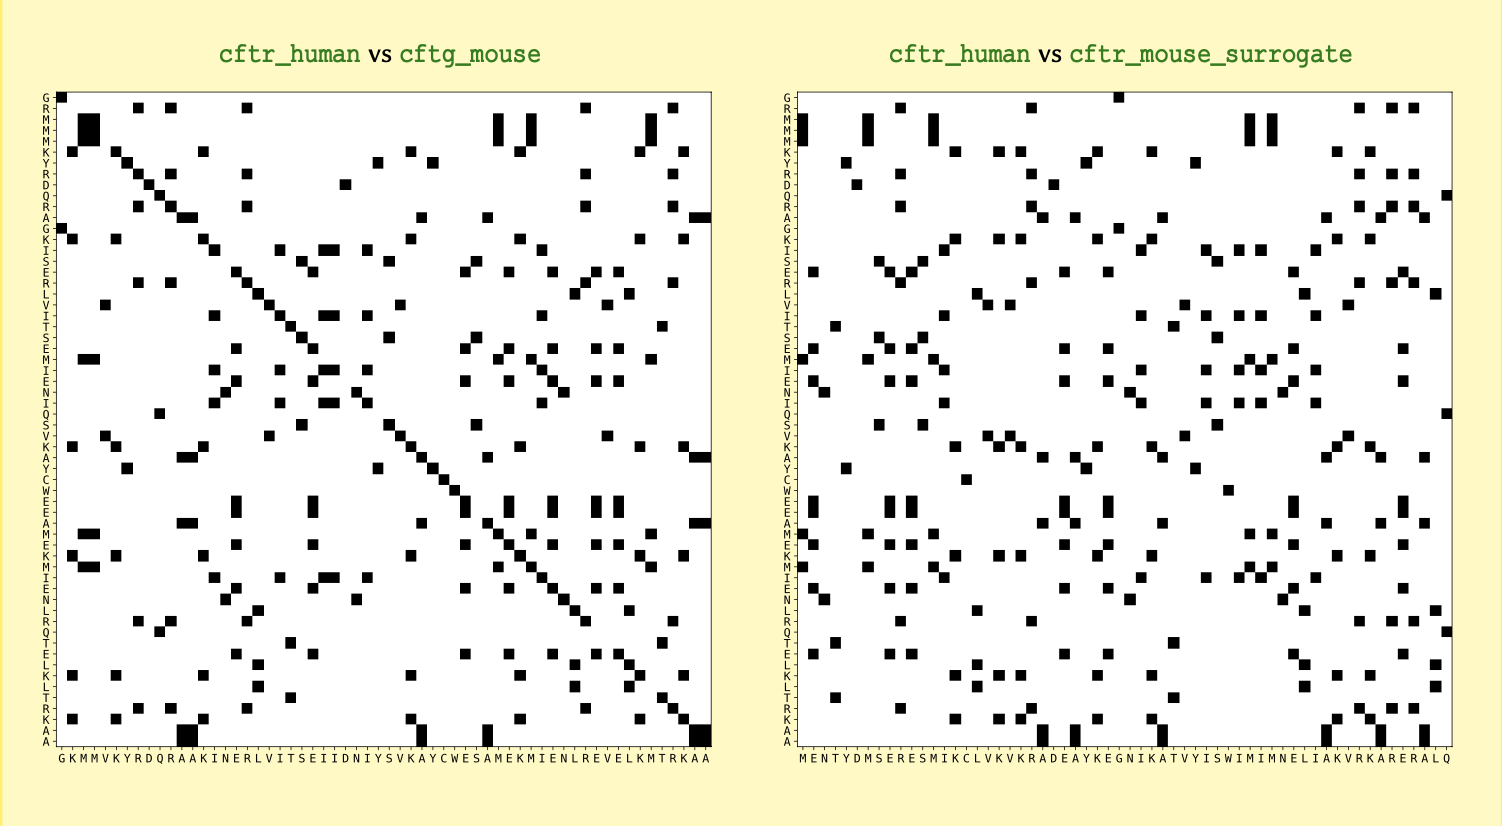
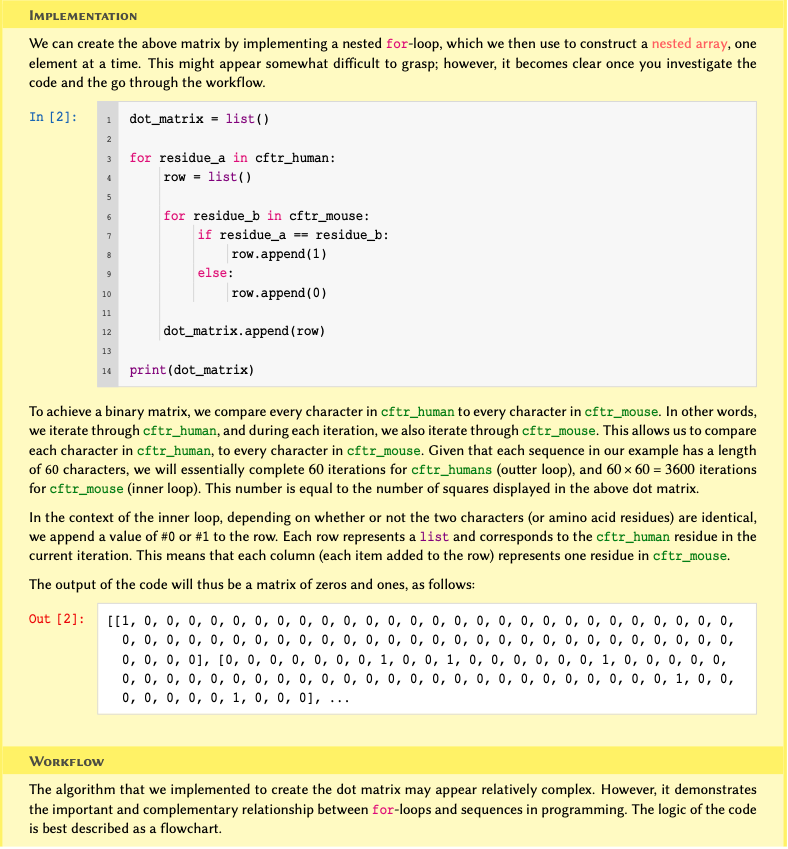
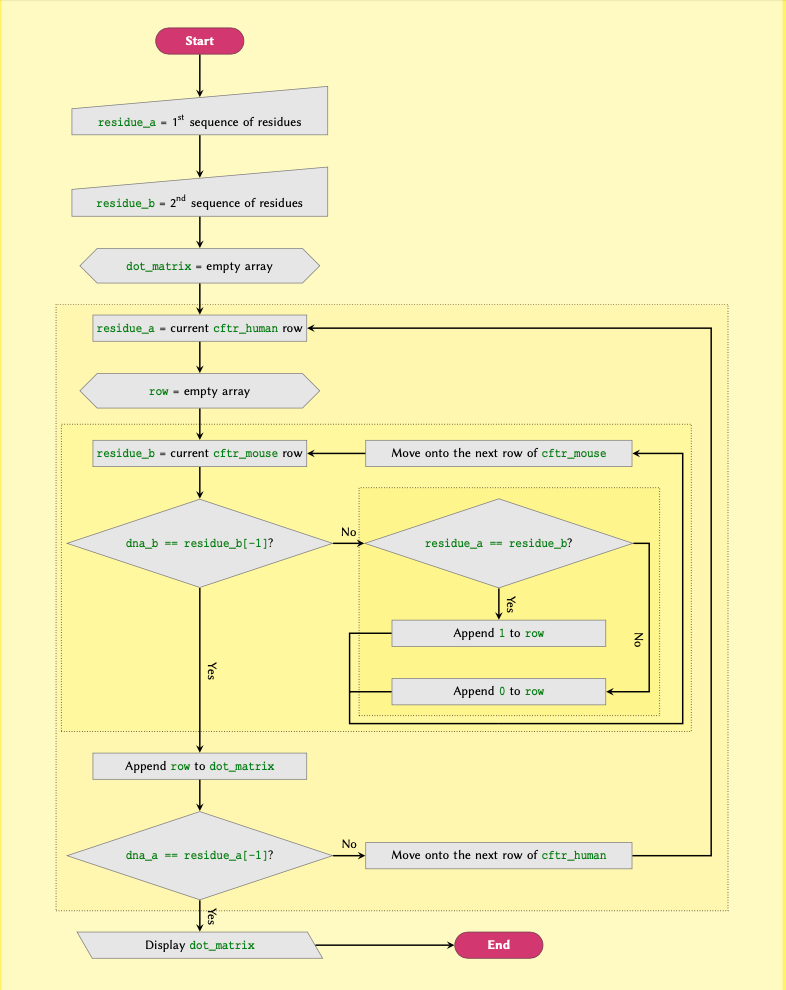
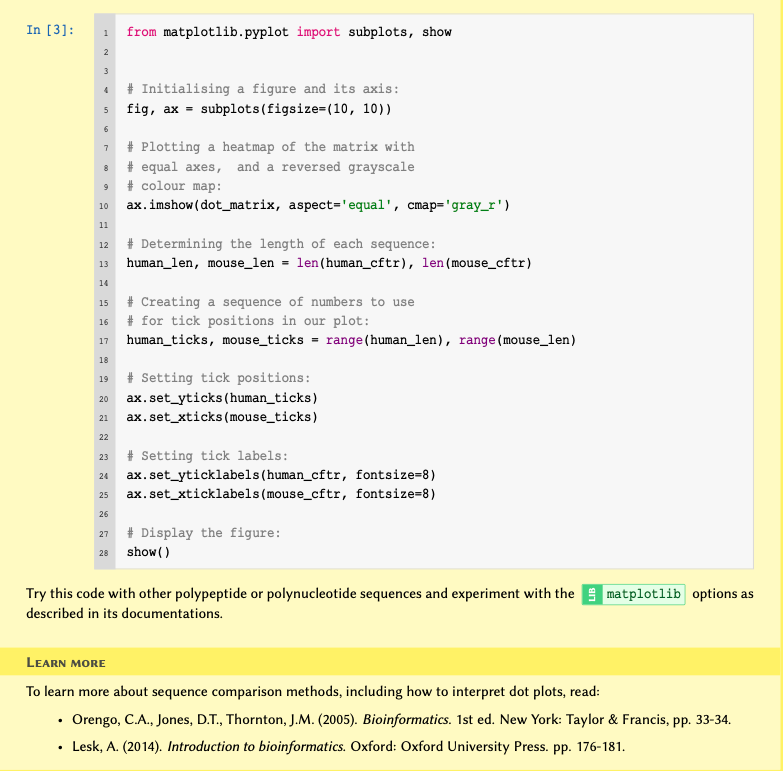
while-loops
In our discussion of for loop mediated iterations above, we
learned that they are exclusively applied to iterable objects —
such as arrays and sequences. This is because, as demonstrated in workflow figure, at the end of each iteration, the
implicit termination condition that is inherent in the process
tests whether or not the end of the sequence being iterating through,
has been reached.
It may, however, be deemed necessary to apply iterative processes based
on conditions other than those embedded within the
for-loop. In such cases, we use a different class of
iterations known as a while-loop.
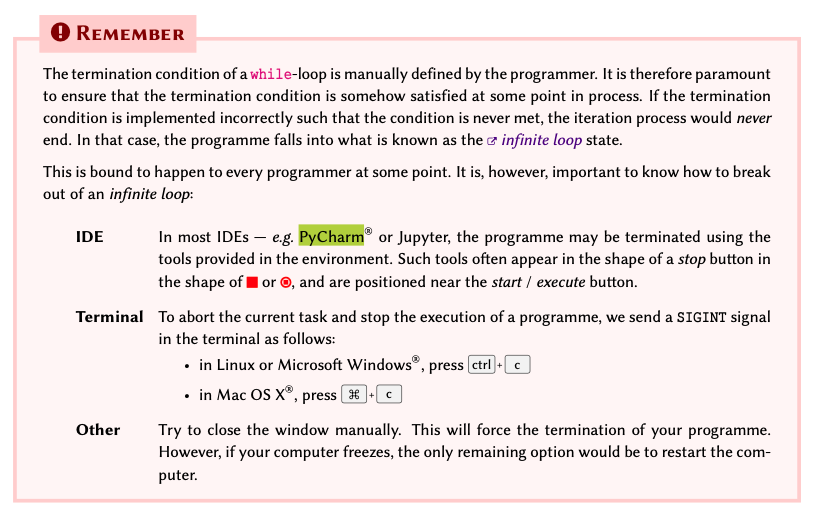
Consider the following:
We want to ask a user to enter a sequence of exactly five amino acids in single-letter code. If the provided sequence is more or less than five letters long, we would like to display a message and ask them to try again; otherwise, we will display the process and terminate the program.
It is impossible to write such a process using a for-loop.
This is because when we initialise the iteration process in a
for-loop, the number of loops we need is unknown. In other
words, we simply do not know how many times the user would need enter
said sequence before they get it right.
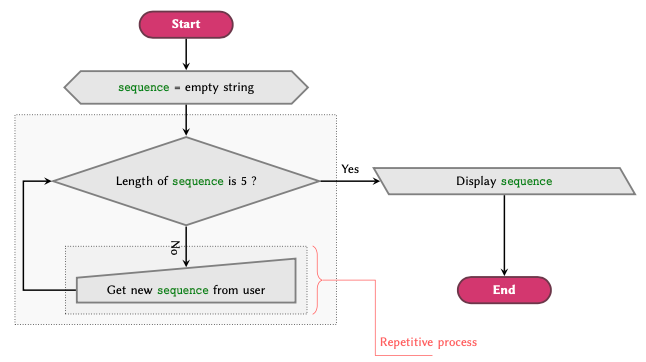
To simplify the understanding of the concept, we can visualise the process in a flowchart, as displayed in figure. In this flowchart, you can see that the only way to exit the loop is to enter a sequence of exactly five characters. Doing anything else — such as entering a different number of letters – is equivalent to going back to the beginning of the loop. The process may be described verbally as follows:
Initialise the variable sequence and assign an empty string to it.
-
While the length of sequence is not equal to 5:
- Ask the user to enter a new sequence.
- Go back to step #2.
Display the value of sequence.
Implementation
We instantiate while-loop using the while
syntax, immediately followed by the loop condition.
We can now implement the process displayed in figure as follows:
sequence = str()
while len(sequence) != 5:
sequence = input('Enter a sequence of exactly 5 amino acids: ')
print(sequence)When executed, the above code will prompt the user to enter a value:
Enter a sequence of exactly 5 amino acids: GCGLLY
Enter a sequence of exactly 5 amino acids: GCGL
Enter a sequence of exactly 5 amino acids: GC
Enter a sequence of exactly 5 amino acids: GCGLL
GCGLLAs expected, the user is repetitively asked to enter a five-character sequence until they supply the correct number of letters.
Practice Exercise 6
-
Write a script which prompts the user to enter a number, then:
- If the second power of the number is smaller than 10, repeat the process and ask again;
- If the second power of the number is equal or greater than 10, display the original value and terminate the program.
- We learned in subsection Sequence of Numbers that the built-in function range() may be utilised to produce a sequence of integer numbers. The function takes 3 input arguments in the following order: stop, start, step.
We now need a sequence of floating-point numbers with the following criteria:
stop = 10
start = 0
step = 0.5
The use of a floating-point number as step means that we cannot use
range() to create the desired sequence. Write a script in
which you use a while-loop to produce a sequence of
floating-point numbers with the above criteria and display the result.
The resulting sequence must be:
- Presented as an instance of type
list; - Similar to range(), the sequence must be non-inclusive — i.e. it must include the value of start, but not that of stop.
value = 0
while value ** 2 < 10:
response = input('Enter a number: ')
value = float(response)
print(value)Breaking a while-loop
Unlike for-loops, it is common to break out of
a while-loop, mid-process. This is also known as
premature termination.
To consider a situation that may necessitate such an approach, we shall modify our scenario as follows:
We want to ask the user to enter a sequence of exactly five amino acids. If the sequence the user provides is more or less than five letters long, we would like to display a message and ask them to try again; otherwise, we will display the sequence and terminate the program. Additionally, the loop should be terminated: - upon three failed attempts; or, - if the user enters the word exit instead of a five-character sequence.
In the former case, however, we would also like to display a message and inform the user that we are terminating the programme because of three failed attempts.
To implement the first addition to our code, we will have to make the following alterations in our code:
Define a variable to hold the iteration cycle, then test its value at the beginning of each cycle to ensure that it is below the designated threshold. Otherwise, we manually terminate the loop using the break syntax.
Create a conjunctive conditional statement for the
while-loop to make, so that it is also sensitive to our exit keyword.
sequence = str()
counter = 1
max_counter = 3
exit_keyword = 'exit'
while len(sequence) != 5 and sequence != exit_keyword:
if counter == max_counter:
sequence = "Three failed attempt - I'm done."
break
sequence = input('Enter a sequence of exactly 5 amino acids or [exit]: ')
counter += 1
print(sequence)Exercises
End of chapter Exercises
- Can you explain the reason why, in the example given in subsection for-loop and conditional statements we set minimum to be equal to the first value of our array instead of, for instance, zero or some other number?
Store your answer in a variable and display it using print().
- Write a script that using a for-loop, calculates the sum of all numbers in an array defined as follows:
numbers = [0, -2.1, 1.5, 3]and display the result as:
Sum of the numbers in the array is 2.4- Given an array of integer values as:
numbers = [2, 1, 3]write a script using for-loops, and display each number in the list as many times as the number itself. The program must therefore display ‘2’ twice, ‘1’ once, and ‘3’ three times.
- Given a
listof numbers defined as:
numbers = [7, 16, 0.3, 0, 15, -4, 5, 3, 15]write a script that using (at most) two for-loops, finds the variance of the numbers, and display the mean, and the variance. Note that you will need to calculate the mean as a part of your calculations to find the variance.
The equation for calculating variance is:
\[\sigma^2 = \frac{\sum^{n}_{i=1}(x_i - \mu)^2}{n}\]
Hint: Breaking down the problem into smaller pieces will simplify the process of translating it into code and thereby solving it:
Work out the Mean or \(\mu\) (the simple average of the numbers): \[ \mu = \frac{\sum^{n}_{i=1} x_i}{n}\]
Calculate the sum of: each number (\(x_i\)) subtracted by the Mean (\(\mu\)) and square the result.
Divide the resulting number by the length of number.
Display the results in the following format:
Mean: XXXX
Variance: XXXXKey Points
- Iterations and loops are used to perform repetitive operations.
- Implementation of
for-loops involves four steps. - Conditional statements are used within loops to handle different situations.
-
while-loops are most suitable when an exact number of conditions/iterations is unknown.
Content from Dictionaries
Last updated on 2024-08-24 | Edit this page
Download Chapter notebook (ipynb)
Mandatory Lesson Feedback Survey
Overview
Questions
- What is a dictionary, in Python?
- What are the ways to interact with a dictionary?
- Can a dictionary be nested?
Objectives
- Understanding the structure of a dictionary.
- Accessing data from a dictionary.
- Applying nested dictionaries to deal with complex data.
This chapter assumes that you are familiar with the following concepts in Python:
Prerequisite
Dictionary
StackOverflow python-3.x dictionaries
Dictionaries are one of the most valuable in-build tools in Python, and are characterised by being able to associate a set of values with a number of keys.
Think of a paperback dictionary, where we have a range of words together with their definitions. The words are the keys, and the definitions are the values that are associated with those keys. A Python dictionary works in the same way.
Consider the following scenario:
Suppose we have a number of protein kinases, and we would like to associate them with their descriptions for future reference.
This is an example of association in arrays. We may visualise this problem as displayed in Figure.
 One way to associate the proteins with their definitions would be to
make use of nested arrays, as covered in Basic Python 2. However, this
would make it difficult to retrieve the values at a later point in time.
This is because in order to retrieve these values, we would need to know
the numerical index at which a given protein is stored, and the level
it’s stored at.
One way to associate the proteins with their definitions would be to
make use of nested arrays, as covered in Basic Python 2. However, this
would make it difficult to retrieve the values at a later point in time.
This is because in order to retrieve these values, we would need to know
the numerical index at which a given protein is stored, and the level
it’s stored at.
As an alternative to using normal arrays in such cases, we can make
use of associative arrays. The most common method for
constructing an associative array in Python is to create dictionaries or
dict.
Remember
To implement a dict in Python, we place our entries
within curly brackets, separated using a comma. We
separate keys and values using a colon — e.g. {‘key’: ‘value’}. The combination of
dictionary key and its associated value is referred to
as a dictionary item.
Note
When constructing a long dict with several
items that span over several lines, it is not necessary to
write one item per line, nor to use indentations for each
item or line. All we need to do is to write key-value pairs as
{‘key’: ‘value’} in curly brackets, and
separate each pair using a comma. However, it is good practice to write
one item per line and use indentations as it makes it
considerably easier to read the code and understand the hierarchy.
We can therefore implement the diagram displayed in Figure in Python as follows:
PYTHON
protein_kinases = {
'PKA': 'Involved in regulation of glycogen, sugar, and lipid metabolism.',
'PKC': 'Regulates signal transduction pathways such as the Wnt pathway.',
'CK1': 'Controls the function of other proteins through phosphorylation.'
}
print(protein_kinases)OUTPUT
{'PKA': 'Involved in regulation of glycogen, sugar, and lipid metabolism.', 'PKC': 'Regulates signal transduction pathways such as the Wnt pathway.', 'CK1': 'Controls the function of other proteins through phosphorylation.'}OUTPUT
<class 'dict'>Practice Exercise 1
Use the Universal Protein Resource (UniProt) database to find the following human proteins:
- Axin-1
- Rhodopsin
Construct a dictionary for these proteins and the number amino acids within each of them. The keys should represent the name of the protein. Display the result.
Now that we have created a dictionary; we can test whether or not a specific key exists our dictionary:
OUTPUT
TrueOUTPUT
FalsePractice Exercise 2
Using the dictionary you created in Practice Exercise 1, test to determine whether or not a protein called ERK exists as a key in your dictionary. Display the result as a Boolean value.
Interacting with a dictionary
In programming, we have already learned that the more explicit our code is, the better it is. Interacting with dictionaries in Python is very easy, coherent and explicit. This makes them a powerful tool that we can exploit for different purposes.
In arrays, specifically in list and tuple,
we routinely use indexing techniques to
retrieve values. In dictionaries, however, we use keys
to do that. Because we can define the keys of a dictionary
ourselves, we no longer have to rely exclusively on numeric indices.
As a result, we can retrieve the values of a dictionary using their respective keys as follows:
OUTPUT
Controls the function of other proteins through phosphorylation.However, if we attempt to retrieve the value for a
key that does not exist in our dict, a
KeyError will be raised:
OUTPUT
FalseOUTPUT
KeyError: 'GSK3'Practice Exercise 3
Implement a dict to represent the following set of
information:
Cystic Fibrosis:
| Full Name | Gene | Type |
|---|---|---|
| Cystic fibrosis transmembrane conductance regulator | CFTR | Membrane Protein |
Using the dictionary you implemented, retrieve and display the gene associated with cystic fibrosis.
Remember
Whilst the values in a dict can be of virtually
any type supported in Python, the keys may only be defined
using immutable types.
To find out which types are immutable, see Table. Additionally, the keys in a dictionary must be unique.
If we attempt to construct a dict using a mutable value
as key, a TypeError will be raised.
For instance, list is a mutable type and therefore
cannot be used as a key:
OUTPUT
TypeError: unhashable type: 'list'But we can use any immutable type as a key:
OUTPUT
{'ab': 'some value'}OUTPUT
{('a', 'b'): 'some value'}If we define a key more than once, the Python interpreter
constructs the entry in dict using the last defined
instance of that key.
In the following example, we repeat the key ‘pathway’ twice; and as expected, the interpreter only uses the last instance, which in this case represents the value ‘Canonical’:
PYTHON
signal = {
'name': 'Wnt',
'pathway': 'Non-Canonical', # first instance
'pathway': 'Canonical' # second instance
}
print(signal)OUTPUT
{'name': 'Wnt', 'pathway': 'Canonical'}Mutability
Like lists, dictionaries are mutable. This means that we can alter the contents of a dictionary, after it has been instantiated. We can make any alterations to a dictionary as long as we use immutable values for the keys.
Suppose we have a dictionary stored in a variable called
protein, holding some information about a specific
protein:
PYTHON
protein = {
'full name': 'Cystic fibrosis transmembrane conductance regulator',
'alias': 'CFTR',
'gene': 'CFTR',
'type': 'Membrane Protein',
'common mutations': ['Delta-F508', 'G542X', 'G551D', 'N1303K']
}We can add new items to our dictionary or alter the existing ones:
OUTPUT
{'full name': 'Cystic fibrosis transmembrane conductance regulator', 'alias': 'CFTR', 'gene': 'CFTR', 'type': 'Membrane Protein', 'common mutations': ['Delta-F508', 'G542X', 'G551D', 'N1303K'], 'chromosome': 7}
7We can also alter an existing value in a dictionary using
its key. To do so, we simply access the value using
its key, and treat it as a normal variable; the same way we
would treat members of a list:
OUTPUT
['Delta-F508', 'G542X', 'G551D', 'N1303K']OUTPUT
{'full name': 'Cystic fibrosis transmembrane conductance regulator', 'alias': 'CFTR', 'gene': 'CFTR', 'type': 'Membrane Protein', 'common mutations': ['Delta-F508', 'G542X', 'G551D', 'N1303K', 'W1282X'], 'chromosome': 7}Practice Exercise 4
Implement the following dictionary:
signal = {'name': 'Wnt', 'pathway': 'Non-Canonical'}}
with respect to signal:
- Correct the value of pathway to “Canonical”;
- Add a new item to the dictionary to represent the receptors for the canonical pathway as “Frizzled” and “LRP”.
Display the altered dictionary as the final result.
Advanced Topic
Displaying an entire dictionary using the print() function
can look a little messy because it is not properly structured. There is,
however, an external library called pprint (Pretty-Print)
that behaves in very similar way to the default print()
function, but structures dictionaries and other arrays in a more
presentable way before displaying them. We do not elaborate on
Pretty-Print in this course, but it is a part of Python’s default
library, and is therefore installed with Python automatically. To learn
more about it, have a read through the official
documentation for the library and review the examples.
Because a dictionary’s keys are immutable, they cannot be altered. However, we can get around this limitation in the following manner. It is possible to introduce a new key and assigning the values of the old key to this new key. Once we have done this, we can go ahead and remove the old item. The easiest way to remove an item from a dictionary is to use the syntax del:
PYTHON
# Creating a new key and assigning to it the
# values of the old key:
protein['human chromosome'] = protein['chromosome']
print(protein)OUTPUT
{'full name': 'Cystic fibrosis transmembrane conductance regulator', 'alias': 'CFTR', 'gene': 'CFTR', 'type': 'Membrane Protein', 'common mutations': ['Delta-F508', 'G542X', 'G551D', 'N1303K', 'W1282X'], 'chromosome': 7, 'human chromosome': 7}OUTPUT
{'full name': 'Cystic fibrosis transmembrane conductance regulator', 'alias': 'CFTR', 'gene': 'CFTR', 'type': 'Membrane Protein', 'common mutations': ['Delta-F508', 'G542X', 'G551D', 'N1303K', 'W1282X'], 'human chromosome': 7}We can simplify the above operation using the .pop() method, which removes the specified key from a dictionary and returns any values associated with it:
OUTPUT
{'full name': 'Cystic fibrosis transmembrane conductance regulator', 'alias': 'CFTR', 'gene': 'CFTR', 'type': 'Membrane Protein', 'human chromosome': 7, 'common mutations in caucasians': ['Delta-F508', 'G542X', 'G551D', 'N1303K', 'W1282X']}Practice Exercise 5
Implement a dictionary as:
with respect to signal:
Change the key name from ‘pdb’ to ‘pdb id’ using the .pop() method.
-
Write a code to find out whether the dictionary:
- contains the new key (i.e. ‘pdb id’).
- confirm that it no longer contains the old key (i.e. ‘pdb’)
If both conditions are met, display:
Contains the new key, but not the old one.Otherwise:
Failed to alter the dictionary.Nested dictionaries
As explained earlier the section, dictionaries are among the most powerful built-in tools in Python. As we have previously done with arrays, it is also possible to construct nested dictionaries in order to organise data in a hierarchical fashion. This useful technique is outlined extensively in example.
It is very easy to implement nested dictionaries:
PYTHON
# Parent dictionary
pkc_family = {
# Child dictionary A:
'conventional': {
'note': 'Require DAG, Ca2+, and phospholipid for activation.',
'types': ['alpha', 'beta-1', 'beta-2', 'gamma']
},
# Child dictionary B:
'atypical': {
'note': (
'Require neither Ca2+ nor DAG for'
'activation (require phosphatidyl serine).'
),
'types': ['iota', 'zeta']
}
}and we follow similar principles to access, alter or remove the values stored in nested dictionaries:
OUTPUT
{'conventional': {'note': 'Require DAG, Ca2+, and phospholipid for activation.', 'types': ['alpha', 'beta-1', 'beta-2', 'gamma']}, 'atypical': {'note': 'Require neither Ca2+ nor DAG foractivation (require phosphatidyl serine).', 'types': ['iota', 'zeta']}}OUTPUT
{'note': 'Require neither Ca2+ nor DAG foractivation (require phosphatidyl serine).', 'types': ['iota', 'zeta']}OUTPUT
Require DAG, Ca2+, and phospholipid for activation.OUTPUT
['alpha', 'beta-1', 'beta-2', 'gamma']OUTPUT
beta-2OUTPUT
beta-1Practice Exercise 6
Implement the following table of genetic disorders as a nested dictionary:
| Full Name | Gene | Type | |
|---|---|---|---|
| Cystic fibrosis | Cystic fibrosis transmembrane conductance regulator | CFTR | Membrane Protein |
| Xeroderma pigmentosum A | DNA repair protein complementing XP-A cells | XPA | Nucleotide excision repair |
| Haemophilia A | Haemophilia A | F8 | Factor VIII Blood-clotting protein |
Using the dictionary, display the gene for Haemophilia A.
PYTHON
genetic_diseases = {
'Cystic fibrosis': {
'name': 'Cystic fibrosis transmembrane conductance regulator',
'gene': 'CFTR',
'type': 'Membrane Protein'
},
'Xeroderma pigmentosum A': {
'name': 'DNA repair protein complementing XP-A cells',
'gene': 'XPA',
'type': 'Nucleotide excision repair'
},
'Haemophilia A': {
'name': 'Haemophilia A',
'gene': 'F8',
'type': 'Factor VIII Blood-clotting protein'
}
}
print(genetic_diseases['Haemophilia A']['gene'])OUTPUT
F8EXAMPLE: Nested dictionaries in practice
We would like to store and analyse the structure of several proteins
involved in the Lac operon - a commonly-studied operon
fundamental to the metabolism and transport of lactose in many species
of enteric bacteria. To do so, let’s create a Python dict
to help us organise our data.
Let’s begin by creating an empty dictionary to store our structures:
We then move on to depositing our individual entries to structures by adding new items to it.
Each item has a key that represents the name of the protein we are depositing, and a value that is itself a dictionary consisting of information regarding the structure of that protein:
PYTHON
structures['Beta-Galactosidase'] = {
'pdb id': '4V40',
'deposit date': '1994-07-18',
'organism': 'Escherichia coli',
'method': 'x-ray',
'resolution': 2.5,
'authors': (
'Jacobson, R.H.', 'Zhang, X.',
'Dubose, R.F.', 'Matthews, B.W.'
)
}PYTHON
structures['Lactose Permease'] = {
'pdb id': '1PV6',
'deposit data': '2003-06-23',
'organism': 'Escherichia coli',
'method': 'x-ray',
'resolution': 3.5,
'authors': (
'Abramson, J.', 'Smirnova, I.', 'Kasho, V.',
'Verner, G.', 'Kaback, H.R.', 'Iwata, S.'
)
}Dictionaries don’t have to be homogeneous. In other words, each entry can contain different items within it.
For instance, the ‘LacY’ protein contains an additional key entitled ‘note’:
PYTHON
structures['LacY'] = {
'pdb id': '2Y5Y',
'deposit data': '2011-01-19',
'organism': 'Escherichia coli',
'method': 'x-ray',
'resolution': 3.38,
'note': 'in complex with an affinity inactivator',
'authors': (
'Chaptal, V.', 'Kwon, S.', 'Sawaya, M.R.',
'Guan, L.', 'Kaback, H.R.', 'Abramson, J.'
)
}The variable structure
which is an instance of type dict, is now a nested
dictionary:
OUTPUT
{'Beta-Galactosidase': {'pdb id': '4V40', 'deposit date': '1994-07-18', 'organism': 'Escherichia coli', 'method': 'x-ray', 'resolution': 2.5, 'authors': ('Jacobson, R.H.', 'Zhang, X.', 'Dubose, R.F.', 'Matthews, B.W.')}, 'Lactose Permease': {'pdb id': '1PV6', 'deposit data': '2003-06-23', 'organism': 'Escherichia coli', 'method': 'x-ray', 'resolution': 3.5, 'authors': ('Abramson, J.', 'Smirnova, I.', 'Kasho, V.', 'Verner, G.', 'Kaback, H.R.', 'Iwata, S.')}, 'LacY': {'pdb id': '2Y5Y', 'deposit data': '2011-01-19', 'organism': 'Escherichia coli', 'method': 'x-ray', 'resolution': 3.38, 'note': 'in complex with an affinity inactivator', 'authors': ('Chaptal, V.', 'Kwon, S.', 'Sawaya, M.R.', 'Guan, L.', 'Kaback, H.R.', 'Abramson, J.')}}We know that we can extract information from our nested
dict just like we would with any other
dict:
OUTPUT
{'pdb id': '4V40', 'deposit date': '1994-07-18', 'organism': 'Escherichia coli', 'method': 'x-ray', 'resolution': 2.5, 'authors': ('Jacobson, R.H.', 'Zhang, X.', 'Dubose, R.F.', 'Matthews, B.W.')}OUTPUT
x-rayOUTPUT
('Jacobson, R.H.', 'Zhang, X.', 'Dubose, R.F.', 'Matthews, B.W.')OUTPUT
Jacobson, R.H.Sometimes, particularly when creating longer dictionaries, it might be easier to store individual entries in a variable beforehand and add them to the parent dictionary later on.
Note that our parent dictionary in this case is represented by the variable structure.
PYTHON
entry = {
'Lac Repressor': {
'pdb id': '1LBI',
'deposit data': '1996-02-17',
'organism': 'Escherichia coli',
'method': 'x-ray',
'resolution': 2.7,
'authors': (
'Lewis, M.', 'Chang, G.', 'Horton, N.C.',
'Kercher, M.A.', 'Pace, H.C.', 'Lu, P.'
)
}
}We can then use the .update() method to update our structures dictionary:
OUTPUT
{'pdb id': '1LBI', 'deposit data': '1996-02-17', 'organism': 'Escherichia coli', 'method': 'x-ray', 'resolution': 2.7, 'authors': ('Lewis, M.', 'Chang, G.', 'Horton, N.C.', 'Kercher, M.A.', 'Pace, H.C.', 'Lu, P.')}Sometimes, we need to see what keys our dictionary contains. In order to obtain an array of keys, we use the method .keys() as follows:
OUTPUT
dict_keys(['Beta-Galactosidase', 'Lactose Permease', 'LacY', 'Lac Repressor'])Likewise, we can also obtain an array of values in a dictionary using the .values() method:
OUTPUT
dict_values(['2Y5Y', '2011-01-19', 'Escherichia coli', 'x-ray', 3.38, 'in complex with an affinity inactivator', ('Chaptal, V.', 'Kwon, S.', 'Sawaya, M.R.', 'Guan, L.', 'Kaback, H.R.', 'Abramson, J.')])We can then extract specific information to conduct an analysis. Note that the len() function in this context returns the number of keys in the parent dictionary only.
PYTHON
sum_resolutions = 0
res = 'resolution'
sum_resolutions += structures['Beta-Galactosidase'][res]
sum_resolutions += structures['Lactose Permease'][res]
sum_resolutions += structures['Lac Repressor'][res]
sum_resolutions += structures['LacY'][res]
total_entries = len(structures)
average_resolution = sum_resolutions / total_entries
print(average_resolution)OUTPUT
3.0199999999999996Useful methods for dictionary
Next, we can demonstrate some of the useful methods that are
associated with dict in Python.
Given a dictionary as:
PYTHON
lac_repressor = {
'pdb id': '1LBI',
'deposit data': '1996-02-17',
'organism': 'Escherichia coli',
'method': 'x-ray',
'resolution': 2.7,
}We can create an array of all items in the dictionary using the .items() method:
OUTPUT
dict_items([('pdb id', '1LBI'), ('deposit data', '1996-02-17'), ('organism', 'Escherichia coli'), ('method', 'x-ray'), ('resolution', 2.7)])Similar to the enumerate() function, the
.items() method also returns an array of tuple
members. Each tuple itself consists of two members, and is
structured as (‘key’:
‘value’). On that account,
we can use its output in the context of a for–loop as
follows:
OUTPUT
pdb id: 1LBI
deposit data: 1996-02-17
organism: Escherichia coli
method: x-ray
resolution: 2.7Practice Exercise 7
Try .items() on a nested dict, and see how it
works.
We learned earlier that if we try to retrieve a key that is
not in the dict, a KeyError will be raised. If
we anticipate this, we can handle it using the .get() method.
The method takes in the key and searches the dictionary to find
it. If found, the associated value is returned. Otherwise, the
method returns None by default. We can also pass a second
value to .get() to replace None in cases that
the requested key does not exist:
OUTPUT
KeyError: 'gene'OUTPUT
NoneOUTPUT
Not found...Practice Exercise 8
Implement the lac_repressor dictionary and try to extract the values associated with the following keys:
- organism
- authors
- subunits
- method
If a key does not exist in the dictionary, display No entry instead.
Display the results in the following format:
organism: XXX
authors: XXXPYTHON
lac_repressor = {
'pdb id': '1LBI',
'deposit data': '1996-02-17',
'organism': 'Escherichia coli',
'method': 'x-ray',
'resolution': 2.7,
}
requested_keys = ['organism', 'authors', 'subunits', 'method']
for key in requested_keys:
lac_repressor.get(key, 'No entry')OUTPUT
'Escherichia coli'
'No entry'
'No entry'
'x-ray'
for-loop and dictionary
Dictionaries and for-loops used together can synergise
into a powerful combination. We can leverage the accessibility of
dictionary values through specific keys that we define
ourselves in a loop in order to extract data iteratively, and
repeatedly.
One of the most useful tools that we can create using nothing more
than a for-loop and a dictionary, in only a few lines of
code, is a sequence converter.
Here, we are essentially iterating through a sequence of DNA
nucleotides (sequence),
extracting one character per loop cycle from our string (nucleotide). We then use that
character as a key to retrieve its corresponding value
from our dictionary (dna2rna). Once we get the
value, we add it to the variable that we initialised using an
empty string outside the scope of our for-loop (rna_sequence) as discussed here. At the
end of the process, the variable rna_sequence will contain a
converted version of our sequence.
PYTHON
sequence = 'CCCATCTTAAGACTTCACAAGACTTGTGAAATCAGACCACTGCTCAATGCGGAACGCCCG'
dna2rna = {"A": "U", "T": "A", "C": "G", "G": "C"}
rna_sequence = str() # Creating an empty string.
for nucleotide in sequence:
rna_sequence += dna2rna[nucleotide]
print('DNA:', sequence)
print('RNA:', rna_sequence)OUTPUT
DNA: CCCATCTTAAGACTTCACAAGACTTGTGAAATCAGACCACTGCTCAATGCGGAACGCCCG
RNA: GGGUAGAAUUCUGAAGUGUUCUGAACACUUUAGUCUGGUGACGAGUUACGCCUUGCGGGCPractice Exercise 9
We know that in reverse transcription, RNA nucleotides are converted to their complementary DNA nucleotides as shown:
| Type | Direction | Nucleotides |
|---|---|---|
| RNA | 5’…’ | U A G C |
| cDNA | 5’…’ | A T C G |
with this in mind:
Use the table to construct a dictionary for reverse transcription, and another dictionary for the conversion of cDNA to DNA.
Using the appropriate dictionary, convert the following mRNA (exon) sequence for human G protein-coupled receptor to its cDNA.
PYTHON
human_gpcr = (
'AUGGAUGUGACUUCCCAAGCCCGGGGCGUGGGCCUGGAGAUGUACCCAGGCACCGCGCAGCCUGCGGCCCCCAACACCACCUC'
'CCCCGAGCUCAACCUGUCCCACCCGCUCCUGGGCACCGCCCUGGCCAAUGGGACAGGUGAGCUCUCGGAGCACCAGCAGUACG'
'UGAUCGGCCUGUUCCUCUCGUGCCUCUACACCAUCUUCCUCUUCCCCAUCGGCUUUGUGGGCAACAUCCUGAUCCUGGUGGUG'
'AACAUCAGCUUCCGCGAGAAGAUGACCAUCCCCGACCUGUACUUCAUCAACCUGGCGGUGGCGGACCUCAUCCUGGUGGCCGA'
'CUCCCUCAUUGAGGUGUUCAACCUGCACGAGCGGUACUACGACAUCGCCGUCCUGUGCACCUUCAUGUCGCUCUUCCUGCAGG'
'UCAACAUGUACAGCAGCGUCUUCUUCCUCACCUGGAUGAGCUUCGACCGCUACAUCGCCCUGGCCAGGGCCAUGCGCUGCAGC'
'CUGUUCCGCACCAAGCACCACGCCCGGCUGAGCUGUGGCCUCAUCUGGAUGGCAUCCGUGUCAGCCACGCUGGUGCCCUUCAC'
'CGCCGUGCACCUGCAGCACACCGACGAGGCCUGCUUCUGUUUCGCGGAUGUCCGGGAGGUGCAGUGGCUCGAGGUCACGCUGG'
'GCUUCAUCGUGCCCUUCGCCAUCAUCGGCCUGUGCUACUCCCUCAUUGUCCGGGUGCUGGUCAGGGCGCACCGGCACCGUGGG'
'CUGCGGCCCCGGCGGCAGAAGGCGCUCCGCAUGAUCCUCGCGGUGGUGCUGGUCUUCUUCGUCUGCUGGCUGCCGGAGAACGU'
'CUUCAUCAGCGUGCACCUCCUGCAGCGGACGCAGCCUGGGGCCGCUCCCUGCAAGCAGUCUUUCCGCCAUGCCCACCCCCUCA'
'CGGGCCACAUUGUCAACCUCACCGCCUUCUCCAACAGCUGCCUAAACCCCCUCAUCUACAGCUUUCUCGGGGAGACCUUCAGG'
'GACAAGCUGAGGCUGUACAUUGAGCAGAAAACAAAUUUGCCGGCCCUGAACCGCUUCUGUCACGCUGCCCUGAAGGCCGUCAU'
'UCCAGACAGCACCGAGCAGUCGGAUGUGAGGUUCAGCAGUGCCGUG'
)PYTHON
mrna2cdna = {
'U': 'A',
'A': 'T',
'G': 'C',
'C': 'G'
}
cdna2dna = {
'A': 'T',
'T': 'A',
'C': 'G',
'G': 'C'
}Q2
OUTPUT
TACCTACACTGAAGGGTTCGGGCCCCGCACCCGGACCTCTACATGGGTCCGTGGCGCGTCGGACGCCGGGGGTTGTGGTGGAGGGGGCTCGAGTTGGACAGGGTGGGCGAGGACCCGTGGCGGGACCGGTTACCCTGTCCACTCGAGAGCCTCGTGGTCGTCATGCACTAGCCGGACAAGGAGAGCACGGAGATGTGGTAGAAGGAGAAGGGGTAGCCGAAACACCCGTTGTAGGACTAGGACCACCACTTGTAGTCGAAGGCGCTCTTCTACTGGTAGGGGCTGGACATGAAGTAGTTGGACCGCCACCGCCTGGAGTAGGACCACCGGCTGAGGGAGTAACTCCACAAGTTGGACGTGCTCGCCATGATGCTGTAGCGGCAGGACACGTGGAAGTACAGCGAGAAGGACGTCCAGTTGTACATGTCGTCGCAGAAGAAGGAGTGGACCTACTCGAAGCTGGCGATGTAGCGGGACCGGTCCCGGTACGCGACGTCGGACAAGGCGTGGTTCGTGGTGCGGGCCGACTCGACACCGGAGTAGACCTACCGTAGGCACAGTCGGTGCGACCACGGGAAGTGGCGGCACGTGGACGTCGTGTGGCTGCTCCGGACGAAGACAAAGCGCCTACAGGCCCTCCACGTCACCGAGCTCCAGTGCGACCCGAAGTAGCACGGGAAGCGGTAGTAGCCGGACACGATGAGGGAGTAACAGGCCCACGACCAGTCCCGCGTGGCCGTGGCACCCGACGCCGGGGCCGCCGTCTTCCGCGAGGCGTACTAGGAGCGCCACCACGACCAGAAGAAGCAGACGACCGACGGCCTCTTGCAGAAGTAGTCGCACGTGGAGGACGTCGCCTGCGTCGGACCCCGGCGAGGGACGTTCGTCAGAAAGGCGGTACGGGTGGGGGAGTGCCCGGTGTAACAGTTGGAGTGGCGGAAGAGGTTGTCGACGGATTTGGGGGAGTAGATGTCGAAAGAGCCCCTCTGGAAGTCCCTGTTCGACTCCGACATGTAACTCGTCTTTTGTTTAAACGGCCGGGACTTGGCGAAGACAGTGCGACGGGACTTCCGGCAGTAAGGTCTGTCGTGGCTCGTCAGCCTACACTCCAAGTCGTCACGGCACSummary
In this section we explored dictionaries: one of the most powerful in-built types in Python. We covered:
- How to create dictionaries in Python.
- Methods to alter or manipulate both normal and nested dictionaries.
- Two different techniques for changing an existing key.
- Examples of how dictionaries can organise data and retrieve specific items and entries as and when required.
Finally, we also explored instantiating iterables (discussed here) from dictionary keys or values using the .key(), the .values(), and/or .items() methods.
Exercises
End of chapter Exercises
We know that the process of protein translation begins by transcribing a gene from DNA to RNA nucleotides, followed by translating the RNA codons into protein.
Conventionally, we write DNA sequences from their 5’-end to their 3’-end. The transcription process, however, begins from the 3’-end of a gene, through to the 5’-end (anti-sense strand), resulting in a sense mRNA sequence complementing the sense DNA strand. This is because RNA polymerase can only add nucleotides to the 3’-end of the growing mRNA chain, which eliminates the need for the Okazaki fragments as seen in DNA replication.
Example: The DNA sequence ATGTCTAAA is transcribed into AUGUCUAAA.
Given a conversion table:
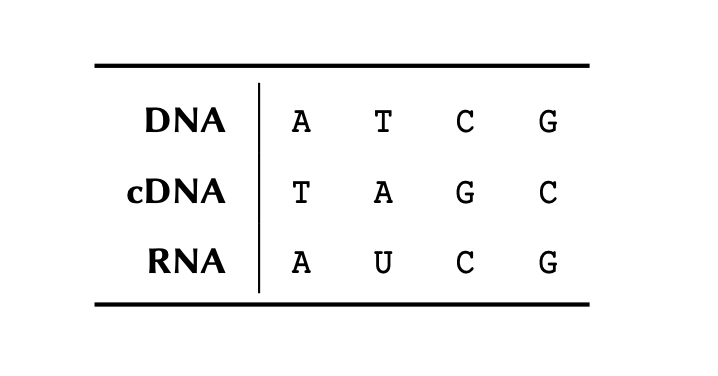
and this 5’- to 3’-end DNA sequence of 717 nucleotides for the Green Fluorescent Protein (GFP) mutant 3 extracted from Aequorea victoria:
PYTHON
dna_sequence = (
'ATGTCTAAAGGTGAAGAATTATTCACTGGTGTTGTCCCAATTTTGGTTGAATTAGATGGTGATGTTAATGGT'
'CACAAATTTTCTGTCTCCGGTGAAGGTGAAGGTGATGCTACTTACGGTAAATTGACCTTAAAATTTATTTGT'
'ACTACTGGTAAATTGCCAGTTCCATGGCCAACCTTAGTCACTACTTTCGGTTATGGTGTTCAATGTTTTGCT'
'AGATACCCAGATCATATGAAACAACATGACTTTTTCAAGTCTGCCATGCCAGAAGGTTATGTTCAAGAAAGA'
'ACTATTTTTTTCAAAGATGACGGTAACTACAAGACCAGAGCTGAAGTCAAGTTTGAAGGTGATACCTTAGTT'
'AATAGAATCGAATTAAAAGGTATTGATTTTAAAGAAGATGGTAACATTTTAGGTCACAAATTGGAATACAAC'
'TATAACTCTCACAATGTTTACATCATGGCTGACAAACAAAAGAATGGTATCAAAGTTAACTTCAAAATTAGA'
'CACAACATTGAAGATGGTTCTGTTCAATTAGCTGACCATTATCAACAAAATACTCCAATTGGTGATGGTCCA'
'GTCTTGTTACCAGACAACCATTACTTATCCACTCAATCTGCCTTATCCAAAGATCCAAACGAAAAGAGAGAC'
'CACATGGTCTTGTTAGAATTTGTTACTGCTGCTGGTATTACCCATGGTATGGATGAATTGTACAAATAA'
)Use the DNA sequence and the conversion table to:
Write a Python script to transcribe this sequence to mRNA as it occurs in a biological organism. That is, determine the complimentary DNA first, and use this to produce the mRNA sequence.
Use the following dictionary in a Python script to obtain the translation (protein sequence) of the Green Fluorescent Protein using the mRNA sequence you obtained.
PYTHON
codon2aa = {
"UUU": "F", "UUC": "F", "UUA": "L", "UUG": "L", "CUU": "L",
"CUC": "L", "CUA": "L", "CUG": "L", "AUU": "I", "AUC": "I",
"AUA": "I", "GUU": "V", "GUC": "V", "GUA": "V", "GUG": "V",
"UCU": "S", "UCC": "S", "UCA": "S", "UCG": "S", "AGU": "S",
"AGC": "S", "CCU": "P", "CCC": "P", "CCA": "P", "CCG": "P",
"ACU": "T", "ACC": "T", "ACA": "T", "ACG": "T", "GCU": "A",
"GCC": "A", "GCA": "A", "GCG": "A", "UAU": "Y", "UAC": "Y",
"CAU": "H", "CAC": "H", "CAA": "Q", "CAG": "Q", "AAU": "N",
"AAC": "N", "AAA": "K", "AAG": "K", "GAU": "D", "GAC": "D",
"GAA": "E", "GAG": "E", "UGU": "C", "UGC": "C", "UGG": "W",
"CGU": "R", "CGC": "R", "CGA": "R", "CGG": "R", "AGA": "R",
"AGG": "R", "GGU": "G", "GGC": "G", "GGA": "G", "GGG": "G",
"AUG": "<Met>", "UAA": "<STOP>", "UAG": "<STOP>", "UGA": "<STOP>"
}Key Points
- Dictionaries associate a set of values with a number of keys.
- Keys are used to access the values of a dictionary.
- Dictionaries are mutable.
- Nested dictionaries are constructed to organise data in a hierarchical fashion.
- Some of the useful methods to work with dictionaries are: .items(), .get()
Content from Functions
Last updated on 2024-08-24 | Edit this page
Download Chapter notebook (ipynb)
Overview
Questions
- What are functions?
- How are functions created?
- What are optional arguments?
- What makes functions so powerful?
Objectives
- Understand how to develop and utilise functions.
- Understanding different ways of creating functions.
- Explaining input arguments.
- Understanding the interconnectivity of functions.
This chapter assumes that you are familiar with the following concepts in Python:
Functions
In programming, functions are individual units or blocks of code that incorporate and perform specific tasks in a sequence defined and written by the programmer. As we learned in the first chapter (on outputs), a function usually takes in one or several variables or values, processes them, and produces a specific result. The variable(s) given to a function and those produced by it are referred to as input arguments, and outputs respectively.
There are different ways to create functions in Python. In the L2D, we will be using def to implement our functions. This is the simplest and most common method for declaring a function. The structure of a typical function defined using def is as follows:
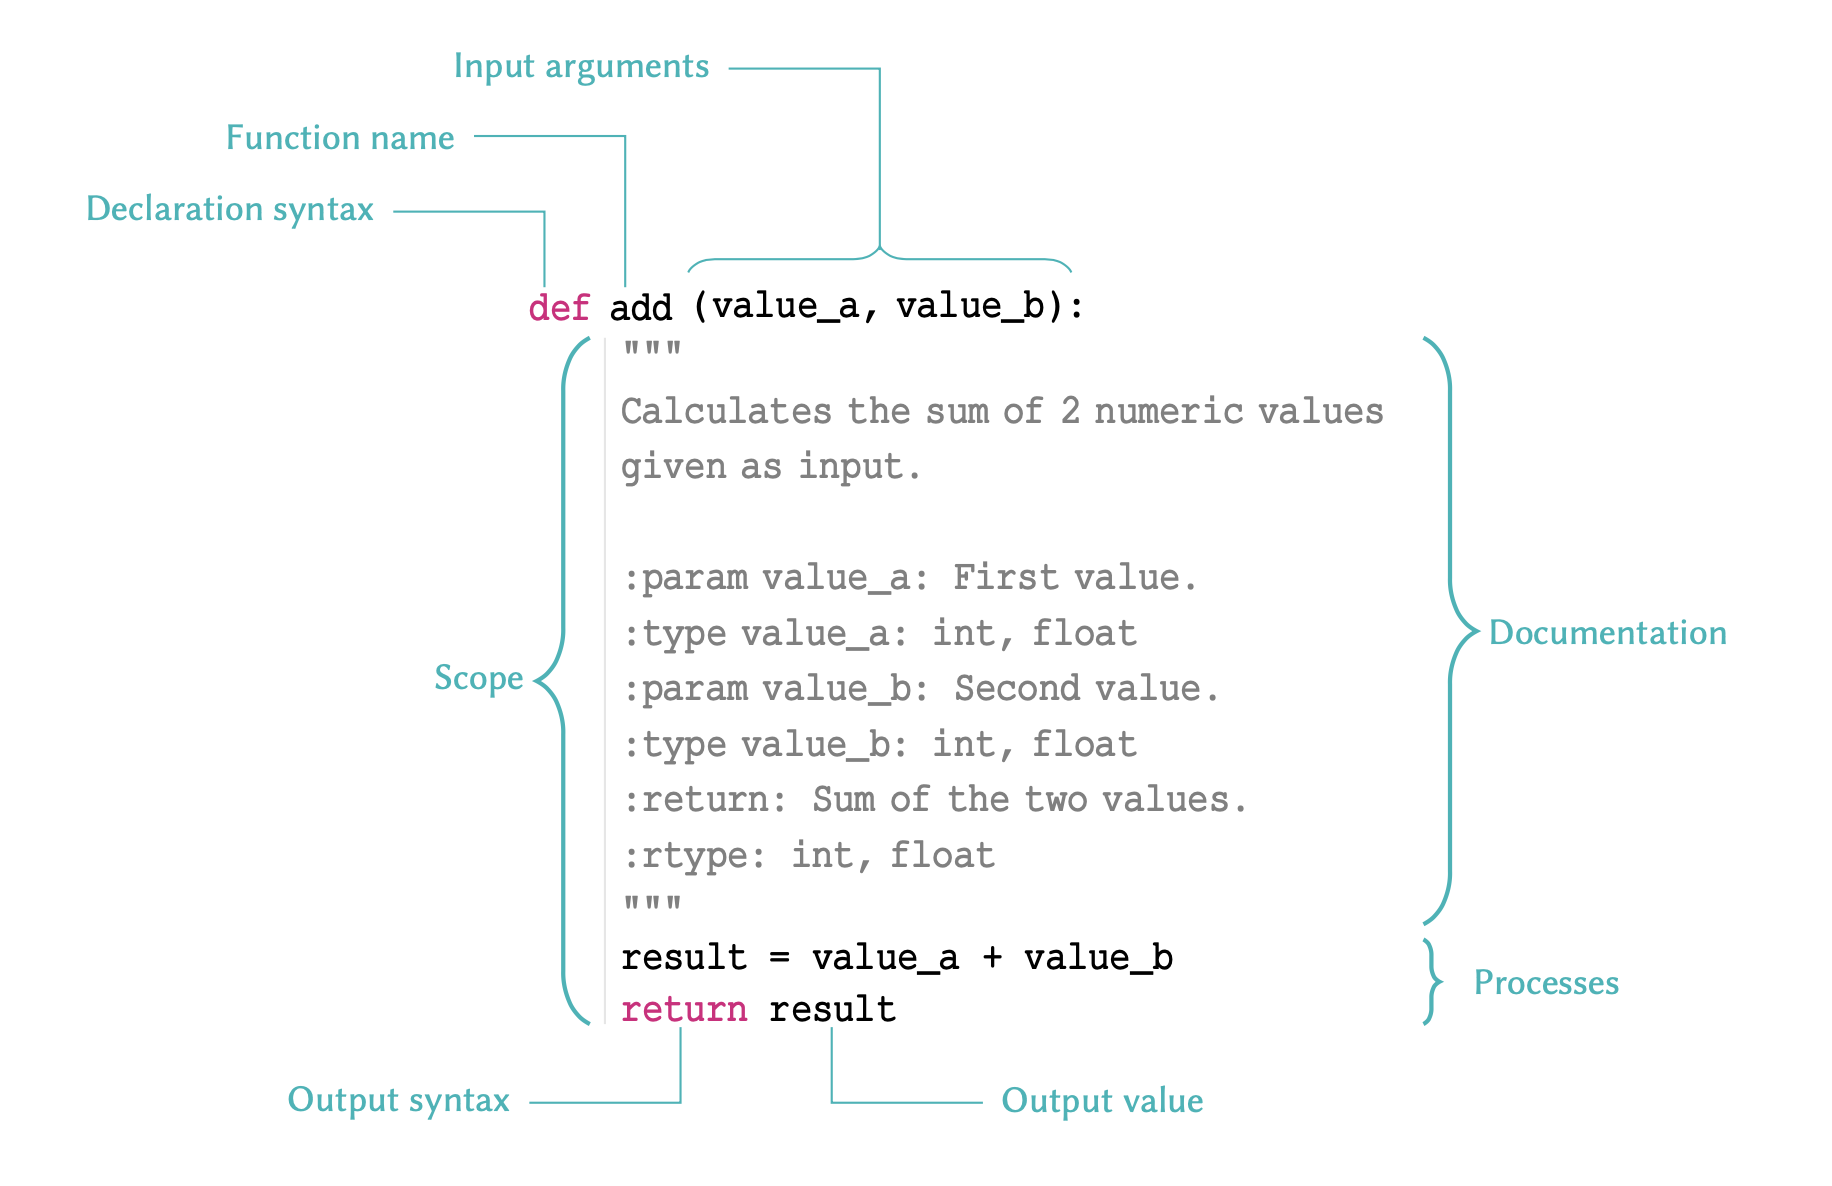
Remember
There are several points to remember relative to functions:
- The name of a function follows same principles as that of any other variable as discussed in variable names. The name must be in lower-case characters.
- The input arguments of a function — e.g. value_a and value_b in the above example; are essentially variables whose scope is the function. That is, they are only accessible within the function itself, and not from anywhere else in the code.
- Variables defined within a function, should never use the same name as variables defined outside of it; or they may override each other.
- A function declared using def should always be terminated with a return syntax. Any values or variables that follow return are regarded as the function’s output.
- If we do not specify a return value, or fail to terminate a function
using return altogether, the Python interpreter will
automatically terminate that function with an implicit
return None. Being an implicit process, this is generally regarded as a bad practice and should be avoided.
We implement functions to avoid repetition in our code. It is important that a function is only performing a very specific task, so that it can be context-independent. You should therefore avoid incorporating separable tasks inside a single function.
Interesting Fact
Functions are designed to perform specific tasks. That is why in the majority of cases, they are named using verbs — e.g. add() or print(). Verbs describe an action, a state, or an occurrence in the English language. Likewise, this type of nomenclature describes the action performed by a specific function. As we encourage with variable naming: sensible, short and descriptive names are best to consider, when naming a function.
Once you start creating functions for different purposes, you will eventually amass a library of ready-to-use functions which can individually address different needs. This is the primary principle of a popular programming paradigm known as functional programming.
So let us implement the example outline in the diagram:
PYTHON
def add(value_a, value_b):
"""
Calculates the sum of two numeric values
given as inputs.
:param value_a: First value.
:type value_a: int, float
:param value_b: Second value.
:type value_b: int, float
:return: Sum of the two values.
:rtype: int, float
"""
result = value_a + value_b
return resultOnce implemented, we can call and use the function we created. We can do so in the same way as we do with the built-in functions such as max() or print():
OUTPUT
7Remember
When calling a function, we should always pass our positional input arguments in the order they are defined in the function definition: i.e. from left to right.
This is because in the case of positional arguments, as the
name suggests, the Python interpreter relies on the position of
each value to identify its variable name in the function
signature. The function signature for our add function is
as follows:
add(value_a, value_b)So in the above example where we say add(2, 5), the value 2 is identified as the input argument for value_a, and not value_b. This happens automatically because in our function call, the value 2 is written in the first position: the position at which value_a is defined in our function declaration (signature).
Alternatively, we can use the name of each input argument to pass values onto them in any order. When we use the name of the input argument explicitly, we pass the values as keyword arguments. This is particularly useful in more complex functions where there are several input arguments.
Let us now use keyword arguments to pass values to our add() function:
OUTPUT
7Now, even if we change the order of our arguments, the function would still be able to associate the values to the correct keyword argument:
OUTPUT
7Remember
Choose the order of your input argument wisely. This is important when your function can accept multiple input arguments.
Suppose we want to define a ‘division’ function. It makes sense to assume that the first number passed to the function will be divided by the second number:
It is also much less likely for someone to use keywords to pass arguments to this function – that is, to say:
than it is for them to use positional arguments (without any keywords), that is:
But if we use an arbitrary order, then we risk running into problems:
In which case, our function would perform perfectly well if we use keyword arguments; however, if we rely on positional arguments and common sense, then the result of the division would be calculated incorrectly.
PYTHON
result_a = divide_bad(numerator=2, denominator=4)
result_b = divide_bad(2, 4)
print(result_a == result_b)OUTPUT
FalsePractice Exercise 1
Implement a function called find_tata that takes in one
str argument called seq and looks for the TATA-box motif inside that
sequence. Then:
if found, the function should return the index for the TATA-box as output.
if not found, the function should explicitly return
None.
Example:
The function should behave, as follows:
sequence = 'GCAGTGTATAGTC'
res = find_tata(sequence)Documentation
It is essential to write short, informative documentation for a functions that you are defining. There is no single correct way to document a code. However, as a general rule, a sufficiently informative documentation should tell us:
what a function does;
the names of the input arguments, and what type each argument should be;
the output, and its type.
This documentation string is referred to as the docstring. It is always written inside triple quotation marks. The docstring must be implemented on the very first line, immediately following the declaration of the function, in order for it to be recognised as documentation:
PYTHON
def add(value_a, value_b):
"""
Calculates the sum of two numeric values
given as inputs.
:param value_a: First value.
:type value_a: int, float
:param value_b: Second value.
:type value_b: int, float
:return: Sum of the two values.
:rtype: int, float
"""
result = value_a + value_b
return resultRemember
You might feel as though you would remember what your own functions do. Assuming this is often naive, however, as it is easy to forget the specifics of a function that you have written; particularly if it is complex and accepts multiple arguments. Functions that we implement tend to perform specialist, and often complex, interconnected processes. Whilst you might remember what a specific function does for a few days after writing it, you will likely have trouble remembering the details in a matter of months. And that is not even considering details regarding the type of the input argument(s) and those of the output. In addition, programmers often share their work with other fellow programmers; be it within their team or in the wider context of a publication, or even for distribution via public repositories, as a community contribution. Whatever the reason, there is one golden rule: a function should not exist unless it is documented.
Writing the docstring on the first line is important. Once a function is documented, we can use help(), which is a built-in function in Python, to access the documentations as follows:
OUTPUT
Help on function add in module __main__:
add(value_a, value_b)
Calculates the sum of two numeric values
given as inputs.
:param value_a: First value.
:type value_a: int, float
:param value_b: Second value.
:type value_b: int, float
:return: Sum of the two values.
:rtype: int, floatFor very simple functions – like the add() function that we implemented above, it is sufficient to simplify the docstring into something straightforward, and concise. This is because it is fairly obvious what are the input and output arguments are, and what their respective types are/should be. For example:
PYTHON
def add(value_a, value_b):
"""value_a + value_b -> number"""
result = value_a + value_b
return resultOUTPUT
Help on function add in module __main__:
add(value_a, value_b)
value_a + value_b -> numberPractice Exercise 2
Re-implement the function you defined in the previous Practice Exercise 1 with appropriate documentation.
Optional arguments
We already know that most functions accept one or more input arguments. Sometimes a function does not need all of the arguments in order to perform a specific task.
Such an example that we have already worked with is print().
We already know that this function may be utilised to display text on
the screen. However, we also know that if we use the file
argument, it will behave differently in that it will write the text
inside a file instead of displaying it on the screen. Additionally,
print() has other arguments such as sep or
end, which have specific default values of ’ ’ (a single space) and \n (a linebreak) respectively.
Remember
Input arguments that are necessary to call a specific function are referred to as non-default arguments. Those whose definition is not mandatory for a function to be called are known as default or optional arguments.
Optional arguments may only be defined after
non-default arguments (if any). If this order is not respected, a
SyntaxError will be raised.
Advanced Topic
The default value defined for optional arguments can theoretically be an instance of any type in Python. However, it is better and safer to only use immutable types (as demonstrated in Table) for default values. The rationale behind this principle is beyond the scope of this course, but you can read more about it in the official documentation.
In order to define functions with optional arguments, we need to assign a default value to them. Remember: input arguments are variables with a specific scope. As a result, we can treat our input argument as variables and assign them a value:
PYTHON
def prepare_seq(seq, name, upper=False):
"""
Prepares a sequence to be displayed.
:param seq: Sequence
:type seq: str
:param name: Name of the sequence.
:type name: str
:param upper: Convert sequence to uppercase characters (default: False)
:type upper: bool
:return: Formatted string containing the sequence.
:rtype: str
"""
template = 'The sequence of {} is: {}'
if not upper:
response = template.format(name, seq)
else:
seq_upper = seq.upper()
response = template.format(name, seq_upper)
return responseNow if we don’t explicitly define upper when calling
prepare_seq(), its value is automatically considered to be
False:
OUTPUT
The sequence of DNA is: TagCtGCIf we change the default value of False for
upper and set to True, our sequence should be
converted to upper case characters:
OUTPUT
The sequence of DNA is: TAGCTGCPractice Exercise 3
Modify the function from the previous Practice Exercise 2 to accept
an optional argument called upper, with a default
value of False. Thereafter:
if
upperisFalse, then the function should perform as it already does (similar to the previous Practice Exercise 2);if
upperisTrue, then the function should convert the sequence to contain only uppercase characters, before it looks for the TATA-box.
Do not forget to update the docstring of your function.
PYTHON
def find_tata(seq, upper=False):
"""
Finds the location of the TATA-box,
if one exists, in a polynucleotide
sequence.
:param seq: Polynucleotide sequence.
:type seq: str
:param upper: Whether or not to
homogenise the sequence
to upper-case characters.
:type upper: bool
:return: Start of the TATA-box.
:rtype: int
"""
tata_box = 'TATA'
if not upper:
result = seq.find(tata_box)
else:
seq_prepped = seq.upper()
result = seq_prepped.find(tata_box)
return resultRemember
It is not necessary to implement your functions in this way. It is, however, a common practice among programmers in any programming language. For this reason, you should be at least be familiar with the technique, as you will likely encounter it at some point.
It is important to note that it is also possible to have more than one return in a function. This is useful when we need to account for different outcomes; such as the one we saw in the previous example with prepare_seq().
This means that we can simplify the process as follows:
PYTHON
def prepare_seq(seq, name, upper=False):
"""
Prepares a sequence to be displayed.
:param seq: Sequence
:type seq: str
:param name: Name of the sequence.
:type name: str
:param upper: Convert sequence to uppercase characters (default: False)
:type upper: bool
:return: Formated string containing the sequence.
:rtype: str
"""
template = 'The sequence of {} is: {}'
if not upper:
return template.format(name, seq)
seq_upper = seq.upper()
return template.format(name, seq_upper)Notice that we got rid of response. Here is a description of what is happening:
In this context, if the conditional statement holds — i.e. when
upperisFalse— we enter the if block. In this case, we reach the firstreturnstatement. It is at this point, that function returns the corresponding results, and immediately terminates.Conversely, if the conditional statement does not hold — i.e. where
upperisTrue— we skip the if block altogether and proceed. It is only then that we arrive at the secondreturnstatement where the alternative set of results are prepared.
This does not alter the functionality of the function, in any way. However, in complex functions which can be called repetitively (e.g. inside for loop), this technique may improve the performance of the function.
Now if we call our function, it will behave in exactly the same way as it did before:
OUTPUT
The sequence of DNA is: TagCtGCOUTPUT
The sequence of DNA is: TAGCTGCInterconnectivity of functions
Functions can also call other functions. This is what makes them extremely powerful tools that may be utilised to address an unlimited number of problems.
This allows us to devise a network of functions that can all call each other to perform different tasks at different times. This network of functions can then collectively contribute to the production of a single, final answer.
Remember
Functions should have specialist functionalities.They should ideally be written to perform one task, and one task only.
So in instances where more operations are required, it is advised not to write more code to execute these, into one function. This would defy the ethos of functional programming. Instead, consider writing more functions that contain less code, and perform more specialist functionalities.
EXAMPLE: A mini toolbox for statistics

PYTHON
def mean(arr):
"""
Calculates the mean of an array.
:param arr: Array of numbers.
:type arr: list, tuple, set
:return: Mean of the values in the array.
:rtype: float
"""
summation = sum(arr)
length = len(arr)
result = summation / length
return resultNow that we have function to calculate the mean, we can go ahead and write a function to calculate the variance; which itself relies on mean:
PYTHON
def variance(arr):
"""
Calculates the variance of an array.
:param arr: Array of numbers.
:type arr: list, tuple, set
:return: Variance of the values in the array.
:rtype: float
"""
arr_mean = mean(arr)
denominator = len(arr)
numerator = 0
for num in arr:
numerator += (num - arr_mean) ** 2
result = numerator / denominator
return resultNow we have two functions, which can be used to calculate the variance, or the mean, for any array of numbers.
Remember that testing a function is inherent to successful design. So let’s test our functions
OUTPUT
134.58871428571427OUTPUT
109633.35462420408Now that we have a function to calculate the variance, we can easily proceed to calculate the standard deviation, as well.
The standard deviation is calculated from the square root of variance. We can easily implement this in a new function as follows:
PYTHON
def stan_dev(arr):
"""
Calculates the standard deviation of an array.
:param arr: Array of numbers.
:type arr: list, tuple, set
:return: Standard deviation of the values in the array.
:rtype: float
"""
from math import sqrt
var = variance(arr)
result = sqrt(var)
return resultNow let’s see how it works, in practice:
OUTPUT
331.1092789762982Practice Exercise 4
Write a function that — given an array of any values — produces a dictionary containing the values within the array as keys, and the count of those values in the original array (their frequencies), as values.
Example:
For the following array:
the function should return the above dictionary:
Suggestion: You can add this as a new tool to the statistics mini toolbox.
PYTHON
def count_values(arr):
"""
Converts an array into a dictionary of
the unique members (as keys) and their
counts (as values).
:param arr: Array containing repeated
members.
:type arr: list, tuple
:return: Dictionary of unique members
with counts.
:rtype: dict
"""
unique = set(arr)
arr_list = list(arr)
result = dict()
for num in unique:
result[num] = arr_list.count(num)
return resultExercises
End of chapter Exercises
Write a function with the following features:
Call the function get_basic_stats() and let it take one input argument which may contain any number of input arrays, e.g. a tuple of arrays.
Using a for loop, for each of the arrays calculate the mean and the variance for each of the arrays using the functions ‘mean’ and ‘variance’, given above, i.e. call these functions from within the function get_basic_stats().
Calculate the standard deviation for each array as the square root of the variance. You will have to import the function
sqrtfrom modulemath.Return a single array containing (in that order) the mean, the variance and the standard deviation for each array.
To test the function, combine three arrays in a tuple as follows:
Call the function get_basic_stats() with this tuple as an argument, and write the output to a variable. Display the results in the following form:
STD of array' index, ':' STDThe result for the above arrays should be:
STD of array 0 : 1.4142135623730951
STD of array 1 : 0.0
STD of array 2 : 0.14357537702854514Key Points
- Functions can help to make repetitive tasks efficient, allowing the passing of values into whole blocks of code, with a simple function call.
- Keyword def is used to write a function.
- Optional arguments do not require prior definition.
- The potential interconnectivity of functions can make them very powerful.